Soft dash restoration

This site contains affiliate links for which LandyZone may be compensated if you make a purchase.
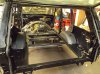
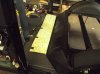
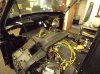
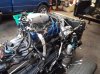
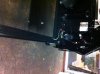
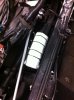
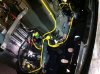
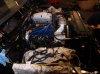
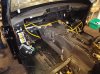
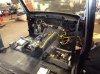
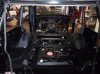
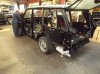
The heat reflective sheet and tape arrived today so that'll be
fitted soon, good for over 500C or 1000F so that should do the
trick with a bit of luck.

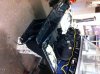
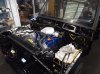
I'm also considering moving away from the wood look on the doors, dash and
centre section around the gearchange, i'm contemplating doing them gloss Black
to make it look a bit more modern inside !!!

Hi,

Great project!

Please let me know where you got the heat reflective sheet and tape.

Cheers.
 

:)

now thats looking swish! how long off till its ready for a test drive?

Cheers i'd have thought in the N/Y

superb work, nice to see a class rebuild. What a machine it will be when its finished.

thanks Henry

Wow one amazing build love it cant wait to see it finished work of art

Cheers Geoff

Hi,

Great project!

Please let me know where you got the heat reflective sheet and tape.

Cheers.

Got the self adhesive sheet from Demon Tweeks but it's just not sticky enough for my application
so i haven't used it or the roll of tape.

We're going to wrap the cats instead with a sheet of very similar material that you lock wire in
place or use metal cable ties. Got that from Holden vintage & classic

A lot of places sell these products inc good old ebay but i prefer to buy from known suppliers

www,merlinmotorsport.co.uk
www.holden.co.uk
 
Last edited:
No problem Spiggy, i'd imagine if you used some good contact adhesive then any of this sheet could be stuck in place and also help the sticky sheet to stick :)

The sheet and tape i have is www.thermotec.com
 
Last edited:
Sod the heat tape.... i want to know who the girl is on holden's website..

holdenjpegcropped_zps5ecd1a5d.jpg
 
Looks a bit moody to me, could be a right handful a bit skinny too,

ahh the crazy ones are usually the best in the sack..

as for skinny.. i was going to say i prefer built for speed not for comfort.. but then i realized.. i have a range rover (or two) - i still prefer a girl built for speed not for comfort though !
 
ahh the crazy ones are usually the best in the sack..

as for skinny.. i was going to say i prefer built for speed not for comfort.. but then i realized.. i have a range rover (or two) - i still prefer a girl built for speed not for comfort though !

I prefer curves, Carol Vorderman shape does it for me :)
 
The chassis is almost finished, fuel lines are done just need to fit the heat wrap to the cats, started sorting out the loom and painting the floor in the shell now
 

Attachments

  • Range Rover finishing chassis 001.jpg
    Range Rover finishing chassis 001.jpg
    132.5 KB · Views: 420
  • Range Rover finishing chassis 005.jpg
    Range Rover finishing chassis 005.jpg
    90.7 KB · Views: 478
  • Range Rover finishing chassis 004.jpg
    Range Rover finishing chassis 004.jpg
    125.8 KB · Views: 424
  • Range Rover finishing chassis 006.jpg
    Range Rover finishing chassis 006.jpg
    143.5 KB · Views: 470
  • Range Rover finishing chassis 008.jpg
    Range Rover finishing chassis 008.jpg
    126.6 KB · Views: 401
Last edited:
Cats are wrapped and the wiring loom has been cleaned, re taped and is pretty much back
where it should be.

The new body mount bushes/bolts are lubed up ready for it to go back on the chassis.

Apologies for the crap photos they're off my phone, i'll update with better ones off my
camera
 

Attachments

  • Range Rover wiring going back into shell 024.jpg
    Range Rover wiring going back into shell 024.jpg
    77.7 KB · Views: 381
  • Range Rover wiring going back into shell 027.jpg
    Range Rover wiring going back into shell 027.jpg
    107.4 KB · Views: 407
  • Range Rover wiring going back into shell 025.jpg
    Range Rover wiring going back into shell 025.jpg
    139.7 KB · Views: 373
  • Range Rover wiring going back into shell 019.jpg
    Range Rover wiring going back into shell 019.jpg
    68 KB · Views: 406
  • Range Rover wiring going back into shell 009.jpg
    Range Rover wiring going back into shell 009.jpg
    79.1 KB · Views: 396
  • Range Rover wiring going back into shell 005.jpg
    Range Rover wiring going back into shell 005.jpg
    58.4 KB · Views: 387
  • Range Rover wiring going back into shell 017.jpg
    Range Rover wiring going back into shell 017.jpg
    79 KB · Views: 417
  • Range Rover wiring going back into shell 004.jpg
    Range Rover wiring going back into shell 004.jpg
    62.4 KB · Views: 396
  • Range Rover wiring going back into shell 003.jpg
    Range Rover wiring going back into shell 003.jpg
    63.8 KB · Views: 414
Last edited:
The body and chassis are back together :)
 

Attachments

  • Range Rover body back on chassis 014.jpg
    Range Rover body back on chassis 014.jpg
    106.4 KB · Views: 405
  • Range Rover body back on chassis 009.jpg
    Range Rover body back on chassis 009.jpg
    114.7 KB · Views: 381
  • Range Rover body back on chassis 018.jpg
    Range Rover body back on chassis 018.jpg
    108.3 KB · Views: 391
  • Range Rover body back on chassis 012.jpg
    Range Rover body back on chassis 012.jpg
    107.9 KB · Views: 382
  • Range Rover body back on chassis 001.jpg
    Range Rover body back on chassis 001.jpg
    91.6 KB · Views: 397
  • Range Rover body back on chassis 025.jpg
    Range Rover body back on chassis 025.jpg
    91.4 KB · Views: 397
  • Range Rover body back on chassis 004.jpg
    Range Rover body back on chassis 004.jpg
    99.1 KB · Views: 411
  • Range Rover body back on chassis 023.jpg
    Range Rover body back on chassis 023.jpg
    89.3 KB · Views: 410
Back
Top