Soft dash restoration

This site contains affiliate links for which LandyZone may be compensated if you make a purchase.
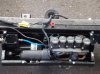
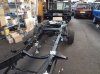
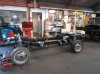
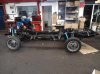
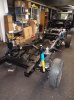
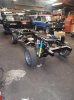
Hey Dunkan, can you tell me how many chassis bolts and the location to remove before removing the body from the chassis? cant see it anywhere in the workshop manuals nor the Haynes repair or rebuild manual.

thanks
 
you joking?cos really finding them is the easy bit!!lifting body without it falling to bits and bending is the hard bit (espically if rotten...BRACEing is a good idea1)

****e loads..the main ones are the body to chassis bolts..look on rear x member just behind rear bumper for 2..then you know what to look for..(on inner wings 4 sills 4 etc..)
..then seat belt mounts..rad..fuel lines.electric cables, pipes..gear levers..hand brake..steering coloum .brake lines.fuel filler etc etc etc etc..
 
Last edited:
Here you go, my guys replaced the sills and rear cross member before taking the body off the chassis
 

Attachments

  • Range Rover chassis flipped over getting 3M coating 002.jpg
    Range Rover chassis flipped over getting 3M coating 002.jpg
    124.9 KB · Views: 269
Last edited:
Ye I rebuilt the body before lifting it off the chassis. Dropped it back on to axle stands straight away to prevent it deforming. The rear sill bolts tend to foul on the floor but if you leave them in and remove when the body is off they come out relatively easily. Just remember to put the new bolts and upper body mount bush on before you put it back on the chassis.
 
you joking?cos really finding them is the easy bit!!lifting body without it falling to bits and bending is the hard bit (espically if rotten...BRACEing is a good idea1)

****e loads..the main ones are the body to chassis bolts..look on rear x member just behind rear bumper for 2..then you know what to look for..(on inner wings 4 sills 4 etc..)
..then seat belt mounts..rad..fuel lines.electric cables, pipes..gear levers..hand brake..steering coloum .brake lines.fuel filler etc etc etc etc..

Thanks, but im just doing the book work study on the restoration before i get stuck in to the removal but just cant seem to find the locations of the bolts written anywhere

Here you go, my guys replaced the sills and rear cross member before taking the body off the chassis

which is the front and which is the rear?? :pound: kidding!! thanks for that. been looking everywhere and even put a thread up with no joy

Ye I rebuilt the body before lifting it off the chassis. Dropped it back on to axle stands straight away to prevent it deforming. The rear sill bolts tend to foul on the floor but if you leave them in and remove when the body is off they come out relatively easily. Just remember to put the new bolts and upper body mount bush on before you put it back on the chassis.

good tips, much appreciated.
 
Air suspension control box is re built and back on the chassis and
the air lines are being fitted. The air bags work :)
 

Attachments

  • Range Rover air conrol box and pipework 009.jpg
    Range Rover air conrol box and pipework 009.jpg
    97.6 KB · Views: 434
  • Range Rover air conrol box and pipework 015.jpg
    Range Rover air conrol box and pipework 015.jpg
    120.8 KB · Views: 398
  • Range Rover air conrol box and pipework 012.jpg
    Range Rover air conrol box and pipework 012.jpg
    108.8 KB · Views: 373
Chassis is pretty much finished, time to unravel the loom !!
 

Attachments

  • Range Rover finishing chassis 004.jpg
    Range Rover finishing chassis 004.jpg
    130.8 KB · Views: 481
  • Range Rover finishing chassis 010.jpg
    Range Rover finishing chassis 010.jpg
    116.5 KB · Views: 418
  • Range Rover finishing chassis 006.jpg
    Range Rover finishing chassis 006.jpg
    127 KB · Views: 394
  • Range Rover finishing chassis 007.jpg
    Range Rover finishing chassis 007.jpg
    110.4 KB · Views: 395
Those wheels and tyres are just to get the chassis mobile, these genuine
5 spokes will be fitted after they have been refurbed along with new tyres
 

Attachments

  • 5 spoke wheels.jpg
    5 spoke wheels.jpg
    90.4 KB · Views: 209
Got a box full of bits all for the engine bay to be stripped and
powder coated satin black and the new battery is soldered
onto the seat ECU pcb.

I'm also after the EAS height sensor links and a replacement airbox as
in the photos if anyone knows of any
 

Attachments

  • Range Rover seat ecu with new battery 002.jpg
    Range Rover seat ecu with new battery 002.jpg
    123 KB · Views: 387
  • Range Rover eas link rod 1.jpg
    Range Rover eas link rod 1.jpg
    40.9 KB · Views: 324
  • Range Rover airbox.JPG
    Range Rover airbox.JPG
    182.1 KB · Views: 323

Attachments

  • $_57 (1).JPG
    $_57 (1).JPG
    16.6 KB · Views: 199
  • $_57.JPG
    $_57.JPG
    18.7 KB · Views: 188
Last edited:
Back
Top