disco 1 rear floor-rottern

This site contains affiliate links for which LandyZone may be compensated if you make a purchase.

offroader84

New Member
Posts
223
Location
ware,herts
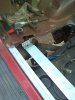
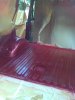
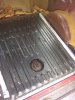
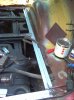
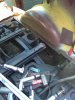
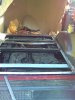
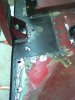
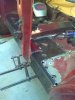
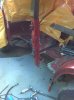
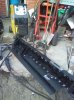
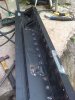
well i decided to lift the carpet at the rear of my disco and have a look at the rear floor to see how bad the rust/rot is,:eek: well as you can see its bad but nothing that cant be replaced.Anyway just wondering if anyone has replaced rear floor,cross member and body mounts this bad before and how much it cost(DIY or garage).
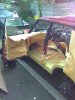
got alot of work ahead of me i no and im shaw it wont stop there but as this is my 1st landy im keeping as a project vehicle.
disco1rearfloor002.jpg

disco1rearfloor004.jpg

disco1rearfloor003.jpg

disco1rearfloor005.jpg

disco1rearfloor006.jpg

disco1rearfloor008.jpg


atb lee
 
that dont look to bad !
the boot floor is easy to do, the cross members if they are to far gone just go to a fabrication place ad get them to cut you a length of steel 3mm thick and as long as the ones that are rotten (dont forget to add the bent bits on the ends)
the ones that rot are the flat steel ones so there easy to make, if the lip the boot floor sits on has rotted again get a repair section made like the ones i did.
a tip is drill out the spot welds on the old boot floor trying not to go through the panel underneath, drill the new boot floor in the same places and spot weld it back in, it makes the job a lot neater.


in my best blue peter voice, hes one i did earlier :)
 

Attachments

  • new crossbrace.jpg
    new crossbrace.jpg
    222.7 KB · Views: 1,592
  • boot floor laq.jpg
    boot floor laq.jpg
    237.7 KB · Views: 1,994
  • boot basecoat.jpg
    boot basecoat.jpg
    141.9 KB · Views: 1,257
  • rs boot.jpg
    rs boot.jpg
    220.1 KB · Views: 1,309
  • boot floor sealed.jpg
    boot floor sealed.jpg
    238 KB · Views: 2,256
  • new rail.jpg
    new rail.jpg
    224 KB · Views: 1,408
  • rear cut.jpg
    rear cut.jpg
    229.6 KB · Views: 1,551
  • bearers.jpg
    bearers.jpg
    230.8 KB · Views: 1,470
that looks excellent mate,shame you weren't nearer i would ask you to do mine.
i'll go out in the morning when its lighter and have a good look and poke and get a better idea of what actually needs replacing/repairing.
thank you for the tip and advice mate.

atb lee
 
Cheers robin t,that looks like a good place to get my parts from think i'll be giving them a call in the week see what they can do for me.

atb lee
 
Mine was worse than that ! and the seat belts are all cracked and held together with tape after somebody burried them under a load of rubble.Still past MOT though :D
 
Philbr, Is that little Clarke welder any good ? Ive been after one similar. My wife said she would buy me one for Christmas if I would pick the one I wanted. I think they do that Clarke stuff at Machine mart in Altrincham Manchester.
 
Philbr, Is that little Clarke welder any good ? Ive been after one similar. My wife said she would buy me one for Christmas if I would pick the one I wanted. I think they do that Clarke stuff at Machine mart in Altrincham Manchester.

I've used a 151 hobby mig from clarke, two things
1)lance and earth ridiculously short
2)hobby torch on the bigger ones doesn't disapate heat on high settings.

I've a clarke 205TE and lance is considerably longer, gas valve in machine not torch =greater cost, not the most expensive brand, but does what I want

that said for a hobby mig they are fine for light body repairs and the 151 will weld chassis
 
Last edited:
Philbr, Is that little Clarke welder any good ? Ive been after one similar. My wife said she would buy me one for Christmas if I would pick the one I wanted. I think they do that Clarke stuff at Machine mart in Altrincham Manchester.

Best little machine i have had to be honest, brought it about 8/9 years ago (about £150 from machine mart Plymouth) and has done everything i have asked of it, before i got the disco i used to mess around with beetles and bay campers and the welder has payed for its self 100 if not more times over, people say buy bigger but for what i have used it for body/ light chassis work i wouldnt need anything bigger (or costly) my advice is get one and a decent helmet and start saving a fortune.
 
and if ya want to push the boat out i would highly recommend this one.
origo ESAB 251 mig/mag
 

Attachments

  • sill ready to weld.jpg
    sill ready to weld.jpg
    233.2 KB · Views: 560
Think I'm gonna have a nice stiff drink and look under my boot carpet as I've only had my 1995 v8 Disco for a couple of months but not been brave enough to look as of yet!
 
Think I'm gonna have a nice stiff drink and look under my boot carpet as I've only had my 1995 v8 Disco for a couple of months but not been brave enough to look as of yet!

you should do mate,better to find out now and fix instead of leaving to get worse,well good luck hope its not to bad for you mate.

atb lee
 
ESAB nice kit, used 3 phase liquid cooled one, set right you look like a welding God. nice kit
As I Said before the clarke stuff is reasonable for mig welder discussions
MIG Welding Forum
lots of good info.


I had use of a clarke hobby mig, just be aware the short lance can be a pain in the arse.

I had the misfortune of trying a cheap chinese mig, the feed speed was uneven and the torch was permanant live-chap up the road, told him to return it as POS. (yellow Cosmo make)
What ever you buy, research it first and buy an established make.
 
i also had a look at the ns sill today,they dont look as bad as i thought but still going to replace them now while im doing the rest up.
discovery1nssill10.jpg

discovery1nssill1.jpg

discovery1nssill.jpg

discovery1nssill6.jpg

discovery1nssill7.jpg

discovery1nssill8.jpg

discovery1nssill2.jpg

discovery1nssill4.jpg
 
inner and outer sills are a little move involved if you gonna do it right, fiddly, arkward but satisfiying to do :)

hes some idea of right and whats involved :)
 

Attachments

  • ps rebuilt rear.jpg
    ps rebuilt rear.jpg
    168.1 KB · Views: 575
  • ps rebuilt.jpg
    ps rebuilt.jpg
    172.5 KB · Views: 575
  • laqu.jpg
    laqu.jpg
    111.9 KB · Views: 584
  • ps prime.jpg
    ps prime.jpg
    139.4 KB · Views: 640
  • ps-side-prime.jpg
    ps-side-prime.jpg
    229.5 KB · Views: 637
  • done.jpg
    done.jpg
    228.3 KB · Views: 649
  • tacked.jpg
    tacked.jpg
    226.6 KB · Views: 603
  • pass front rear.jpg
    pass front rear.jpg
    224.8 KB · Views: 613
  • pre op.jpg
    pre op.jpg
    231.1 KB · Views: 639
  • old new.jpg
    old new.jpg
    219.8 KB · Views: 672
after you cut out and drill out the floor spot welds clean it all up ready to take the new sill. you will need to remove ALL the body mounting bolts in order to lift the body a few inches as you fit them in position.


fit the inner and outer sills (put together but not joined)
get both the inner and outer sills to line up in the correct position with the rubber body mounts fitted and bolted holding the sill in the correct place.
drill the inner and outer sills in a few places and rivet them together to hold them in the right position. remove the sills.
next thing to do is spot weld the sills before you fit them.

make sure to put the body mounting rubbers in the new sill and lower the body onto it, put the bolts through the holes and make sure everything is lined up perfect, clamp the center door pillar refit doors and set them up so they shut perfect.

remove doors carefully spot weld the sill in a few places back and front, spot the center door pillar in a few places refit doors and check everything is good.

if it is remove again and fully weld. get a few tins of seam sealer and give all the joints a good going over with a short haired paint brush to get a factory finnish look.

etch prime, prime then base and laquer. rebuild, job done :)
 

Attachments

  • new floor sill.jpg
    new floor sill.jpg
    229.1 KB · Views: 554
  • pass sill cleaned.jpg
    pass sill cleaned.jpg
    236.5 KB · Views: 521
  • sill ready to weld.jpg
    sill ready to weld.jpg
    233.2 KB · Views: 521
  • sill welded.jpg
    sill welded.jpg
    231.7 KB · Views: 491
My plan, since they'll probably need doing sometime is to replace my sills on my D1 with box section so that they stronger, cheaper, act as rock sliders and something jackable and also easier to do than standard sills. Surely thats easier than replacing them with standard right?
I also plan to swap my boot floor (which is pretty horrific!) with a piece of 3mm ally chequer plate. Would that not be easier and longer lasting than the replacement?
 
cheers vivnap,your work looks really good are you a pro,the sills look alot harder and fiddly then the rear floor im not looking forward to doing them :faint2:

atb lee
 
jmattley i've been thinking that same thing but weren't shaw what would be better.
Really i want something strong but cheap thats going to last a few years without letting me down,my disco is only going to be used for off roading and the occassional holidays to wales,cornwall and yorkshire.
 
Back
Top