1992 200tdi Discovery- gradually improving my daily driver

This site contains affiliate links for which LandyZone may be compensated if you make a purchase.
Thanks for reply. Sorted it now- there was an instruction sheet in the box…!
Have used the chunky cable to go straight to the battery and left off the brown positive cable on the alternator. Other 2 cables are warning light and tachometer- both connected fine and all good and working. Voltage at battery now 14.4v when engine running, so that’s sorted.
8FDED39B-6152-4A41-B6FC-D140F83E1C62.jpeg
 
Might not do any harm to connect the old wire as well if it's still there? If nothing else it will mean that it can't move around and short out anywhere as I doubt there will be a fuse anywhere in it. Just a thought.

Rich
 
Not much of an update but played a gig with my folk rock band at Moira Furnace in Leicestershire. Pulled the Disco up to the blast furnace to unload, and accidentally re-created a 1990s Land Rover promo shot (especially if you ignore the gazebo)!
E3AE2BF6-E5C7-4C44-8DD0-A8A66BBC2FEA.jpeg
 
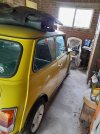
Zombie thread update! I’d been happily using the old thing for the last few months knowing it’d need work before the MOT, which lapsed in April. Got distracted by fixing up my classic Mini which has been off the road for 5 years and needed serious work, this is now finished (as much as they ever are) and ready to be used! Here she is at the Festival of the Unexceptional on Saturday.
A061E6FE-AEA1-4495-8043-DE3FC0387852.jpeg


Anyway, this meant that it was time to look at the Disco; I knew it needed the corners under the rear door welding. Guess what? Turns out the complete boot floor is utterly buggered too… should have guessed really. The corners look like this…
55F4028C-33D2-4C12-9B6C-44CE722983C9.jpeg

With the trim out it looks even worse. When I tried to undo the passenger side rear seatbelt mount the whole square of metal came out in one…
So looks like new boot floor and surrounding panels! Have been reading the many posts on this before attempting it, going to get replacement panels from YRM. Any advice is much appreciated!
5312513D-DED8-49E6-9681-E2FB383208A3.jpeg
B8210660-6361-44C6-B1A2-6C61604A9682.jpeg

1A493DB0-63E5-4618-B734-DF63DB15DFA5.jpeg

13457C3F-1CD0-4B89-9634-CC6ED066633D.jpeg
 
Zombie thread update! I’d been happily using the old thing for the last few months knowing it’d need work before the MOT, which lapsed in April. Got distracted by fixing up my classic Mini which has been off the road for 5 years and needed serious work, this is now finished (as much as they ever are) and ready to be used! Here she is at the Festival of the Unexceptional on Saturday.
View attachment 322658

Anyway, this meant that it was time to look at the Disco; I knew it needed the corners under the rear door welding. Guess what? Turns out the complete boot floor is utterly buggered too… should have guessed really. The corners look like this…
View attachment 322662
With the trim out it looks even worse. When I tried to undo the passenger side rear seatbelt mount the whole square of metal came out in one…
So looks like new boot floor and surrounding panels! Have been reading the many posts on this before attempting it, going to get replacement panels from YRM. Any advice is much appreciated!
View attachment 322665View attachment 322666
View attachment 322664
View attachment 322663
Love the mini
This is my one, not on the road at the moment though
 

Attachments

  • 20230429_143531.jpg
    20230429_143531.jpg
    346 KB · Views: 72
  • 20230429_143537.jpg
    20230429_143537.jpg
    348.1 KB · Views: 74
Zombie thread update! I’d been happily using the old thing for the last few months knowing it’d need work before the MOT, which lapsed in April. Got distracted by fixing up my classic Mini which has been off the road for 5 years and needed serious work, this is now finished (as much as they ever are) and ready to be used! Here she is at the Festival of the Unexceptional on Saturday.
View attachment 322658

Anyway, this meant that it was time to look at the Disco; I knew it needed the corners under the rear door welding. Guess what? Turns out the complete boot floor is utterly buggered too… should have guessed really. The corners look like this…
View attachment 322662
With the trim out it looks even worse. When I tried to undo the passenger side rear seatbelt mount the whole square of metal came out in one…
So looks like new boot floor and surrounding panels! Have been reading the many posts on this before attempting it, going to get replacement panels from YRM. Any advice is much appreciated!
View attachment 322665View attachment 322666
View attachment 322664
View attachment 322663

Plus body mounts and sills, careful to jig and brace while trying to find good metal ... do it once - do it right ..(one side at a time ;)
 
Not touched this for a while, apart from moving it around front garden!

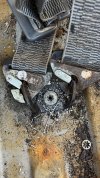
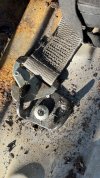
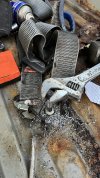
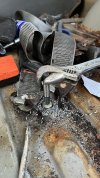
Anyway got in Sunday afternoon to attack the seat belt mounting bolts which had stuck when I started it last year. A set of bolt removers and a session with drill bits had them out.
29788311-6791-4513-A4DB-958DC1ABE4F7.jpeg7EE6C708-27A4-4428-A6BF-454C6367B13B.jpeg2D44FAA6-07AC-4A7A-8099-890BAF5C9B65.jpeg98A77E31-EC59-403D-B534-2BF7837A3934.jpeg
Then I started prodding around the boot floor corners- they’re not good!
I’m really looking for a bit of inspiration and your best boot floor threads to show me it’s not going to be that bad! I have all the panels ready to fit though.
40BAA5CD-2463-4873-82FF-8442EE1ECA85.jpeg
Fun with the sparky stick awaits again!
 
Also mate (you may already know), if you plan to use dicky seats, their belt anchors are in rear quarter. There’s a panel fold spot weld join to the right of c pillar bottom, and then 105mm to the right of c pillar is a reinforcement plate. Rear quarter panel can rot between this and also at that panel join.
IMG_6738.jpeg
IMG_6709.jpeg
 
Ah that’s good to know, I’ll check that area out. Probably best investing in good spot weld drill bit. All the ones I’ve used before had a tendency to snap; is there a trick to stop this?
 
I don’t use the centre spring loaded ones anymore as I always end up jamming them up. I use a solid one. As above, use cutting oil. Probably not the best but I keep a bottle from my last service and use it as cutting oil in my oil squirter can.
Screwfix also used to do a big box of mixed drill bits. Looks like pic n mix with sets of 4 plastic wrapped. I use these for pilot drilling and just chuck them when blunt
 
Latest update, productive afternoon yesterday! Got most of the floor out.
3CD4B48A-E046-41BA-9062-9B6F7402BAE7.jpeg


4402FFE6-87CF-49F4-A6B0-B3E705A0C628.jpeg


13E56B9B-878F-42D8-8324-298B0518ADE0.jpeg


697CDA9E-44DD-40F9-A649-40D04649468F.jpeg

The corners are utterly buggered, so I’m hoping the repair panels will help. I’m also going to have to do some fabrication at the bottom of the door panels and replace the door lip. Weirdly enough the crossmember is quite solid!
EA7E5604-6F18-48AE-8F1A-1838D6774EBA.jpeg
 
If you want to tie into the rear quarters like it is front factory, the rear quarters have 90 degree angle at bottom that the side pieces go to. Also looks like these have been eaten away by tin worm. You going to remove rear quarters?
 
I’m hoping not to remove rear quarter panels. I’m working in the open on the front garden so I don’t have a covered workspace. I’m not that bothered about it being factory fresh as long as it’s solid and safe. Do the three reinforcement beams under the boot floor attach to the bottom of the boot floor sides?
 
I’m hoping not to remove rear quarter panels. I’m working in the open on the front garden so I don’t have a covered workspace. I’m not that bothered about it being factory fresh as long as it’s solid and safe. Do the three reinforcement beams under the boot floor attach to the bottom of the boot floor sides?
They do mate via spot welds. Yeah totally get that - it becomes a mare when outside and you can’t keep it sealed up. I’m sure I saw threaded holes right next to the side pieces too but can’t remember now?
My new floor turned up but I got a load of work to do yet.
Keep at it mate, well worth doing. Love the colour too! If I had a new range it would be that champagne colour!!
 
Back
Top