charliedurrant
Member
- Posts
- 96
- Location
- Broadstairs, Kent, UK
For a while I have been concerned with the coolant temperature in the L322 BMW V8 engine and following on from:
http://www.landyzone.co.uk/lz/f10/two-failed-thermostats-2-months-267358-5.html.
The engine temperature is controlled using:
The M62 engine is based on the BMW M60 engine and the objectives were:
ref: http://www.meeknet.co.uk/e31/M62B44_Engine.pdf
To reduce help fuel consumption and emissions the coolant temperature is kept relatively high during low load conditions and low during high load conditions. The thermostat is set to be fully open at ~108oC but can be forced open using an inbuilt heater element. An ECU monitors load to control the forced thermostat opening.
I whole heartedly agree with decreasing emissions (it is hardly a fuel efficient car though) but the downside is that as time goes by the cooling system parts wear with the higher temperatures as does the break down of oil the annoying one to replace being the transmission oil.
Quantifying that rate of wear is difficult and there are a lot or parts in the M62 coolant system to go wrong but I have had:
So after losing lots of coolant (it isnt cheap) over the years and the general headaches I have punted for reducing the coolant temperature to thus reduce pressure and thus reduce strain on the components. I dont have any kit to perform tests as to whether less strain is put on the system but it would seem logical that it would help.
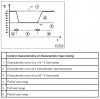
With this thermostat modification the engine will still run closed loop which means the ECU is varying fueling according to the environment and the engine will be running in a zone which according to BMW it is designed to run. Ultimately the low load running temperature will be roughly the same as the high load temperature (figure A)

There currently seem to be three options available to reduce the coolant temperature:
1) A Pulse Wave Modulation circuit to essentially turn on and off the inbuilt heater element in the standard thermostat. By pulsing the element the thermostat can be kept open at different temperatures. Its a clever solution and piggy backs on top of the stock system and I wish the stock system made the feature available but alas it does not.
ref: Controlling the thermostat yourself on the M62 4.4i (a really long post) - Xoutpost.com
Advantages:
2) A BEHR stock body thermostat that opens at 88oC. The body is missing the connector for the heater element price is high approx. £100 to your door.
Ref: fullfatrr.com - View topic - 4.4 Thermostats - could it be this easy for a lower temp ?
Advantages
3) An after market thermostat sandwich plate that piggy backs onto the existing thermostat housing
Ref: 80°C Thermostat kit for BMW E39 540i E38 740i X5 M62 - Reduce engine temperature - Abbes-Performance.com
Advantages
I decided to go for the after market thermostat. Primarily because it has been tested by the manufacturer on both VANOS and non VANOS M62 engines and I like it when people give things a go and try to solve a problem which has been left (this can be argued) by the manufacturer.
So I went ahead and order the parts. The company is based in the Czech Republic and the kit arrived in 3 days from ordering to the UK. I asked the manufacturer what temp they recommended (80oc thermostat) and also whether the coolant would be at a high enough temp for closed loop running the manufacturer said the coolant temp would be ~90oC. Email responses were fast and polite.
The kit consisted of:

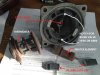
The first thing to do is take off your old thermostat and remove the thermostat and make some modifications.
Thermostat removal is detailed here:

Range Rover MKIII - Replace Electric Thermostat - YouTube
...by Storey Wilson (Mr AllComs). I disagree with they way he did it but the video is useful to see everything in place. I would have differed from his video by:
1) Don't remove the fan shroud and fan - I really cant see why he did this
2) I drained my coolant using the drain plug on the bottom right of radiator - it's what it is for but others have said it can break (my rad is new though) and took the top off the coolant expansion tank to allow air in.

3) I expect Storey may have also replaced his bottom hose as there is no need to remove the bracket holding the bottom hose away from the fan.
4) The hardest part is taking the pipe off the thermostat - it always seems to stick and the braided pipe going to the intake plastic - I found it hard to squeeze the clip together to free the hose.

Once the thermostat is removed the actual thermostat needs to be removed from its housing. The pillars that retain the housing must be cut off. I used a Dremmel tool to cut them off however a hacksaw will be as effective. They cuts need to be as flush as possible and I suggest removing the o ring before hand.
Getting the cuts flush was easy with the Dremmel but a file will be required if using a hack saw to grind the stumps flush with the body.

You will then find that the new thermostat pancake does not sit flush with the original housing. The bleed ball bearing on the new thermostat sticks out and a notch will need to be cut in the original housing at the right point. Stupidly I didnt take a photo of my notch. Cutting the notch is by far the hardest part and my concern was that I would cut through the housing, note the notch can only go in one location. It was relatively easy using a Dremmel but a bit fiddly.
Note the instructions describe at length getting the orientation of the thermostat correct with respect to the bleed ball bearing. It is obvious that the bearing needs to allow flow away from the pump, however the 80oC thermostat can only fit into the stock housing one way round so there is no 'thought process' required.
On removal of the old heater element it is clear that two wires are exposed. It is not mentioned in the instructions however I decided to be prudent and seal up the wires with some epoxy.
Once the original housing has been adapted you are ready to fit. This is simply a question of bolting it on. It took me a few flips and twists to get the orientation of the gasket correct and then I used two pieces of studding (sets screws with the heads cut off) to enable me to place the gasket and thermostat on the water pump without going crazy holding both in line.
Tighten up the set screws, refit the parts, refill with coolant, bleed accordingly (bleed instructions are given) and you are good to go. It is noted in the instructions that in some global locations your L322 may give an engine warning light due to the lack of live connection to the heater element. In the UK this was not the case (well I have an O2 sensor warning anyway) but no other fault codes were present on the AllComms software.
For zones where this is an issue a resister can be plugged in to the heater
element connector to remove the warning (the spec of the resister is detailed in the instructions).
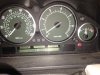
Using the hidden menu (Test 7):
Hidden menu
...you can check the coolant temperature I never knew about the hidden menu - Saint kindly directed me to it. Note in all the online guides on how to access it none of them seemed to mention which buttons where the 'left' and 'right' ones. For information they are the two small knob type buttons on the instrument cluster (one of them is used to reset the odometer).
I didnt measure the temp before the mod (the car takes ages to cool down) but after the mod while sitting coolant temperature read 93oC (sitting for 15 minutes) and while moving 89-90oC.

Conclusion
It can be argued that this mod is not sensible as we are modifying a system what was designed to run at 108oC. My belief from research is that the higher temperatures were a compromise to achieve better emissions.
The mod has simply made the low load running temp match the high load running temp and according to 'Figure A' the coolant temp will be in the 'working zone'
I could also be argued that the motor will now fail emissions tests. I run LPG so my emissions are practically zero. My UK annual test is not due for 9 months so time will tell. I would lay money that on petrol or LPG the engine will pass UK emissions tests that is a gut feeling of course!
So, is this the best option to reduce running temperatures .? I think so, its approximately half the price of the stock 88oC option and supports someone who is trying to address the issue (if you believe there is one).
The modification to the housing is a pain but you do retain the heater connector and you can change the thermostat to a different temp if required.
The stock housing with an 88oc thermostat is a clear second but you do loose the heater connector in the stock place and its approximately twice the price. You can remove the connector from your old housing (there is a clip I didnt try it though) but I prefer the wire to go to the right place even though it isnt doing anything.
References:
This guy (Tim) really has documented a lot about the BMW V8 - I donated to the site as it is excellent.
In particular "Coolant system described"
Timm's BMW M60, M62 and M62TUB V8 Engines
and
http://www.meeknet.co.uk/e31/M62B44_Engine.pdf
http://www.landyzone.co.uk/lz/f10/two-failed-thermostats-2-months-267358-5.html.
The engine temperature is controlled using:
- A thermostat to control flow of coolant to the radiator
- A viscous coupling to control fan speed
- An additional electric fan
The M62 engine is based on the BMW M60 engine and the objectives were:
- Reduction of fuel consumption
- Rounder/fuller torque curves (for improved vehicle elasticity)
- Optimization of engine acoustic and comfort characteristics
- Compliance with new exhaust emission regulations (EU-2) as well as the expected on-board diagnosis (OPD II) requirements in the USA.
ref: http://www.meeknet.co.uk/e31/M62B44_Engine.pdf
To reduce help fuel consumption and emissions the coolant temperature is kept relatively high during low load conditions and low during high load conditions. The thermostat is set to be fully open at ~108oC but can be forced open using an inbuilt heater element. An ECU monitors load to control the forced thermostat opening.
I whole heartedly agree with decreasing emissions (it is hardly a fuel efficient car though) but the downside is that as time goes by the cooling system parts wear with the higher temperatures as does the break down of oil the annoying one to replace being the transmission oil.
Quantifying that rate of wear is difficult and there are a lot or parts in the M62 coolant system to go wrong but I have had:
- 3 radiators in as many years and they only malfunctioned under load and a standard offline pressure test didnt find the faults. Only under running conditions did they leak grrr
- Head gaskets replaced after an overheat on the motorway coolant lost through a pipe.
- LPG vaporiser nylon inlet cooling elbow (this was the latest issue) literally disintegrated
Various coolant pipes this I do expect at 89,000 miles
So after losing lots of coolant (it isnt cheap) over the years and the general headaches I have punted for reducing the coolant temperature to thus reduce pressure and thus reduce strain on the components. I dont have any kit to perform tests as to whether less strain is put on the system but it would seem logical that it would help.
With this thermostat modification the engine will still run closed loop which means the ECU is varying fueling according to the environment and the engine will be running in a zone which according to BMW it is designed to run. Ultimately the low load running temperature will be roughly the same as the high load temperature (figure A)
Figure A - extract from http://www.meeknet.co.uk/e31/M62B44_Engine.pdf
There currently seem to be three options available to reduce the coolant temperature:
1) A Pulse Wave Modulation circuit to essentially turn on and off the inbuilt heater element in the standard thermostat. By pulsing the element the thermostat can be kept open at different temperatures. Its a clever solution and piggy backs on top of the stock system and I wish the stock system made the feature available but alas it does not.
ref: Controlling the thermostat yourself on the M62 4.4i (a really long post) - Xoutpost.com
Advantages:
- No physical mods to the thermostat
- Coolant temp can be changed as required
- Could wear out the heater element
You have to make the circuit and wire it in
2) A BEHR stock body thermostat that opens at 88oC. The body is missing the connector for the heater element price is high approx. £100 to your door.
Ref: fullfatrr.com - View topic - 4.4 Thermostats - could it be this easy for a lower temp ?
Advantages
- Drop in replacement no alterations required
- The connector for the heater element is not there so you will have a loose wire
- I cant confirm it but the coolant temp will probably be around 100oC (this is based on a 80oC thermostat having coolant temps of ~90oC). This may be what you want but for me it isnt a large enough change.
- Approx £100 to your door in the UK
3) An after market thermostat sandwich plate that piggy backs onto the existing thermostat housing
Ref: 80°C Thermostat kit for BMW E39 540i E38 740i X5 M62 - Reduce engine temperature - Abbes-Performance.com
Advantages
- Cheapest solution (I havent priced the PWM circuit) - £57 to the UK.
- Allows the heater element connector to be retained
- Allows for the thermostat to be changed to a different temperature with relative ease.
- Allows for cheap thermostat replacement instead of ~£50 in the UK for the stock thermostat. This isnt much of advantage as you dont expect them to go wrong.
- It has been tested (with varying temperature thermostats) by manufacturer.
- You have to modify the stock thermostat housing. This is awkward to do well I found it awkward.
I decided to go for the after market thermostat. Primarily because it has been tested by the manufacturer on both VANOS and non VANOS M62 engines and I like it when people give things a go and try to solve a problem which has been left (this can be argued) by the manufacturer.
So I went ahead and order the parts. The company is based in the Czech Republic and the kit arrived in 3 days from ordering to the UK. I asked the manufacturer what temp they recommended (80oc thermostat) and also whether the coolant would be at a high enough temp for closed loop running the manufacturer said the coolant temp would be ~90oC. Email responses were fast and polite.
The kit consisted of:
- Three aluminium plates sandwiched together to clamp the thermostat with gaskets between each slice and the slices held together with 4 cotter pins.
- Two paper gaskets
- 3 longer set screws and one allen head bolt to accommodate the resulting longer housing. The instructions stipulated the allen key head would be needed for the set screw furthest away from your body when fitting. I didnt find this to be the case and for consistency I swapped it out for a hex head set screw.
- Detailed instructions which include the make and model of all the possible thermostats (87oC/80oC75oC) no pictures though.
The first thing to do is take off your old thermostat and remove the thermostat and make some modifications.
Thermostat removal is detailed here:
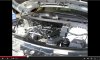
Range Rover MKIII - Replace Electric Thermostat - YouTube
...by Storey Wilson (Mr AllComs). I disagree with they way he did it but the video is useful to see everything in place. I would have differed from his video by:
1) Don't remove the fan shroud and fan - I really cant see why he did this
2) I drained my coolant using the drain plug on the bottom right of radiator - it's what it is for but others have said it can break (my rad is new though) and took the top off the coolant expansion tank to allow air in.
3) I expect Storey may have also replaced his bottom hose as there is no need to remove the bracket holding the bottom hose away from the fan.
4) The hardest part is taking the pipe off the thermostat - it always seems to stick and the braided pipe going to the intake plastic - I found it hard to squeeze the clip together to free the hose.
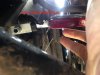
Once the thermostat is removed the actual thermostat needs to be removed from its housing. The pillars that retain the housing must be cut off. I used a Dremmel tool to cut them off however a hacksaw will be as effective. They cuts need to be as flush as possible and I suggest removing the o ring before hand.
Getting the cuts flush was easy with the Dremmel but a file will be required if using a hack saw to grind the stumps flush with the body.
You will then find that the new thermostat pancake does not sit flush with the original housing. The bleed ball bearing on the new thermostat sticks out and a notch will need to be cut in the original housing at the right point. Stupidly I didnt take a photo of my notch. Cutting the notch is by far the hardest part and my concern was that I would cut through the housing, note the notch can only go in one location. It was relatively easy using a Dremmel but a bit fiddly.
Note the instructions describe at length getting the orientation of the thermostat correct with respect to the bleed ball bearing. It is obvious that the bearing needs to allow flow away from the pump, however the 80oC thermostat can only fit into the stock housing one way round so there is no 'thought process' required.
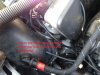
On removal of the old heater element it is clear that two wires are exposed. It is not mentioned in the instructions however I decided to be prudent and seal up the wires with some epoxy.
Once the original housing has been adapted you are ready to fit. This is simply a question of bolting it on. It took me a few flips and twists to get the orientation of the gasket correct and then I used two pieces of studding (sets screws with the heads cut off) to enable me to place the gasket and thermostat on the water pump without going crazy holding both in line.
Tighten up the set screws, refit the parts, refill with coolant, bleed accordingly (bleed instructions are given) and you are good to go. It is noted in the instructions that in some global locations your L322 may give an engine warning light due to the lack of live connection to the heater element. In the UK this was not the case (well I have an O2 sensor warning anyway) but no other fault codes were present on the AllComms software.
For zones where this is an issue a resister can be plugged in to the heater
element connector to remove the warning (the spec of the resister is detailed in the instructions).
Using the hidden menu (Test 7):
Hidden menu
...you can check the coolant temperature I never knew about the hidden menu - Saint kindly directed me to it. Note in all the online guides on how to access it none of them seemed to mention which buttons where the 'left' and 'right' ones. For information they are the two small knob type buttons on the instrument cluster (one of them is used to reset the odometer).
I didnt measure the temp before the mod (the car takes ages to cool down) but after the mod while sitting coolant temperature read 93oC (sitting for 15 minutes) and while moving 89-90oC.
Conclusion
It can be argued that this mod is not sensible as we are modifying a system what was designed to run at 108oC. My belief from research is that the higher temperatures were a compromise to achieve better emissions.
The mod has simply made the low load running temp match the high load running temp and according to 'Figure A' the coolant temp will be in the 'working zone'
I could also be argued that the motor will now fail emissions tests. I run LPG so my emissions are practically zero. My UK annual test is not due for 9 months so time will tell. I would lay money that on petrol or LPG the engine will pass UK emissions tests that is a gut feeling of course!
So, is this the best option to reduce running temperatures .? I think so, its approximately half the price of the stock 88oC option and supports someone who is trying to address the issue (if you believe there is one).
The modification to the housing is a pain but you do retain the heater connector and you can change the thermostat to a different temp if required.
The stock housing with an 88oc thermostat is a clear second but you do loose the heater connector in the stock place and its approximately twice the price. You can remove the connector from your old housing (there is a clip I didnt try it though) but I prefer the wire to go to the right place even though it isnt doing anything.
References:
This guy (Tim) really has documented a lot about the BMW V8 - I donated to the site as it is excellent.
In particular "Coolant system described"
Timm's BMW M60, M62 and M62TUB V8 Engines
and
http://www.meeknet.co.uk/e31/M62B44_Engine.pdf
Attachments

Last edited: