Here the sump is fitted and the crank pulley..........I also started fitting the push rods here.
 

Attachments

  • ImageUploadedByTapatalk HD1372479958.867135.jpg
    ImageUploadedByTapatalk HD1372479958.867135.jpg
    63.2 KB · Views: 132
  • ImageUploadedByTapatalk HD1372479984.239685.jpg
    ImageUploadedByTapatalk HD1372479984.239685.jpg
    61.2 KB · Views: 136
  • ImageUploadedByTapatalk HD1372480030.608635.jpg
    ImageUploadedByTapatalk HD1372480030.608635.jpg
    68.9 KB · Views: 128
  • ImageUploadedByTapatalk HD1372480063.434388.jpg
    ImageUploadedByTapatalk HD1372480063.434388.jpg
    62 KB · Views: 121
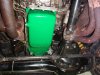
This is a special tool.....lol.....lol...I made for driving the oil pump.ImageUploadedByTapatalk HD1372483242.752917.jpg

I used this tool to prime the oil pump, then fitted the new oil filter and started priming the rest of the engine until the oil came through the heads supplying the rocker shafts.ImageUploadedByTapatalk HD1372483648.983785.jpg

Please be aware that the thread hole below the oil channel fills with oil during the priming stage, so don't forget to clear the threaded hole because when you screw the rocker shaft down you could cause a hydraulic lock and crack the head, you can just screw one of the rocker shaft bolts in each hole before you do the priming.

These are my rocker shafts all lubed with assembly lube ready for the initial start up eventually. I will fit my distributor moments before I start her up, because I will prime the engine again with my special tool I made, then fit the distributor and fire her up.
ImageUploadedByTapatalk HD1372484309.829591.jpg

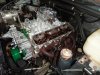
Here both rocker shafts are fitted and I primed the engine again, rotated the engine a few times and primed her again, but this time I ran the priming for a full 60 seconds and watching how the oil was coming out the rockers.......very nice.ImageUploadedByTapatalk HD1372484730.117920.jpg

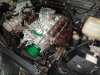
Here the engine is closed up for real.ImageUploadedByTapatalk HD1372484847.950482.jpg

This is now starting to look like the business end of the engine.........lol....some pulleys fitted, P.A.S. pump fitted.
ImageUploadedByTapatalk HD1372485114.175986.jpg

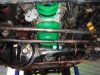
Oooopsie..........what is wrong with this picture???
ImageUploadedByTapatalk HD1372485331.991472.jpg

After fitting the upgraded alternator and checking alignment with the P.A.S. pump pulley, I found my original tensioner did not line up properly, lucky I had a old Jag rocker cover grommet, and I did a small mod to it and now it looks like it was like that from the factory....lol...lolImageUploadedByTapatalk HD1372485988.471017.jpg
ImageUploadedByTapatalk HD1372486016.531252.jpgImageUploadedByTapatalk HD1372486036.108684.jpg
 
They are powder coated, everything is, even the rocker covers, the only thing that is painted is the expansion tank and the crank damper pulley, its done with 2K and that I have done myself, don't have the space for powder coating.
 
Last edited:
The belt friction will work the contact surface off to metal again. The reason for me doing this is to get rid of the ugly rust and to prevent it happening. All and all $220 AUD. What you see is not all for the money there is a lot more, I don't know if you checked my thread from the start, I powder coated my tow bar as well but it is not a fancy one.
 
So.......it looks like I could reach my goal over the weekend..........that is to start my baby, the excitement is almost unbearable.
Here you can see the tensioners and the new V-belts just fitted loosely.
ImageUploadedByTapatalk HD1373013046.679956.jpg
Here I think all of you can guess what is happening.........
ImageUploadedByTapatalk HD1373013252.031318.jpg
Now at this stage I actually have the engine cranking, I must just check if I have spark, and if that is good, fit the top radiator hose, fill the cooling system, get fuel in the carby and fire her up....WOOOOHOOOOO
ImageUploadedByTapatalk HD1373013673.098001.jpg
 
Looking good, I wish I had the time scale to clean up my engine so it looked as good as yours. I realy like the green, it's not to in your face against the polished block :cool:
 
Don't let the time factor cloud your mind...lol...I am paced at my finance availability factor.....lol..lol..got nothing to do with time.
Then on the other hand this is not my only vehicle, and I want to do everything myself, and as correct and perfect as my ability allows me, once ready and back on the road I just want to do the normal servicing and maintenance.
 
Mine is in the grain store at work. We start combining in 4 weeks and I have got to put it back together yet.
 
Mine is in the grain store at work. We start combining in 4 weeks and I have got to put it back together yet.

I have no clue what you just said....lol, 😛 I more or less get it's disassembled for some reason....
 
I have no clue what you just said....lol, 😛 I more or less get it's disassembled for some reason....

I work on a farm, the rangy is in the store for the crops which we start cutting in 4 weeks. It has had a full rebuild to the body as it was very rotten so everything got taken off. It is having a new 2nd hand engine and manual gearbox so lifted the shell off the chassis for better access and so I could paint the complete chassis. Look up Tinkering With My Vogue in the rangy section on hear and you will see what I mean.
 
Ok..........

As promised........the video clip😳😳 please bear in mind there was no tuning here, I took this after the cam shaft has been run in and this procedure did not go as well as I hoped for. I was alone during this proses, and trying to keep the rpm up, checking the stop watch, and trying to see if the cooling system is doing what it should...........
Now this is where things got a bit hairy.........😁😁 one of my temporary blanking pipes came of at around 13 minutes, so its coolant all over the place. So the video is taken just after I gave the engine a wash to get rid of the most of the coolant, so that is the reason for the water everywhere, she is not leaking, timing was guessed, but I still love the sound.

Sorry if I can fink the dam thing???
 
Damn its just not working.......👿👹👅💔💔💔💔
 
Put it up on YouTube then copy and paste the link, there is a setting on there for public or private viewing that needs to be on public (I made that mistake) that should work then.
 

Similar threads