You are using an out of date browser. It may not display this or other websites correctly.
You should upgrade or use an alternative browser.
You should upgrade or use an alternative browser.
Steep learning curve
- Thread starter resto_d1
- Start date
This site contains affiliate links for which LandyZone may be compensated if you make a purchase.
- Posts
- 9,105
- Location
- Roaming the UK on assignments
I can't believe this cars rear. I'm struggling to find bits that aren't patches around the rear arch to weld to lol.
The inner rear arch lip is shot so I'm going to try and bend some angle to fit it then weld that to a froggats repair panel. Can then spot weld it in as per original fitment.
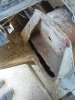
@dieseldog69 - my screwdriver suggested there is a hole in the rail where the tubular cross member attaches. What did you do about keeping the lip for the new boot floor when you cut out an access hole?
Don't worry about it, there is a new "Z" section from YRM https://yrmit.co.uk/product/rear-fl...n-land-rover-discovery-1-range-rover-classic/
Use that and it makes life so much easier, I ordered 3 bits for mine along with a new floor, fcuk knows why but I got a huge 1.5mm sheet sitting outside waiting for me to cut it to bits lol.
- Posts
- 9,105
- Location
- Roaming the UK on assignments
So the dishwasher is now running and the socket it was running off is making some nasty noises! Kitchen wiring is not good. Luckily my best mate is a sparky. Good news is I haven't touched my landy money hahaha
Good, now quickly get on YRM and spend before summit else blows up lol
Don't worry about it, there is a new "Z" section from YRM https://yrmit.co.uk/product/rear-fl...n-land-rover-discovery-1-range-rover-classic/
Use that and it makes life so much easier, I ordered 3 bits for mine along with a new floor, fcuk knows why but I got a huge 1.5mm sheet sitting outside waiting for me to cut it to bits lol.
That's a propper winner. It doesn't come up in d1 section so wouldn't have known! Can plate my rear floor sections straight up to that.
alanowens33
New Member
- Posts
- 4
- Location
- Billingham
Hi all this is the first time on here so bare with me I was at the billing show on Saturday and there was a stall there and they had a 300tdi disco with a upgraded inlet manifold with twin crome inlet and pipe work there was no one around to ask about this I’m just wondering if any one had seen this or no were I can get one thanks
- Posts
- 9,105
- Location
- Roaming the UK on assignments
That's usually for the front bits or short sections that need repair, the full side sheets come with the pressed in lip along the full width of sheet, the "Z" section also serves to help repair the side section at the back (underneath the rear lights) where it joins the rear cross member.
Unless, of course, you are replacing the whole rear body cross member? Then the new cross member kit should come with a proper section that the floor sits in and the sides marry up to.
Unless, of course, you are replacing the whole rear body cross member? Then the new cross member kit should come with a proper section that the floor sits in and the sides marry up to.
- Posts
- 9,105
- Location
- Roaming the UK on assignments
Hi all this is the first time on here so bare with me I was at the billing show on Saturday and there was a stall there and they had a 300tdi disco with a upgraded inlet manifold with twin crome inlet and pipe work there was no one around to ask about this I’m just wondering if any one had seen this or no were I can get one thanks
Erm, no, but what are you trying to achieve? Looks? Power and performance?
If it's aesthetics you're into then you could do little better than actually taking your original and polishing it to a mirror finish, painting the indents and then lacquering it, I've seen a couple now and they do look smart and well worth the time invested, it's only time as the cost is a bit of paint an lacquer.
alanowens33
New Member
- Posts
- 4
- Location
- Billingham
Hi and thanks for getting back to me from wot I could tell off the car it’s a performance upgrade it had a Union Jack sticker on if I remember correctly just trying to track down the maker so I can find out more about this thanks for your help
That's it mate. Yes whole cross member is shot. I did consider doing it in box but probably beyond me if I'm honest. From what I can see and their workshop pics it comes in two parts. As you say, one part is almost an overlay, the other part being the one with the mountsThat's usually for the front bits or short sections that need repair, the full side sheets come with the pressed in lip along the full width of sheet, the "Z" section also serves to help repair the side section at the back (underneath the rear lights) where it joins the rear cross member.
Unless, of course, you are replacing the whole rear body cross member? Then the new cross member kit should come with a proper section that the floor sits in and the sides marry up to.
- Posts
- 9,105
- Location
- Roaming the UK on assignments
So, in summary, will need full boots kit, z section, rear cross member then arch bits for other side. Ouch. Need two new tyres for the daily too
Rebuilds are hungry for your cash, just wait until you want to start modding and upgrading
")
I'm looking forward to that lol. At least it will be in use then. I was really aiming for October. I don't think its out the question yet. I can blitz through a lot of the mechanical requirements with the only major one that I'm currently aware of being suspension/steering issues. Knowing me I'll be re-bushing and replacing half of it anyway haha
- Posts
- 9,105
- Location
- Roaming the UK on assignments
Oh yeah, I remember that, all too well, use your after hours CAD to size up your plates and get her done, I did a two piece repair to the top of the chassis rail with 2mm to maintain the seam welded "C" sections but would have just done it as a one piece plate and blazed the MIG in the gaps.
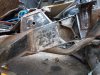
Looks scaly and rusty inside, you'd better be busy with the waxoyl when you're finshed setting fore to and cutting yourself to bits LOL
Looks scaly and rusty inside, you'd better be busy with the waxoyl when you're finshed setting fore to and cutting yourself to bits LOL
That meant to say alignment wise haha. I'm going to cad up the sill and the chassis tonight. Thanks all for your pics and help/advice. I wouldn't have dreamed cutting a chassis a year ago! This is the whole point to learn skills away from my desk job
Oh and ref the rust on inside it's actually cleaning back quite nicely. I'll fill it with dynax. It's mad that there's a hole on those trapeze mounts on the tubular. Allows spray to enter and just run down the inside and sit!!! She will be fully closed there now for sure
Similar threads
- Replies
- 1
- Views
- 657
- Replies
- 5
- Views
- 525