rear wheel carrier bolts?

This site contains affiliate links for which LandyZone may be compensated if you make a purchase.

colla

New Member
Posts
9
Help o wise ones!
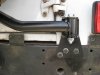
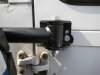
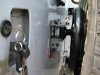
Having purchased a 110 h/t spare wheel swingaway [Paddock £102] I am flumoved as to how I extract the 2 no body mounting bolts without using a screw extractor and how do I fit new bolts thro the cross member?
Advice from the sages is sought:confused:
As you might have guessed I am an enthusiastic but novice owner of the biggest mobile meccano set for big boys
 
Hi,
Yes it is supposed to
The top two bolts on the lower bracket go thro the holes for the tub mounting [below the fog light] and the lower third bolt on the same bracket, goes directly thro the cross member.
My problem is access
Do I drill out the two existing tub bolts and fit new bolts and nuts?
How do I fit the nut on the lower crossmember bolt?
 
Tub bolts just unbolt. They are held in place by a captive plate. But peeps do replace em with ordinary nuts and bolts. a long extension bar will reach over the cross member. Cross member bolt should be easily accessible from underneath or by sliding a spanner in thru the open end of the crossmember.
 
I fitted a swingaway a few months back.... I think you will find that ALL 3 bolts on the lower bracket go through the cross member. See these pics...
Access is an issue....it can be done. You need a ring spanner to fit the nuts and a socket for the bolt, a bit of grease helps to hold the nut in the spanner.
Take your time and make sure you get the hinges vertical. The 3 holes for the lower hinge should already be there. They are 2 that hold a grab handle and one hole below to the left. Remove the grab handle and drill the 2 holes for the top bracket into the body capping make sure its lined up.
The 'trick' is getting the ring spanner inside the cross member and dropping it onto the nuts holding the grab handle while you ratchet off the the bolt. Seems impossible at first, but it can be done.

Bolt the swingaway top bracket enough to hold it firm and pop the bolts in for the bottom.... then remove 2 of the bolts leaving just the furthest bolt away from the access slot at the back of the xmember. Then a blob of grease on your ring spanner and pop the nut on it. Go for the furthest away first.... you should be able to move the bolt with your right hand and try and keep your finger on top of the nut (using left hand) as you try and get the first twist. Then the ring spanner will hit the bottom of the inside of the xmember making it easy to tighten up. The do the next nearest etc... if you do the nearest first you wont get at the furthest as the bolts will be in the way.

Hope you read this before starting in the morning!!
 
Last edited:
Pics re above
 

Attachments

  • Spare wheel carrier 039.JPG
    Spare wheel carrier 039.JPG
    72.8 KB · Views: 4,331
  • Spare wheel carrier 040.JPG
    Spare wheel carrier 040.JPG
    53.8 KB · Views: 1,096
  • Spare wheel carrier 041.JPG
    Spare wheel carrier 041.JPG
    64.7 KB · Views: 4,694
Many thanks but the lower bracket is different on mine [Paddock must have changed it] and is supposed to fit on the tub bolts[2 no] with a third offset bolt in the cross member, otherwise the fittings for the other two brackets are identical.
I like the grease idea and I understand your explanation of the ring spanner and bolt sequence.Thanks again and I will let you know how it goes.
No doubt I will need your help on other aspects and conundrums of my meccano set!
 
Yes.
Thats exactly the same as mine.
I think that there are captive nuts on these bolts and I am going to drill and use a screw extractor to shift the originals, then refit using longer bolts with traditional heads.
[Failing this I will grind off and knock thro as you suggest!!!!!!!!!!]
How about the third cross member bolt ? Do I need surgery to lenghten my digits?
 
I suggest you send Buster a message.... he is the man so it can be done. I was thinking of gaffa tape on the back of a ring spanner and pop the nut in so it sticks.... then pay a 3 year old to get his arm inside the xmember...then I gave up! Buster has done it.
 
Ah don't see what all the fuss is aboot mesel'?? Like ah said, just grind off the heads and poke through. If ye take the time to have a look, ye'll find that ye can get yer hand (and arm) into the back of the x-member pretty easily... unless ye're called Popeye!
Can't quite remember (and not goin' out to the garage at this time) But there should be a hole on yer x-member fur the 3rd bolt... if not, drill one right through.
This is what yer standard x-member looks like from behind...

rearxmember002.jpg


When ah came to refit the carrier on me new x-member ah had tae drill all the holes through both sides of 6mm thick box section!!...

rearxmember010.jpg


rearxmember007-1.jpg


Just remembered... the bolts that go through the tub mounts are behind a rubber flap;)
 
Last edited:
Many thanks to both of you .
I resorted to Busters solution and surgically removed the bolts with an angle grinder and poked thro.
Meccano was never this much fun as a Kid [ and you get to move it occassionally when it lets you!!!!!!!!!!!!]
Thanks guys
 
Many thanks to both of you .
I resorted to Busters solution and surgically removed the bolts with an angle grinder and poked thro.
Meccano was never this much fun as a Kid [ and you get to move it occassionally when it lets you!!!!!!!!!!!!]
Thanks guys

Nae wurries an Ah'll bet it was a lot easier doin' it that way;):D
 
Yep,
Damn easy, the old girl played ball eventually when threatened with a 9 inch grinder!!!!!!!!!!
Carrier is now operational
In future I shall start from the basis of if its rusted up cut it up.
Thanks again Buster
 
Yep,
Damn easy, the old girl played ball eventually when threatened with a 9 inch grinder!!!!!!!!!!
Carrier is now operational
In future I shall start from the basis of if its rusted up cut it up.
Thanks again Buster

Aye ye're learnin';):D
(but that's just mainly nuts and bolts!)
 
Last edited:
Back
Top