What have you done on your 90/110/130 today?

This site contains affiliate links for which LandyZone may be compensated if you make a purchase.
Carefully inspect the rear chassis legs all the way up to where the trailing arms attach to the chassis before making a decision. Use a pointy thing as part of your decision making.
I repaired the same area on my son's Ninety a couple of years ago maybe.
It now needs a new chassis, although I am still welding to give him some time to save up.
You are very lucky if that's all it needs.

A light tapping stick helps, when the 'ring' changes you know there's a hole/thin bit somewhere near ....
 
A light tapping stick helps, when the 'ring' changes you know there's a hole/thin bit somewhere near ....
I’ve got the professional equipment for the job.

1750105806767.jpeg
 
Thought I’d sand down a couple of spots to give the rear a lick of paint and uncovered a rust collection. Bugger.
Oh no! Mine had a couple of small bits in the same places, seems like a common place to start rusting through.

For me it went from investigating why there was a circular plate screwed onto the crossmember, to cutting some holes, buying a new welder and then welding in 3 patches!
 
Oh no! Mine had a couple of small bits in the same places, seems like a common place to start rusting through.

For me it went from investigating why there was a circular plate screwed onto the crossmember, to cutting some holes, buying a new welder and then welding in 3 patches!
I bought a welder especially to do the same job. Ok it cost about £500 or so but cheaper than paying for welding.
 
I bought a welder especially to do the same job. Ok it cost about £500 or so but cheaper than paying for welding.
I went for the cheap option, only about £300! I got one of those chinese made Static arc MIGs and bit the bullet and got a proper gas bottle to go with as I knew I needed to go gas really. But it totally paid for itself just for this one job so definitely worth it, and now I can weld up my doors next :rolleyes:
 
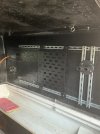
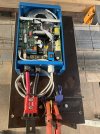
Pre-Installing an inverter/charger on a plyboard with large Anderson connectors and all cabling in such way that is quickly separable.
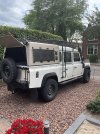
Due to Dutch tax-laws the canopy must be easy seperable and removable in 1 motion.
First photo is the pre installation of the inverter second is the place where its suppost to fit (right sidewall of the canopy. Photo 3 is the side of the car on the right side.
Btw: this is a 130 “dachshund” specially made by Land Rover for the Dutch market
 

Attachments

  • image.jpg
    image.jpg
    435.8 KB · Views: 19
  • image.jpg
    image.jpg
    376.5 KB · Views: 20
  • image.jpg
    image.jpg
    607 KB · Views: 20
Pre-Installing an inverter/charger on a plyboard with large Anderson connectors and all cabling in such way that is quickly separable.
Due to Dutch tax-laws the canopy must be easy seperable and removable in 1 motion.
First photo is the pre installation of the inverter second is the place where its suppost to fit (right sidewall of the canopy. Photo 3 is the side of the car on the right side.
Btw: this is a 130 “dachshund” specially made by Land Rover for the Dutch market
Nice!😎
 
I've had a go at the rear suspension bushes and ball joint. I last did them in 2013, so they've been good for 12 years.
IMG_0240.JPG

I did a whole thread on this in the autumn of 2013 so I shan't repeat it here. Plus I forgot to take very many pictures. Here it all is complete with new bushes, springs and ball joint:
IMG_0241.JPG
The most difficulyt bit was getting rhe hole inthe top of the axle to line up with the pin on the centre ball joint. It was much easier 12 years ago. I raised the chassis, lowered the axle, lowered the chassis, lowered the axle with packing under the nose of the diff to rotate it and much else besides, Eventually I got the pin through far enough to get the nut started and was able to haul everything into position that way. Let's hope they'll be good for another 12 years.
 
Last edited:
I've had a go at the rear suspension bushes and ball joint. I last did them in 2013, so they've been good for 12 years.
View attachment 344178
I did a whole thread on this in the autumn of 2013 so I shan't repeat it here. Plus I forgot to take very many pictures. Here it all is complete with new bushes, springs and ball joint:
View attachment 344179The most difficulyt bit was getting rhe hole inthe top of the axle to line up with the pin on the centre ball joint. It was much easier 12 years ago. I raised the chassis, lowered the axle, lowered the chassis, lowered the axle with packing under the nose of the diff to rotate it and much else besides, Eventually I got the pin through far enough to get the nut started and was able to haul everything into position that way. Let's hope they'll be good for another 12 years.
Which springs did you buy?
 
Back
Top