Try again….
- Thread starter resto_d1
- Start date
This site contains affiliate links for which LandyZone may be compensated if you make a purchase.
Been doing little stuff while I’ve not had a chance to get gas. Also been doing bits on pig.
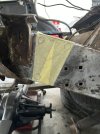
So much corrosion was on rear quarter. I dug it all out, then epoxy primered, then filler, then etched the bare stuff then dolphin glaze.
Stripped rear door down and window frame needs a new bit making.
Took all Seam sealer out of the door skin folds, cleaned all back and have applied hydrate 80


So much corrosion was on rear quarter. I dug it all out, then epoxy primered, then filler, then etched the bare stuff then dolphin glaze.
Stripped rear door down and window frame needs a new bit making.
Took all Seam sealer out of the door skin folds, cleaned all back and have applied hydrate 80
Finally, got some gas and new gloves. The welding supplies shop I use is sooo helpful and really good blokes.
I said my earth was too tired and in the way so he made me a nice thick one up with a new clamp.
Annoyingly, I assumed it would be a post earth but it’s not. It’s a daft hard connecting thing.
So I ordered one of the joiners below to suit the 25mm.


I said my earth was too tired and in the way so he made me a nice thick one up with a new clamp.
Annoyingly, I assumed it would be a post earth but it’s not. It’s a daft hard connecting thing.
So I ordered one of the joiners below to suit the 25mm.
Got the suspension section welded in then stopped and moved onto my other D1 as thought I’d left my drill at home.
Turned out to be in back of truck whole time
I think, I’ve just fuel tank strap bracket left to do on chassis.
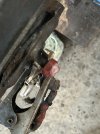
Also, been soaking this for long time. Not budging. Soaked and welded nut on, soaked again, nice and hot, smoking like hell. still didn’t budge and stud just snapped. I want it out as want to rebuild the step but it’s seriously stuck
Turned out to be in back of truck whole time
I think, I’ve just fuel tank strap bracket left to do on chassis.
Also, been soaking this for long time. Not budging. Soaked and welded nut on, soaked again, nice and hot, smoking like hell. still didn’t budge and stud just snapped. I want it out as want to rebuild the step but it’s seriously stuck
Attachments
Always an awkward repair but more so when you’ve got to ensure it doesn’t knock out your lining up across the rest of the repairs.
Test fitting is a must. Takes longer but I don’t want to find I’m out on my boot floor which would then knock on to my offside repairs.
The repair panels only cover the body mount tie in area but luckily the curve from what I cut off was useable.


Test fitting is a must. Takes longer but I don’t want to find I’m out on my boot floor which would then knock on to my offside repairs.
The repair panels only cover the body mount tie in area but luckily the curve from what I cut off was useable.
More alignment work. What a tricky job that was.
I made a z plate for the rear floor and rivnutted the seat nuts in.
From there it got tricky! You can see why. You’d think the z plate was bent. It wasn’t - the floor rise was.
So I made a little clamp and messed about lining up. I didn’t plan to fix it in until I had everything in but i ended up tacking it just to get things lined up!
The only unknown is the offside arch. I am considering doing this in reverse I.e. getting the tub in before I do the pillar. Haven’t worked it out in my head yet.
Overall it looks like we are in business though.
Offside had been repaired but only finished in primer. The result was it was rusty and the repair around the bottom wasn’t too nice most of it was usable. I cut out what I didn’t like which also gave me access to epoxy the mount area.
Lots of messing about to get the arch/boot/side pieces how I wanted. I wanted the seam lines all lining up which was easier said than done. I bolted the rear of tub on with the mudflat bolts then kleko’d the rest. Again, I’ve got to take it all apart again to paint etc but when it comes to welding it they’ll be no surprises and it will line up where I want it.


Lots of messing about to get the arch/boot/side pieces how I wanted. I wanted the seam lines all lining up which was easier said than done. I bolted the rear of tub on with the mudflat bolts then kleko’d the rest. Again, I’ve got to take it all apart again to paint etc but when it comes to welding it they’ll be no surprises and it will line up where I want it.
- Posts
- 6,585
- Location
- South Bucks
That's an amazing amount of work there, well doneOffside had been repaired but only finished in primer. The result was it was rusty and the repair around the bottom wasn’t too nice most of it was usable. I cut out what I didn’t like which also gave me access to epoxy the mount area.
Lots of messing about to get the arch/boot/side pieces how I wanted. I wanted the seam lines all lining up which was easier said than done. I bolted the rear of tub on with the mudflat bolts then kleko’d the rest. Again, I’ve got to take it all apart again to paint etc but when it comes to welding it they’ll be no surprises and it will line up where I want it.
View attachment 340931View attachment 340932

Thank you sirThat's an amazing amount of work there, well done

Mate! Just caught up on this, spectacular thread, and work!
I'm in the middle of doing up a house that we're living in, and keeping my 90 on the road and family life etc etc is taking up alot of time right now, so I'm in awe of your motivation and progress!
Will be nice to get back to working on my project, feels good to do something for the love of it! Excellent work mate!
- Posts
- 6,585
- Location
- South Bucks
Got any photos of your projectMate! Just caught up on this, spectacular thread, and work!
I'm in the middle of doing up a house that we're living in, and keeping my 90 on the road and family life etc etc is taking up alot of time right now, so I'm in awe of your motivation and progress!
Will be nice to get back to working on my project, feels good to do something for the love of it! Excellent work mate!
Mate! Just caught up on this, spectacular thread, and work!
I'm in the middle of doing up a house that we're living in, and keeping my 90 on the road and family life etc etc is taking up alot of time right now, so I'm in awe of your motivation and progress!
Will be nice to get back to working on my project, feels good to do something for the love of it! Excellent work mate!
Thanks, not much time for it at the moment but it’s always there when I have got time! I’m missing my blue one a bit so will be glad when this is done but we are a way off yet!
Somewhere I think, when I start on it I'll be sure to make a thread, if not for anything else than the motivation from the well wishers!Got any photos of your project

Similar threads
- Replies
- 18
- Views
- 2K
- Replies
- 138
- Views
- 10K
- Replies
- 3
- Views
- 401