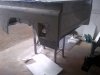
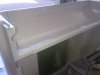
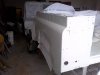
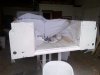
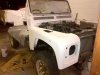
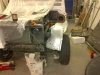
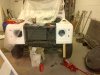
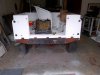
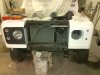
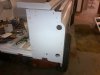
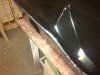
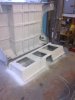
Got some painting done last night.

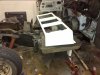
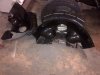
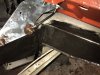
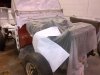
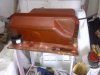
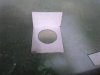
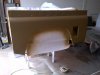
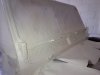
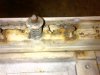
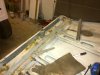
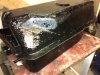
Got the underside of the tub and the seatbox painted. Happy with the results for what it is, didn't put enough thinners in, sort of forgot, so it wasn't spraying as well as it should have but it's all covered and there are no runs (lack of thinners saw to this I guess) or orange peel, a big bit of mud did fly out from somewhere though and covered the back of the fuel filler recess but I'll cope.

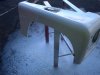
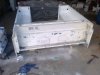
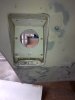
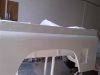
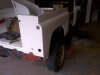
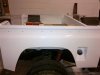
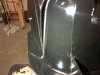
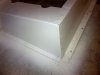
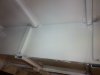
I was thinking of clear waxoyling the very bottom of the tub and leaving the sides white, I figure it will look cleaner and will make it easier to clean - factory they are just painted aren't they?

I used 2pack.
 

Attachments

  • IMG-20120703-00416.jpg
    IMG-20120703-00416.jpg
    323.3 KB · Views: 515
  • IMG-20120703-00417.jpg
    IMG-20120703-00417.jpg
    786.5 KB · Views: 552
  • IMG-20120703-00418.jpg
    IMG-20120703-00418.jpg
    346.9 KB · Views: 530
  • IMG-20120703-00419.jpg
    IMG-20120703-00419.jpg
    311.5 KB · Views: 521
I agree.... Good work.... I am watching these posts with interest and I really like all the pictures....1000 words and all that...

Jase
 
Got some painting done last night - front end: wings and grille surround.

Pleased with most of it, while painting one of the sides of the NS wing the gun started to spatter a bit, so as I was painting I would get: paint – mist of paint – paint – mist of paint – so I ended up with some of the wing painted with a mist and some that was well covered. When I came to my second pass it then started causing issues. It only effected the side of the wing so I will look into sorting it out but I suspect it will still be tacky and won’t sand well... So I’ll need to think about it, I may end up just rebuilding the LR, and in a month’s time or so, sand and repaint it from the seam.

My fuel tank bracket was damaged when someone ran into me years ago, £45 for a new one! That would just about but me all my new door seals! So I cut the bent bit off, fully seam welded a piece of angle onto it with a substantial overlap, and then welded a piece on with a cap for the bolt to go through – I also designed it with a 1/4inch gap so I can fit a small rubber bush like the original one. I was in a bad mood after the painting and didn’t want to spend hours on a tank bracket – it’s solid but maybe a little ugly?!?!

A quick thought on the painting, I use a good quality gravity fed gun that is immaculate – I always fully strip and clean it – after the poor paint spray last night I cleaned it all and filled the gun with water to see if I could get it to spray properly again and noticed that the water just bubbled in the pot and very little came out – this has never happened with paint – is it the case that if the paint is not viscous enough it won’t spray well? Did I perhaps add too much thinner?

N.B. The tarmac was wet to stop dust, so after painting I just hosed all that paint away - a bit messy but no lasting damage!
 

Attachments

  • IMG-20120712-00455.jpg
    IMG-20120712-00455.jpg
    346.4 KB · Views: 433
  • IMG-20120712-00453.jpg
    IMG-20120712-00453.jpg
    247.4 KB · Views: 509
  • IMG-20120712-00452.jpg
    IMG-20120712-00452.jpg
    322.5 KB · Views: 501
  • IMG-20120712-00451.jpg
    IMG-20120712-00451.jpg
    926.8 KB · Views: 449
  • IMG-20120712-00450.jpg
    IMG-20120712-00450.jpg
    395.3 KB · Views: 559
  • IMG-20120712-00447.jpg
    IMG-20120712-00447.jpg
    336.4 KB · Views: 437
Got all the brake lines connected up, filled and bled, so I could check all the unions for leaks before putting the bodywork back on.

I bought a couple of litres of 2 pack etch primer and etch primed the road side of my galvanised inner wings - someone suggested I just left them and that would ease cleaning but I want to get a heap of underseal onto them to help reduce the road noise and wheel drone a little - I've left the engine bay side.

I took the vac pump off and stripped it down - it looks like it has been leaking from the plate that is riveted on and maybe a small weep between it and the block so I'll reseal that in an attempt to minimise the oil leaks I've done this while access is good. I'll do the oil filter housing tonight.

I just painted the back of the bulkhead with red oxide and I will give it a spray of white when I am painting the top of the bulkhead, A pillars etc...

I'll need to take the brackets off again and paint up that bit of the chassis but the bulkhead was a bit loose without it!
 

Attachments

  • IMG-20120714-00468.jpg
    IMG-20120714-00468.jpg
    406.6 KB · Views: 377
  • IMG-20120714-00466.jpg
    IMG-20120714-00466.jpg
    304.9 KB · Views: 335
  • IMG-20120714-00465.jpg
    IMG-20120714-00465.jpg
    294.9 KB · Views: 400
  • IMG-20120714-00464.jpg
    IMG-20120714-00464.jpg
    465.5 KB · Views: 427
  • IMG-20120713-00457.jpg
    IMG-20120713-00457.jpg
    333.4 KB · Views: 450
Last edited:
So as said before, inner wings were galvanised, acid etched on the road side only and last night painted with some black chassis. I will then give them several large coatings of underseal.

Bulkhead mounts are back on and I setup the chassis earth, I've put it here because on the other side is the braided earth which is connected directly to a starter bolt. I am aware that it's location will expose it to more road spray etc and I may yet end up moving it round and putting it on the inner side of the chassis. I cleaned everything up and put it together clean, then painted loads of copperslip onto the outside to protect it for just now.
 

Attachments

  • IMG-20120716-00473.jpg
    IMG-20120716-00473.jpg
    280.7 KB · Views: 388
  • IMG-20120716-00475.jpg
    IMG-20120716-00475.jpg
    339.1 KB · Views: 364
  • IMG-20120716-00476.jpg
    IMG-20120716-00476.jpg
    336.1 KB · Views: 426
Got the bulkhead more or less fully masked for it's respray - I had to cut access holes to get into the vent controls to open them!

It's been wiped down with thinners and tonight I will mix up a bit of acid etch and spray the windscreen hinges and a few other bit that would probably benefit from acid etch. By the time I clean the gun and get the white mixed up I will be ready to spray it white. Looking forward to this as it's probably the hardest bit to paint - at least with the roof and bonnet and things you just paint it, no making required... Took me an age tearing the masking tape I had to piece to mask the little seal between the bulkhead and window frame.

I got the drivers side wing rebuilt last night too, so once the bulkhead has a chance to set I can get that wing back on - starting to come together!

The fuel tank has been cleaned, painted with red oxide and I then painted it with fibreglass resin and some thin matting round the seam. So it is fully encapsulated in fibreglass. That will give me some peace of mind and give the tank an extra lease of life, I'll give it a quick sand and acid etch it tonight aswell so I can give it a coat of back hammerite.
 

Attachments

  • IMG-20120720-00501.jpg
    IMG-20120720-00501.jpg
    345.6 KB · Views: 427
  • IMG-20120719-00500.jpg
    IMG-20120719-00500.jpg
    323.8 KB · Views: 641
  • IMG-20120717-00498.jpg
    IMG-20120717-00498.jpg
    360.8 KB · Views: 418
Last edited:
Been busy with the 90 - painting is well on the way, various parts are at various stages, tub outside is in etch inside is done though, drivers side wing and the bulkhead is done, roof and bonnet will be done last when the vehicle is actually drivable again. Means I can drive it out and paint them with more space to get around them etc...

Floors & transmission tunnel all painted, repairs made to the tub...

Getting there, I will be really pleased when the tub and seabox are back in, that will be a big step forward.

I had a problem with a run on the passenger side wing and decided just to let it dry, sand it back and do it again so that has held up reconstruction of the front end but it's been repreped and ready to take paint again.
 

Attachments

  • IMG-20120802-00575.jpg
    IMG-20120802-00575.jpg
    700.6 KB · Views: 399
  • IMG-20120802-00574.jpg
    IMG-20120802-00574.jpg
    306.3 KB · Views: 415
  • IMG-20120730-00563.jpg
    IMG-20120730-00563.jpg
    299.5 KB · Views: 390
  • IMG-20120730-00562.jpg
    IMG-20120730-00562.jpg
    359.6 KB · Views: 432
  • IMG-20120802-00576.jpg
    IMG-20120802-00576.jpg
    359.3 KB · Views: 401
  • IMG-20120802-00577.jpg
    IMG-20120802-00577.jpg
    745.1 KB · Views: 426
  • IMG-20120802-00579.jpg
    IMG-20120802-00579.jpg
    282.1 KB · Views: 389
  • IMG-20120802-00583.jpg
    IMG-20120802-00583.jpg
    340.6 KB · Views: 435
Been away so have not done that much or had time to post updates.

Got the NS wing and tub painted so they are ready to go back on, I will get some help this week to put it back together so it may be driveable, if not damn near it by Friday.

I'll worry about the doors, bonnet roof and sides once I can get the 90 out clean the whole place up and work out where I am with scrap and old parts and things.
 

Attachments

  • IMG-20120812-00654.jpg
    IMG-20120812-00654.jpg
    255.1 KB · Views: 337
  • IMG-20120812-00653.jpg
    IMG-20120812-00653.jpg
    291.2 KB · Views: 340
  • IMG-20120811-00630.jpg
    IMG-20120811-00630.jpg
    255.9 KB · Views: 370
  • IMG-20120809-00621.jpg
    IMG-20120809-00621.jpg
    341.8 KB · Views: 383
Last edited:
Thank you Drewster. I always enjoy watching other projects come together so I thought it only fair I shared my experiences.

Last night I had help from a friend and his Newfoundland (I'm sure there are bolts & washers stuck in his coat now!) and got the NS wing on.

We decided to try the inner wing on first, then the outer on second method, just out of curiosity. It certainly makes getting the inner wing in over the shocker turret easier. Once it was in place I bolted it to the bracket at the back and put a temp long bolt through it at the front and into the chassis so we could just let it sit. Then we put the wing into place over it and it all worked out quite nicely, a bit of persuasion (the inner wing being galvanised meant it was slightly distorted, but it is very easy to bend back) and it all slotted in nicely. With all the bolts done up loosely it all sort of popped into position.

The only problem I had was that 2 out of the 4 bolts that hold the inner to the outer would not line up, it needed to go towards the bulkhead about 5mm, a jack under the inner wing at the front soon pushed it all back and the bolts went in no bother.
 

Attachments

  • IMG-20120820-00747.jpg
    IMG-20120820-00747.jpg
    362.2 KB · Views: 367
  • IMG-20120820-00751.jpg
    IMG-20120820-00751.jpg
    354.5 KB · Views: 1,027
I have just read this thread from the start and i'm going to have to go and have a little lie down I'm exhausted. Nice build , can't wait to see it finished.
 
Got some more done at the weekend.

Drivers side electrics are all reconnected except for the side repeater as the old one was knackered. I had also last year reloomed it and made up all the connections on superseal multiplugs, I want to do this to the passenger side next. I am also going to build a fusebox/relay box with a main bubar and fuseable links and relays for my additional electrics and any possible future electrics. Hope to find a small piece of copper to make a busbar now!
 

Attachments

  • IMG-20120824-00771.jpg
    IMG-20120824-00771.jpg
    266 KB · Views: 523
  • IMG-20120824-00770.jpg
    IMG-20120824-00770.jpg
    302.9 KB · Views: 377
  • IMG-20120823-00767.jpg
    IMG-20120823-00767.jpg
    375 KB · Views: 424
Got a fair bit done over the last couple of days, seatbelt brackets cleaned and painted, rock sliders & tub cappings etched and painted, redid the seatbox; it was one of the first things I painted, and I was having the air leak with the gun so it wasn't 100%, even though it will be covered with carpet I decided I would recoat it anyway.

Cut out the front of the bonnet frame and welded in a new piece right along the front (not the neatest as I didn't clean away as much paint as I should have), I just need to work out if I want to remove the frame from the skin and get it blasted and galvanised, or will I leave it alone, and just seam seal and paint it all. It will be covered with sound deadening anyway.
 

Attachments

  • IMG-20120827-00780.jpg
    IMG-20120827-00780.jpg
    391.5 KB · Views: 474
  • IMG-20120827-00784.jpg
    IMG-20120827-00784.jpg
    344.7 KB · Views: 446
  • IMG-20120828-00787.jpg
    IMG-20120828-00787.jpg
    399.3 KB · Views: 437
Got the metalwork back onto the tub, well, the back stuff and the drivers side capping. Pleased with how it looks.

Picked the A-frame ball joint fulcrum up today, local engineering shop pressed the old joint out for me, so I can get the new ball joint pressed in tomorrow and reinstall it.

If my M8 1.25 hex die arrives tomorrow I can get the excess zinc removed from the tub support/seatbelt brackets and installed which means the seatbox can go back in, which means my battery has a home again, which means for the sake of some coolant she would be drivable again which would be great!
 

Attachments

  • IMG-20120829-00798.jpg
    IMG-20120829-00798.jpg
    265.2 KB · Views: 363
  • IMG-20120829-00794.jpg
    IMG-20120829-00794.jpg
    237.8 KB · Views: 359
I've been on holiday hence the lack of updates.

I did get my die and did get the brackets back on, after a bit of adjusting I decided to leave them loose until I have the seatbox properly lined up and can get a door lined up to check the lines match up, the galv supports of the tub are sitting on rubber pads against the upstands on the chassis so it should be in the right position but you never know with a Defender.

I actually sat the roof back onto it so I could give the place a good tidy and discovered that either the roof/sides has shrunk and is now narrower across the tub cappings at the back end, or the tub has sprung slightly (don't think this is likely). The last time I had the roof off I didn't remember it being so out of alingment, perhaps by the time I get some bolts onto it it will pull down where it should sit, worst comes to the worst I might need to get a big clamp onto the tub cappings and squeeze it altogether while I do up the bolts and hopefully it will then sit square.

I was going to paint the inside of the roof and the inside of the sides but since I will be covering them with soundproofing I decided not to, good plan or am I just being lazy?

With any luck whatever I chose the roof will be painted and back on within a week.
 
Had some big setbacks due to work and other projects! A bit annoyed but not to worry, I'm getting there!

My fuel tank sprang a leak when I refilled it (the rust dried out when it was off and pinholed it would seem) so it had to come back out and get replaced. I wanted a stainless steel tank but they don't seem to make them any more and any I can find are about £300 - I'd rather spend that extra money on something else, so I took a bog standard cheapy tank and have set about improving it.

When they make these tanks now, the cradle which wraps around the bottom of the tank it is put on before anything is painted. So when they paint it the raw steel from the tank and the cradle remain uncoated! Which, given this area is the perfect place for muck to get trapped it really isn't a good idea!!

So, first step was to seal between the cradel and the tank, I have left a small hole and will pump the inside of the area full of Dinitrol and then seal it (didn't want to put it on prior to sealing so it didn't impede the adhesion of the sealant.

I am then going to paint the whole tank with fibreglass resin to give it an outer skin, I may even put some thin mat over it all. Once this is done the tank will go on and I can bolt the seatbox inplace, floors transmission tunnel etc...
 

Attachments

  • IMG-20121016-00996.jpg
    IMG-20121016-00996.jpg
    254.4 KB · Views: 499
  • IMG-20121017-01009.jpg
    IMG-20121017-01009.jpg
    229.6 KB · Views: 450
When they make these tanks now, the cradle which wraps around the bottom of the tank it is put on before anything is painted. So when they paint it the raw steel from the tank and the cradle remain uncoated! Which, given this area is the perfect place for muck to get trapped it really isn't a good idea!!

Is the cradle the most "outside" area (facing down) of the fuel tank? If that doesn't make sense i wouldn't be surprised.....My (possibly) cradle has a hole rusting in it, so I need to sort something before MOT, and i've had issues finding what I thought was a seperate part.....if it is part of the fuel tank, that makes sense!
 
Yes that is part of the fuel tank - stupid design! If you look at the pictures above, what you will see is the gap between the cradle and the tank and then the other one is of this area fully sealed.

Last night I filled the cavity with Dinitrol, once it started pouring spraying back out I figured it has had enough! I then went on to fibreglass the whole lot - layer 1! I ran out of resin but think I will go and get another gallon at lunch time and get layer 2 done tonight.
 

Attachments

  • IMG-20121022-01017.jpg
    IMG-20121022-01017.jpg
    405.2 KB · Views: 359
  • IMG-20121022-01018.jpg
    IMG-20121022-01018.jpg
    306.5 KB · Views: 402
Last edited:

Similar threads