Steve's unexpected Series 3 rebuild.

This site contains affiliate links for which LandyZone may be compensated if you make a purchase.
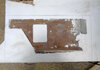
Here's a picture of that other piece and my attempts at butt welding the thin stuff.
upload_2023-2-14_23-34-32.jpeg

Clearly unfinished but looking a bit scabby already. Also you can't see the distortion in the photo. I think this might get re-done with an overlapped, joggled repair.
 
I like to butt weld stuff and grind it back so you can hardly see where i've been. I tried that on this piece but it has not gone well.

Try backing the seam with a piece of copper to take the heat away - should enable you to weld it ..

The distortion is the worst.

MIG? Slow down! Try a relatively high current, but VERY short duration "spot" weld.. space them apart, and then fill them in over what will seem like quite a long time.. I'll see if I can find pictures to explain a bit better..

Of course if you had TIG ... :rolleyes: ;)
 
This next bit to be tackled.
upload_2023-2-14_23-41-55.jpeg

I'm trying to remove as little as possible and finish each bit before moving on. Very long winded but should be less like to go horribly wrong.
upload_2023-2-14_23-43-58.jpeg

upload_2023-2-14_23-44-53.jpeg

Time for the cardboard aided design again.
upload_2023-2-14_23-46-22.jpeg

upload_2023-2-14_23-46-54.jpeg

upload_2023-2-14_23-47-25.jpeg

I just overlapped here, no stepped edge or anything. It's so thin it's just about flush anyway. I'm justifying this to myself as i'm only really ever satisfied with butt welded, ground flat, invisible to the naked eye repairs. That just isn't going to happen this time so it's a running battle with the perfectionist demons. I keep telling myself it's strong, it works, it's never going to be seen and it's taking less time.
upload_2023-2-14_23-52-30.jpeg
 
Trickiest bit now.
upload_2023-2-14_23-56-12.jpeg

upload_2023-2-14_23-56-48.jpeg

I've been able to leave the bracket for the airflow direction flap thing in place so will make the holes for that later when everything can be put back in place. For now the big problems are the bends in this section. A ninety degree one and a more subtle radius. I have a hard time making these but it's a bit easier with the thinner steel.
upload_2023-2-15_0-2-37.jpeg

upload_2023-2-15_0-3-14.jpeg

Not quite finished and not quite as the original one was but going to have to be close enough for this job.
upload_2023-2-15_0-5-4.jpeg

upload_2023-2-15_0-5-57.jpeg

I have improved it a bit since this photo and I think it's now ready for welding which I hope to do tomorrow as i'm off work this week. Fingers crossed. If it goes well i'll post photos soon, if it goes badly i'll sulk for a bit and then post a limited few photos of the best bits.
 

Attachments

  • upload_2023-2-15_0-1-8.jpeg
    upload_2023-2-15_0-1-8.jpeg
    288 KB · Views: 104
  • upload_2023-2-15_0-2-13.jpeg
    upload_2023-2-15_0-2-13.jpeg
    288 KB · Views: 93
Try backing the seam with a piece of copper to take the heat away - should enable you to weld it ..


MIG? Slow down! Try a relatively high current, but VERY short duration "spot" weld.. space them apart, and then fill them in over what will seem like quite a long time.. I'll see if I can find pictures to explain a bit better..

Of course if you had TIG ... :rolleyes: ;)
Evening. Thanks for the tips. To be honest i've been trying those things and i'm still getting the problems. It is MIG. My welder is old but has had very little use for it's age. I'm blipping the trigger so fast it's unreal. You know what will probably happen, i'll just about get my eye in and start being some use by the time it's finished and then I won't weld anything that thin for ages and i'll lose my touch by the time I need to do any more. I'd love to be able to TIG weld and have the kit but I can't see that happening. Never mind, press on regardless.
 
Evening. Thanks for the tips.

Morning! - HTH - or at least try :)

I'd love to be able to TIG weld and have the kit but I can't see that happening.

Tig is way easier on thin stuff - if you have the kit, then .... I'd suggest it is time to use it - IMO, it is not such a steep learning curve for single position welding of thin stuff - it might give you a bit of confidence to try vertical roots in 40mm plate... or not :D - If you think I could talk you through it, PM me, and we'll have a chat :)

I'm blipping the trigger so fast it's unreal.

Too hot! even 0.8mm should be able to take a MIG arc .. over a second - I did some on my D1 for its MOT last week, but I didn't take pictures, sorry.. thought I had :(
 
Had another go today. Turns out I can weld the new steel like a legend. Overlaps, easy. Butt welds are also fine with a bit of copper behind. It's just the existing old stuff that is tricky. One end is now done, I'll post photos soon. It's not as neat as I would like but it's going to be fine.
 
So here we are as promised, just a bit late. Life gets right in the way of hobbies sometimes.
upload_2023-2-27_11-50-20.jpeg

upload_2023-2-27_11-50-59.jpeg
upload_2023-2-27_11-51-22.jpeg

upload_2023-2-27_11-51-46.jpeg

Now here's something I never thought i'd hear myself say. I'm leaving it like that. I'm not going over it again and finishing all those welds. It's plenty strong enough, it's not going to be seen, it will save time and I will only end up getting distortion in there. It's going to be covered in seam sealer, rust converter and paint. I normally make myself a slave to over-doing stuff for the sake of it but it just doesn't make sense this time. What a liberating feeling. It won't last.
 
This next bit was a bit daunting. Loads of rust not leaving much to use for reference.
upload_2023-2-28_21-10-15.jpeg

I've now marked out on my template where all the holes are on the bulkhead so as long as i'm careful I should be able to get it to fit. It's handy to be able to screw it down before chopping it about.
upload_2023-2-28_21-15-55.jpeg

Don't worry, I haven't gone mad. That hole in the middle on the line isn't one of mine, it was in the board before I started. I got the positions with card templates from the bulkhead but I will just use them to get me close. Then i'll get the true positions by offering it up to the bulkhead again to be sure.
Here's a nice oversized bit of metal to give plenty of room for mistakes.
upload_2023-2-28_21-52-25.jpeg

Time to break out the home built folder again.
upload_2023-2-28_21-53-33.jpeg

Went better than expected and better than the bit I did for the other end.
upload_2023-2-28_21-55-50.jpeg

Matches up nicely inside.
upload_2023-2-28_21-58-20.jpeg

Now just got to get the top end fitted and all the joggling done. I reckon it looks ok and as long as don't go and cut something wrong we should be ok.
 
I'm still also tinkering about with the steering and have been making bits and bobs for it. There are two little plates the captive bolts that needed re doing. Had to drill the holes first. Sometimes I wish I had done a complete dummy re-assembly before painting anything to check fittings. Might have saved some hassle but would have taken ages.

These are the captive bolts.
View attachment 283651
The right hand one of these has two clips on. One is for a brake or clutch pipe and the other is for the wiring loom.
View attachment 283652
All very well but I want to be able to take those clips off without disturbing the rest if I need to like this.
View attachment 283653
I drilled and tapped some holes and cut the heads off some bolts then welded them in place so they are flush at the back.
View attachment 283654
The other holes are ready for the main bolts.
View attachment 283655
Completed with ugly welding but tarted up with paint and positioned where nobody will ever see.
View attachment 283656
They'll do.
 
Well that didn't work very well. Here are the photos that I tried to add to the previous post. They are in the right order so it sort of makes sense.
upload_2023-2-28_22-36-8.jpeg
upload_2023-2-28_22-37-4.jpeg
upload_2023-2-28_22-37-59.jpeg
upload_2023-2-28_22-38-43.jpeg
upload_2023-2-28_22-39-14.jpeg
upload_2023-2-28_22-39-39.jpeg
upload_2023-2-28_22-40-7.jpeg
 
Back
Top