Inner Farmer
New Member
- Posts
- 5
Evening
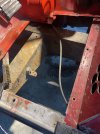
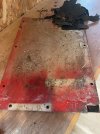
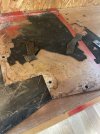
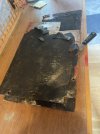
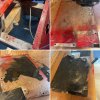
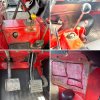
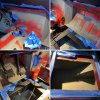
Can’t stop peeking… finished painting the pedals and added new rubber on my 1974 Series three, but wanted oi look at the floor boards they had some galvanic white powder on top and wanted to check out the chassis under the feet… easy to take out and found the chassis with normal surface rust (phew) but the underside of the floor boards had a @1mm rubber pad glued to the panels… It was pretty tired and oil where an old Feary overdrive was removed by the last owner. So I scraped off one panel (hard) but then thought to ask the group some questions I can’t find here or in the manuals:
1. Is the pad for sound proofing? The panel was painted underneath so think this is a later DIY.
2. Is it necessary or recommended… having scraped it off, so do I now I buy new pad and reglue? Or paint and set it back without the pad… parts manual doesn’t show any pad. Is there a gasket just around the edges to reduce any rattles down the road?
3. I got the Masai red paint and am
wondering how to treat the panels before painting finish coat… scrape/sand to bare aluminum or something less? What’s best to take off old glue? Then degrease? Lots of “miracle” products or just use lacquer thinner?
4. Is it etch primer on bare aluminum or something else?
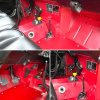
5. Spray or roll with finish coat? Do you then clear coat for durability… this will all be covered with fitted rubber mats that came with the truck but I want to start doing things right before I tackle any visible interior parts that need some TLC
Note to all… the exterior patina will be kept but the interior needs some help… and will paint the chassis with Por15 after a bit of a clean up.
Thanks in advance for any advice!!
Can’t stop peeking… finished painting the pedals and added new rubber on my 1974 Series three, but wanted oi look at the floor boards they had some galvanic white powder on top and wanted to check out the chassis under the feet… easy to take out and found the chassis with normal surface rust (phew) but the underside of the floor boards had a @1mm rubber pad glued to the panels… It was pretty tired and oil where an old Feary overdrive was removed by the last owner. So I scraped off one panel (hard) but then thought to ask the group some questions I can’t find here or in the manuals:
1. Is the pad for sound proofing? The panel was painted underneath so think this is a later DIY.
2. Is it necessary or recommended… having scraped it off, so do I now I buy new pad and reglue? Or paint and set it back without the pad… parts manual doesn’t show any pad. Is there a gasket just around the edges to reduce any rattles down the road?
3. I got the Masai red paint and am
wondering how to treat the panels before painting finish coat… scrape/sand to bare aluminum or something less? What’s best to take off old glue? Then degrease? Lots of “miracle” products or just use lacquer thinner?
4. Is it etch primer on bare aluminum or something else?
5. Spray or roll with finish coat? Do you then clear coat for durability… this will all be covered with fitted rubber mats that came with the truck but I want to start doing things right before I tackle any visible interior parts that need some TLC
Note to all… the exterior patina will be kept but the interior needs some help… and will paint the chassis with Por15 after a bit of a clean up.
Thanks in advance for any advice!!