P38 rear door window trims replacement

This site contains affiliate links for which LandyZone may be compensated if you make a purchase.

Rubberknees

Well-Known Member
Full Member
Posts
4,653
Location
Rotherham
1714151221262.jpeg

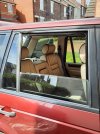
Both my rear door window trims have seen better days. The other day at breakers there were both sides available in better nick than mine so whilst there got my hand in pocket and splashed out.
First step today was to get old ones out. Its easier than I first thought.
Wind down window fully
Because the old ones were being thrown I didn't need to be to kind extracting them. Using a screwdriver and small plastic pry bar popped out the trim from the frame. once it's started to move just pulls off frame easy enough. The ends slide down between glass and frame.
Once pulled off cleaned up the frame where it seats with a small copper wire brush. IMPORTANT make not of how it comes off as they are handed so you don't fit the wrong one back in.
Lube the sides of the frame with WD40 or such like to help refitting. Being careful slide each side onto frame and downwards . There was enough room on mine to push the sides down so the trim slotted in place about an inch down from top. Then nice and gently slide it upwards into position. Be careful you don't bend the new trim when sliding into frame as this will kink it. Take your time. Did find once up into place to run window up and down to bed it in.
Took me about 3/4 hr to do both sides without rushing.
I know they are second hand looks 100% better than before.
 

Attachments

  • 20240426_142052.jpg
    20240426_142052.jpg
    356.1 KB · Views: 107
  • 20240426_142322.jpg
    20240426_142322.jpg
    372.2 KB · Views: 91
  • 20240426_142331.jpg
    20240426_142331.jpg
    376.9 KB · Views: 103
  • 20240426_143846.jpg
    20240426_143846.jpg
    322.1 KB · Views: 91
  • 20240426_143902.jpg
    20240426_143902.jpg
    322.3 KB · Views: 109
View attachment 315760
Both my rear door window trims have seen better days. The other day at breakers there were both sides available in better nick than mine so whilst there got my hand in pocket and splashed out.
First step today was to get old ones out. Its easier than I first thought.
Wind down window fully
Because the old ones were being thrown I didn't need to be to kind extracting them. Using a screwdriver and small plastic pry bar popped out the trim from the frame. once it's started to move just pulls off frame easy enough. The ends slide down between glass and frame.
Once pulled off cleaned up the frame where it seats with a small copper wire brush. IMPORTANT make not of how it comes off as they are handed so you don't fit the wrong one back in.
Lube the sides of the frame with WD40 or such like to help refitting. Being careful slide each side onto frame and downwards . There was enough room on mine to push the sides down so the trim slotted in place about an inch down from top. Then nice and gently slide it upwards into position. Be careful you don't bend the new trim when sliding into frame as this will kink it. Take your time. Did find once up into place to run window up and down to bed it in.
Took me about 3/4 hr to do both sides without rushing.
I know they are second hand looks 100% better than before.
Niiiice one cyril👌😎👍
 
View attachment 315760
Both my rear door window trims have seen better days. The other day at breakers there were both sides available in better nick than mine so whilst there got my hand in pocket and splashed out.
First step today was to get old ones out. Its easier than I first thought.
Wind down window fully
Because the old ones were being thrown I didn't need to be to kind extracting them. Using a screwdriver and small plastic pry bar popped out the trim from the frame. once it's started to move just pulls off frame easy enough. The ends slide down between glass and frame.
Once pulled off cleaned up the frame where it seats with a small copper wire brush. IMPORTANT make not of how it comes off as they are handed so you don't fit the wrong one back in.
Lube the sides of the frame with WD40 or such like to help refitting. Being careful slide each side onto frame and downwards . There was enough room on mine to push the sides down so the trim slotted in place about an inch down from top. Then nice and gently slide it upwards into position. Be careful you don't bend the new trim when sliding into frame as this will kink it. Take your time. Did find once up into place to run window up and down to bed it in.
Took me about 3/4 hr to do both sides without rushing.
I know they are second hand looks 100% better than before.
Nice job:)
 
If you want me to talk you through it PM me and I'll send you my phone number. Its quite simple but you have to be careful fitting it.
Looks easy enough to be fair.
I'm just glad you don't have to strip the whole door down from the inside. I did briefly Google it and found the first hit was off here. He prised the outer weather strip off to fit the seal but you haven't so that's even easier! I bet the weather strips have steel inside too so probably buckle a bit trying to get them off.
These trims have metal inside and will buckle if you are not careful putting them in. As I said plenty of lube and nice and easy
 
Just done mine today, looks lots better. As @Rubberknees says, plenty of wd40. The replacement had a bit of a kink in it already about half way up on the rear edge which threatened to worsen as I was doing the final lift into the top horizontal edge but it bent back OK.
 
Back
Top