Hicap phill
Well-Known Member
- Posts
- 16,195
- Location
- Wiltshire
Ok.No mate It came like it is now with parts I have in boxes.
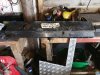
Have you got the grey cover this bolts onto that black bracket?
Ok.No mate It came like it is now with parts I have in boxes.
This one Mate ? its just propped in place there.Ok.
Have you got the grey cover this bolts onto that black bracket?
Very Nice of you mate Thank You for the offer, would you believe it I actually have 2 of the bloody things.It’s just I have a spare if it was needed.
At that price Id rather sit the bloody Binnacle on my knee when driving around.Try this part number for a td5.
https://www.lrworkshop.com/parts/AHP710180
@jamesmartin may know if there are many differences.

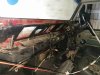
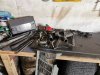
fits in the dash ie where you throw the stuffDid find this in my box Aint got a clue what it is, never seen one before. something to do with Cubby box as the PO labelled it.
Got it here page 915 http://www.retroanaconda.com/landro..._trim_seats_stowage_accessories_p910-1075.pdffits in the dash ie where you throw the stuff
Mad question but would/could yrm have 1?No reply from Breakers, don't think anyones got one of these things, must be rare , Trust me to be missing something like this
I contacted them today they don't do them.He said he did have one but gave it away couple of months ago or I could of had it. Just my Luck. Seems a nice bloke, only half hour drive from me to.Mad question but would/could yrm have 1?
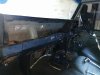
You need it to attach the flap closures to
x2Would like pics in stages if anyone's done this. Im sure I've got all the bits you mentioned above. its just how they go, as said I didn't take it apart so just guessing how things go back.Your new panel goes in first.
Then dash pod & heater controls
Black grommets for the air vents x2
Now cable tie the pipes to these
Put the black cable tray in
Now connect the top of the vents(cable tie again)
Now the grey cover
if you need photos I can take some
Thanks Mate, got a better Idea now , I have the heater controls, need to know where the cables thread through. Glad you told me the top goes last.not got photos of the stages. Don’t put the grey cover on until you have installed vents.
Dash top goes on last.
View attachment 207087
View attachment 207088
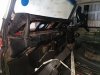
This is an RDX extension for the heater controls
View attachment 207092
Welcome To LandyZone, the Land Rover Forums!
Here at LandyZone we have plenty of very knowledgable members so if you have any questions about your Land Rover or just want to connect with other Landy owners, you're in the right place.
Registering is free and easy just click here, we hope to see you on the forums soon!