Fuel Filter Assembly Bolts

This site contains affiliate links for which LandyZone may be compensated if you make a purchase.

DIYDefender

New Member
Posts
9
Location
London
Hi all, I’m looking for a bit of advice. I’m in the process of changing the fuel filter and assembly on my TD5 as the old one was completely perished and leaking diesel on my driveway. I’ve had my defender a few months and it wasn’t well maintained by the previous owner - the fuel filter hadn’t been touched in years by the look of it.

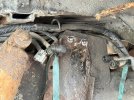
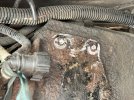
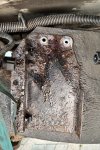
I’ve managed to take the four fuel lines off and most of the perished assembly came away (it had snapped and was being held on only by the fuel lines). When I’ve tried to remove the two bolts that would have held on the original assembly, they were both so corroded that they snapped off.

Does anyone have any advice of how I can get the snapped off bolts out of the rivnut? Is it a case of drilling them and using a bolt extractor tool, or is that unlikely to work if they’re quite corroded? I don’t have a blow torch or access to welding facilities but do have a cheap extractor set. Am I best to just drill the whole thing out instead and try to put a new rivnut in? I swear every video I watch makes these things look easy but I’ve never had a single bolt in my defender that hasn’t come loose without a massive struggle! Thanks for any advice
 

Attachments

  • IMG_5074.jpeg
    IMG_5074.jpeg
    500.9 KB · Views: 45
  • IMG_5075.jpeg
    IMG_5075.jpeg
    503.7 KB · Views: 47
That’s a bugger. Looking at those photos if you could perhaps clean up the damaged bolts to smooth it off then centre punch the bolt and drill a hole and try to get an eezee-out/ stud extractor into it and hopefully that gets them out…can be a devil to do but worth the shot. 👍
 
That’s a bugger. Looking at those photos if you could perhaps clean up the damaged bolts to smooth it off then centre punch the bolt and drill a hole and try to get an eezee-out/ stud extractor into it and hopefully that gets them out…can be a devil to do but worth the shot. 👍
Thanks - I came to the same conclusion. Will give it a go 🤞🏻
 
Beware of stud or bolt extractors - they can snap off when force is applied, and as they're made of harder metal than one's drills this can be difficult to deal with. If you can get a hole drilled reasonably centrally, it might be easier to get a tap in and cut a new thread. At least you can back off a tap half a turn and put a bit more oil on if it feels like it's binding, so there's less chance of snapping it.
 
I'm not a big fan of extractors either havinhg done exactly what @Brown describes.

They look M8 sort of size ?
I'd also go for the punch/drill and cut a new thread approach.
Thanks for this. I’m not keen to end up with a snapped extractor stuck in there so will opt to drill them out instead. I’ve got m8 x35mm fs108357 as replacements so pretty sure it is m8.

Just need to buy a thread tap now as don’t currently own one!
 
If they're in riv nuts, my money is on the riv nut spinning before the bolt remains come free.

Before you spend a whole bunch of time on it, I would suggest making sure that your new fuel component mates up to the fuel lines perfectly still, as it's a possibility that you may have to mess around with the fuel lines, and, if the issue goes that far, you may relocate the part anyway.
 
Am I best to just drill the whole thing out instead and try to put a new rivnut in?

If they're in riv nuts, my money is on the riv nut spinning before the bolt remains come free

my view would be to just drill it out and put new no nuts in. People above talking about drilling out and cutting new threads might know more than me about the construction of that section of the chassis but if it is a rivnut just keep drilling the bolt out in larger sizes until the whole thing has gone and install new rivnuts.

If there is a plate welded inside the chassis with threaded holes then yes drill and re tap to M8.
 
Why Land Rover put the filter there on TD5's right in the crud I can't think.
Some have fitted replacements in better positions. Don't know myself but could it be placed on the inside of the chassis leg?
 
Really appreciating the replies. I’m fairly new to this but plan is to grind what’s left of the bolt/washer down flush to the back of the housing, tap the stud and, starting small, drill the centre with a left handed drill bit. I might tentatively try the bolt extractors with copious amounts of penetrating spray but if it doesn’t feel like it’s going to turn, I’ll back it out and just carry on drilling. Will then figure out from there whether I can re-thread or whether a new ruvnut(s) are needed. Classic Landy 10 minute job 😂
 
Really appreciating the replies. I’m fairly new to this but plan is to grind what’s left of the bolt/washer down flush to the back of the housing, tap the stud and, starting small, drill the centre with a left handed drill bit. I might tentatively try the bolt extractors with copious amounts of penetrating spray but if it doesn’t feel like it’s going to turn, I’ll back it out and just carry on drilling. Will then figure out from there whether I can re-thread or whether a new ruvnut(s) are needed. Classic Landy 10 minute job 😂
See ya in two weeks then🔧
 
If they're rivnuts (or some other sort of self-expanding captive nut) once you've ground the outer flange off, you should be able to push them through so they fall down inside the chassis and then you can put new ones in. I should know, becuase I have this model, but it's several years since I had my fuel filter housing off so I can't remember.
 
Last edited:
How you getting on?
Looking on the chassis on the opposite side suggests they are rivnuts.
I have the same job to do at some point.
I finally got a chance to attempt it yesterday.. as ever it took far longer than I thought it would!

I basically had to drill everything out, starting small then increasing in drill bit size until I could get two new rivnuts in. I then used a combination of a cheap rivnut insert tool and a DIY nuts and bolts method to make sure they were tight in the holes. There was absolutely no chance the existing bolts were coming out using a bolt extraction tool and totally agree with the advice on here that drilling is the way to go.

I think it’s stating the obvious but my main issue was having blunt drill bits. The few I had that were new went through the material relatively easily but I had no chance with the blunt ones. At one point I snapped off a small drill bit in one of the studs (cue lots of cursing and a retreat to make a brew!) but luckily I could dremel around the stud to remove that material and get a pair of mole grips on the snapped bit. The only two tools I used were the drill and the dremel with a cutting disc (angle grinder was too big to use accurately).

Good luck with yours. I hope your bolts aren’t corroded and come out easily - this was by far the least enjoyable job I’ve done on the Landy so far!
 

Attachments

  • IMG_5130.jpeg
    IMG_5130.jpeg
    633.3 KB · Views: 19
Thank you for the update. Looking at your photo the rivnuts actually attach to the mounting plate, rather than the chassis itself, is that correct?
I tried one bolt and that has snapped off, 100% the other bolt will also break.
I have it wedged in place with some insulation foam at the moment.
 
I think it’s stating the obvious but my main issue was having blunt drill bits. The few I had that were new went through the material relatively easily but I had no chance with the blunt ones.

Drill bits are easy to sharpen if you have an angle grinder. I lie it on its back then carefully dab the flat onto the disc. Only quick dabs so you don’t overheat the bit. Takes a bit of practice but the more you do it the better you get. Even snapped bits can be reshaped
 
Thank you for the update. Looking at your photo the rivnuts actually attach to the mounting plate, rather than the chassis itself, is that correct?
I tried one bolt and that has snapped off, 100% the other bolt will also break.
I have it wedged in place with some insulation foam at the moment.
That’s what I did but no idea if it’s the right way. It seemed a lot more effort to take the back plate of the housing off as well to rivnut direct to the chassis as there were two more bolts holding it on that definitely would have snapped and needed drilling.

When I attached the fuel filter assembly it felt rock solid so I’m pretty confident that it should last a while
 
IMO it would have been worthwhile taking the back plate off and checking behind for the tin worm.
The plate could have been cleaned up and slathered in paint (and grease) before being put back on with some nice stainless bolts ...
If I am feeling brave I shall do that but I am going to ignore it all until next filter change.
 
Back
Top