Tonight I welded in the new framework for the boot floor and finished painting the rear of the chassis. It all looks very nice but what a sod - in the dark with a lead light and all the cables to the grinders and welder are black and I have big clumsy feet lol.

Cheers.

Seem to be missing pics ;)
 
Yeah but I have tried and black paint at night is a bitch to see :(

BUT DONT WORRY - I will be taking lots of photos at the weekend as I am planning to have the interior back in, Well nearly all of it as I need to paint the floor etc too.

Tonight I will be cleaning out the sedementor and mounting that along with tidying the cables etc to the rear end.

Then bring on the weekend.:D
 
Well Its Saturday Evening and you all know what that means - - Yes its Photo Time :D:D:D:D

Today I needed to start finishing off some small bits as I head towards completion of the GreenHornet, not that completion is an option as there is always something for a LR owner to do :(:(:(:( Mostly this hinges around putting the thing back together after bits have either fallen off or been ripped off.

Anyway the first thing on thelist was the Sedementor. Now I have read many posts arguing the need for this piece of equipment and to some extent I am on the side of Joe Blogs whose arguement is that if its too hard to service and maintain and give little perceived benefit - then rip the ****er out :eek:

However on opening mine up I will be doing a Cameron and performing a complete U Turn.

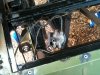
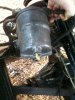
The sedementor for the benefit of those that dont know, is mounted on the offside rear of the vehicle just in front of the axle. Well in front of the axle if you think the front of the car is where the front is, however if you are stood behind the vehicle you may feel, no matter how incorrectly that the front of the axle is in front of you. I know that the front is actually in fact in front of your but you could argue that the rear of the axles is also in froint of you too. Anyway for the purposes of clarity, the front of the axle is where the prop shaft fits into the differential - :doh:

So the Sedementor was already unbolted as I had replaced the suspension and all I did was to remove the bolt at the top of it which is located in the centre.

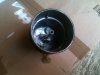
Be careful of the rubber O-Ring to the bowl. Now remove the bowl and boy it was full of ****. Sand, Fat as I run veggie from time to time and some rather black tar looking stuff too. Anyhow it was all stuff that I wouldn't want to block my fuel pipe so I will be keeping it.

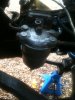
The underside of the top section of the item houses the seperator which I imagine helps skim the crap off the top and therefore only allows descent clean fuel through.

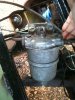
A good clean all orund and inside and also I made sure that the plastic drain plug was taken out. I cleaned the threads and put it back in finger tight as the next time I will be servicing this item will be from underneath and you dont want to be struggling as room can be tight. :) Yeah :) Up there for thinking and down there for dancing...:)

So it was all bolted together and then mounted on the frame by the chassis. I made sure that the bolts were tight but not too tight that they couldn't be undone whilst underneath.

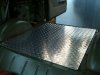
Then I made sure the new boot floor would fit. I bought some 2mm Chequer plate off fleabay for £47. The measurements are 1250mm x 1000mm and it fitted perfectly. Looks the dogs danglys - well not my dog as we had him done last year. Poor sod but in our defence i did actually catch him humping my 5 year old son so that was the key decision maker - I mean the dog scratched all his sides and was shoving him around the living room....:eek:

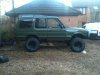
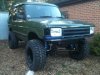
Finally I put the wheels back on so I could take a descent photo of how she looks.

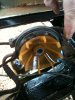
I then had a quick look at the rear springs. A friend said that the rear springs were seated incorrectly so I unbolted the base and twisted them around until they appeared to seat properly. I think they are OK but the tail of the spring doesnt face me which is what my friend said should be the case. Anyhow I will be testing the articulation set up once the rest is done so will do final adjusting then.

Finally I fitted a wading kit. I fitted new hoses and banjos to the front and rear axles and also a vent to the timing cover. However there are supposed to be vents to the transfer box and the gearbox but I cant find them - can anyone help???? :confused::confused:

So what do we think of the 300 style front end?? I prefer the 200 front end but didnt have a choice cause of the panels but I like it all the same.

Now tomorrow we will be fitting the inner wing bits and bobs such as air cleaner and header tank etc and then the interior will be going in. I have the battery on charge so cant wait to fire her up again.
 

Attachments

  • IMG_0400 (1024x768).jpg
    IMG_0400 (1024x768).jpg
    191.6 KB · Views: 670
  • IMG_0398 (1024x768).jpg
    IMG_0398 (1024x768).jpg
    100.8 KB · Views: 603
  • IMG_0399 (1024x768).jpg
    IMG_0399 (1024x768).jpg
    94.4 KB · Views: 602
  • IMG_0402 (768x1024).jpg
    IMG_0402 (768x1024).jpg
    136.2 KB · Views: 614
  • IMG_0403 (768x1024).jpg
    IMG_0403 (768x1024).jpg
    164 KB · Views: 627
  • IMG_0404 (768x1024).jpg
    IMG_0404 (768x1024).jpg
    156.8 KB · Views: 631
  • IMG_0406 (768x1024).jpg
    IMG_0406 (768x1024).jpg
    130.5 KB · Views: 587
  • IMG_0411 (1024x768).jpg
    IMG_0411 (1024x768).jpg
    134.6 KB · Views: 637
  • IMG_0407 (1024x768).jpg
    IMG_0407 (1024x768).jpg
    164 KB · Views: 1,528
  • IMG_0409 (1024x768).jpg
    IMG_0409 (1024x768).jpg
    141.1 KB · Views: 1,494
Last edited:
Cheers Disco mark. Yeah I do like it. It's growing in me. I am just a bit miffed messing around with little brackets to the headlight trims and electrical connectors to the indicators etc. it does look good though and how many 300 are three door?

How are you doing with the tray back conversion.
 
I was thinking would a set of HID's make the 200 light better?

Yea its gettin there, got my cutting tool for the tubing now so tomorow ill start on the roll cage n get it moving along!

Cant wait.. well excited to get it done!
 
I was thinking would a set of HID's make the 200 light better?

Yea its gettin there, got my cutting tool for the tubing now so tomorow ill start on the roll cage n get it moving along!

Cant wait.. well excited to get it done!

HIDs never really look right in reflector headlamps imo, I've got some HID bulbs/ballasts that I want to put on my 300 but I want to fit projector lamps first - maybe from a range rover l322...they seem to all be xenon/HID and look more or less the right shape/size to fit.
 
Are you building a roll cage for the whole vehicle or just reinforcing the rear?

Are you using a tube bender and CDS tubing?

Yeah the lights on a 200 are bollocks. Better of with torches on sticks lol. That's why there are so many rusty reflectors around. The normal lights are soo bad that even when the reflectors rust you can't tell the difference.

HID lights are good but tbh I wouldn't put them in mine. Use it off road so lights and indicators are vulnerable to say the least. Had them in my Previous cars and they were great. I am also thinking of putting them in my bike when finances allow.


Im building a full roll cage, Im gettin the scafolding bent at my local metal fab place.

CDS?


When you say vunerable, by water or physical damage?
 
CDS - Cold Drawn Seel it's the material that roll cages are made of. FIA regulated too and comes in several sizes. Standard size fro HD cages is I believe 42mm OD.

Scaffold is OK for light work and when you look at it you will see the seam where it is joined.

For scaffold you can use a hydraulic bender from Machine Mart. That would make your life easier than going elsewhere and risking getting it bent wrongly. Then again it's all easy if we had enough money. I know I would be better lol after all I am thinking of how I can make rear seat belt anchors without spending £30 odd quid on two for the rear.
 
I have some new anchor eye bolts and the new Ali floor. I have one old mount but can't find the other.mthe one I have is pretty much had it and they are only pressed plate so my thoughts were to engineer some others up which would be stronger and more corrosion resistant.
 
hi mate
damn the hornet is looking horny lol.
fitted rest of me bits yesterday so wont be long before the three amigos will be out together lol.
the lights on the 200 hundred are fine lol (if you have spots like mine ):D
 
Discomark, if your seat belt anchors are serviceable then yeah I would be interested. Pm me with what you want and I will see you right.

Gummy bear,

Where were ya buddy? There I was bolting everything together and my spanner man was nowhere to be seen :-(

Today I fitted the lights and indicators plus surrounds and then dashboard. Looks good.
 

Similar threads