Datatek
Well-Known Member
Why replace the transfer box and turn a small job into a big one? The transfer box is pretty robust.Ashcrofts do refurbes VCUs but you might want to just replace the whole transfer box if you're keeping it.
The VCU should turn very slowly with steady pressure. Not sure what torque when you're directly on the output rather than turning the hub-nut but less than 80nm for sure.
Grrrrrr
Technician, Bodgit & Scarper Ltd
Why replace the transfer box and turn a small job into a big one? The transfer box is pretty robust.
It us but the chain has normally stretched by 150k (supposed to be replaced every 100k) and you'd be amazed how much smoother it is afterwards.
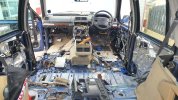
OK fellas, thanks, it may be a while yet, as im in the process of pulling out the dash, having a bit of difficulty removing the centre section at the moment, everything is loose, but it dosnt seem to want to part company for some reason!! Got to get the front carpet out of the way to address the 'hole' in the floor!!
Also, the top plastic dash-frame, the bit with all the buttons, is sort of 'sticky' black, & if I rub my nails on it, the 'paint' or whatever it is, scrapes off!! Is this a failing paint finish/age or what?? I think ill try & remove with some sort of solvent & have a go at re-spraying, the lower side plastic pieces are the same.
Pic, storey so far.
Attachments
Grrrrrr
Technician, Bodgit & Scarper Ltd
OK fellas, thanks, it may be a while yet, as im in the process of pulling out the dash, having a bit of difficulty removing the centre section at the moment, everything is loose, but it dosnt seem to want to part company for some reason!! Got to get the front carpet out of the way to address the 'hole' in the floor!!
Also, the top plastic dash-frame, the bit with all the buttons, is sort of 'sticky' black, & if I rub my nails on it, the 'paint' or whatever it is, scrapes off!! Is this a failing paint finish/age or what?? I think ill try & remove with some sort of solvent & have a go at re-spraying, the lower side plastic pieces are the same.
Pic, storey so far.
I think someone did something to your dash. Should be smooth not sticky.
Centre part of dash. Take the sides off the transmission tunnel part, the surround for the gearstick off which means the switchpack on the centre console has to be out the way. There are some bolts under the cubby hole that need to come out and a few screws around the gear surround. Iirc you lift the back and sort of rotate and push down at the dash end and it pops free.
There's a guide to removing the dash on something like PaulsP38A website with lots of pictures.
Datatek
Well-Known Member
The surface of the plastic surround bit with the buttons etc has gone sticky on both mine, so I would say it's normal Land Rover quality.OK fellas, thanks, it may be a while yet, as im in the process of pulling out the dash, having a bit of difficulty removing the centre section at the moment, everything is loose, but it dosnt seem to want to part company for some reason!! Got to get the front carpet out of the way to address the 'hole' in the floor!!
Also, the top plastic dash-frame, the bit with all the buttons, is sort of 'sticky' black, & if I rub my nails on it, the 'paint' or whatever it is, scrapes off!! Is this a failing paint finish/age or what?? I think ill try & remove with some sort of solvent & have a go at re-spraying, the lower side plastic pieces are the same.
Pic, storey so far.
I'd go for a replacement transfert box as well. It makes a lot of sense when you see the price of a chainAshcrofts do refurbes VCUs but you might want to just replace the whole transfer box if you're keeping it.
The VCU should turn very slowly with steady pressure. Not sure what torque when you're directly on the output rather than turning the hub-nut but less than 80nm for sure.
Wow...OK fellas, thanks, it may be a while yet, as im in the process of pulling out the dash, having a bit of difficulty removing the centre section at the moment, everything is loose, but it dosnt seem to want to part company for some reason!! Got to get the front carpet out of the way to address the 'hole' in the floor!!
Also, the top plastic dash-frame, the bit with all the buttons, is sort of 'sticky' black, & if I rub my nails on it, the 'paint' or whatever it is, scrapes off!! Is this a failing paint finish/age or what?? I think ill try & remove with some sort of solvent & have a go at re-spraying, the lower side plastic pieces are the same.
Pic, storey so far.
brianp38dse
Well-Known Member
OK fellas, thanks, it may be a while yet, as im in the process of pulling out the dash, having a bit of difficulty removing the centre section at the moment, everything is loose, but it dosnt seem to want to part company for some reason!! Got to get the front carpet out of the way to address the 'hole' in the floor!!
Also, the top plastic dash-frame, the bit with all the buttons, is sort of 'sticky' black, & if I rub my nails on it, the 'paint' or whatever it is, scrapes off!! Is this a failing paint finish/age or what?? I think ill try & remove with some sort of solvent & have a go at re-spraying, the lower side plastic pieces are the same.
Pic, storey so far.
That image reminds me of ones i have seen in the scrappy
hope it all goes back ok.
Ha Ha, nice one!
I was about to order a set of air-bags, but I might hold off for a bit, I pressed them up manually from my tyre inflator a couple of days ago & they're still up, couldn't go via the newly rebuilt compressor as I've ripped out most of the electrics!!
I was about to order a set of air-bags, but I might hold off for a bit, I pressed them up manually from my tyre inflator a couple of days ago & they're still up, couldn't go via the newly rebuilt compressor as I've ripped out most of the electrics!!
Attachments
Nice blueHa Ha, nice one!
I was about to order a set of air-bags, but I might hold off for a bit, I pressed them up manually from my tyre inflator a couple of days ago & they're still up, couldn't go via the newly rebuilt compressor as I've ripped out most of the electrics!!
Grrrrrr
Technician, Bodgit & Scarper Ltd
Ha Ha, nice one!
I was about to order a set of air-bags, but I might hold off for a bit, I pressed them up manually from my tyre inflator a couple of days ago & they're still up, couldn't go via the newly rebuilt compressor as I've ripped out most of the electrics!!
If they're holding up for days then there's probably nothing wrong with them. £200 saved, maybe more these days.
Grrrrrr
Technician, Bodgit & Scarper Ltd
The surface of the plastic surround bit with the buttons etc has gone sticky on both mine, so I would say it's normal Land Rover quality.
Really? Both my '95s are fine. Do you think it might be something to do with exposure to hot sun?
Underneath the car? Is yours upside downReally? Both my '95s are fine. Do you think it might be something to do with exposure to hot sun?
While they are inflated in wade height, check for any cracking in the rubber surface that is normally hidden in standard and motorway height. Any cracking is a weakening of the bags.If they're holding up for days then there's probably nothing wrong with them. £200 saved, maybe more these days.
Datatek
Well-Known Member
Perhaps the early ones were better quality? The MY 2000 one spent it's formative years away from the sun in the UK.Really? Both my '95s are fine. Do you think it might be something to do with exposure to hot sun?
No doubt they were better qualityPerhaps the early ones were better quality? The MY 2000 one spent it's formative years away from the sun in the UK.
Flossie
Well-Known Member
Ref- sticky plastics.
Mine were terrible really bad.
I stripped it all out and the wife washed them in hot soapy water and a sponge with the rough green scourer. Loads of it came off but needs repeating. Even fine wire wool was used , with different solvents but don't use cellulose thinner! A long boring job but I got all the sticky stuff off then some back to black car bumper liquid stuff buffed up and they are now like new.
I took all the switches, clock etc out so nowt electrical could get damaged. Remove the little fan in the dash vent too, that'll be full of fluff. The rear part of the centre consul I did in situ but that wasn't as bad as the front part except for the rear Ash tray lid which was super sticky so I removed that and the switch pack cover.
It's worth the effort. I understand that the earlier plastics didn't suffer from this stickiness so swopping them out might be an option.
This back to black stuff also transformed the grill and bumpers.
Yeh, I'm in the process of stripping & cleaning mine as well, it weird, if I scrape my nail across it, a gooey 'layer' is removed.
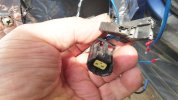
There are 3 plugs in the doors, not used as the previous owner fitted high-power speakers etc. BUT, I see two original 'T' type plugs which obviously went to 2 speakers, but can any one tell me where the yellow cored plug goes?? I cant find anything or anywhere for it to go??? And all the sockets in the doors are already occupied.
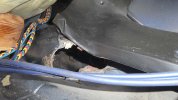
Then had a mad 1/2 hour with a big copper/hide mallet persuading the floor back to where it belongs, The impact had pulled up the heating duct out of place, seems ok now.


