Mid crossmember replacement 110 TD5

This site contains affiliate links for which LandyZone may be compensated if you make a purchase.

lightning

Well-Known Member
Posts
4,144
Location
High Peak
I got on to this job today, floor panel and seat brackets came out OK.

Now it’s apart l am not sure l can do it, two of the bolts clearly won’t come out and need to have the heads cut off, then the new ones installed with the nut at the top.

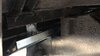
There’s also two brackets on the chassis that look like they might prevent you from sliding the new mid crossmember in.

Having said that, my crossmember is actually not as bad as l thought, no holes. But as l have a galvanised one on order l may as well carry on an change it.

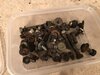
At least l didn’t find any other corrosion, only a selection of rusty washers on top of the chassis rail, clearly left there by Duncan in “final assembly” when his shift ended.

But what about these two brackets on top of the chassis?
 

Attachments

  • 1662694E-F8A3-4A2C-89FA-FDA173982F07.jpeg
    1662694E-F8A3-4A2C-89FA-FDA173982F07.jpeg
    189.3 KB · Views: 368
  • 47F42B76-5DC7-4B6C-8ADF-2F07C7FC4A3C.jpeg
    47F42B76-5DC7-4B6C-8ADF-2F07C7FC4A3C.jpeg
    329.4 KB · Views: 202
  • 32FCBA28-73A4-4B2E-B742-A890E2BC8311.jpeg
    32FCBA28-73A4-4B2E-B742-A890E2BC8311.jpeg
    183.1 KB · Views: 193
  • D76CEA42-C085-48D5-9F8A-D60EF34B01E2.jpeg
    D76CEA42-C085-48D5-9F8A-D60EF34B01E2.jpeg
    227.2 KB · Views: 218
No they are just unused brackets on top of the chassis,
It would obviously be fine if the body was off, but l have to try and fit mine with it in place.
 
The easy way is....cut it in half....slide the bits in...weld back together....job done with next to nothing removed :)
 
Reading one thread about it, says the “rear tub will drop 5-10mm when the mid crossmember is removed” and l should “support the body under the C pillars with a piece of wood to spread the load”

Looking like it may have to go in to the LR specialist for this job.
 
So l got this job done today, took most of the day, not that there’s anything else to do

Had all the best intentions to cut through the old crossmember with a hacksaw, but it’s just not possible, the saw soon cuts through but you can’t get access to cut the top part.

So l borrowed an angle grinder, first time l’ve ever used one, found l had to first cut a slot in the side to be able to get the tool in to cut the top and other side.

All the bolts came out OK, l made two small holes in the edge of the floor to get the two bolts out that are normally not possible.
The holes are covered by the main floor panel, but l put grommets in them anyway.
The body dropped slightly on the O/S when l unbolted the crossmember, just a few mm but the door was slightly out of alignment.
I put a trolley jack under the rear tub and raised it a little, to re align it, once all the new bolts and brackets were back on it was perfect.

Once the old part was out, l realised it wasn’t actually that bad! Although large flakes of rust were falling off it. Could probably have left it another couple of years.

But, the new galvanised mid crossmember looks great and l didn’t find any other corrosion so that was a plus.
And, there were plenty of rusty screws etc (see the photo) to replace, fortunately l had bought a selection sometime in the past and was able to fit mostly new ones.
 

Attachments

  • 6C708D27-B8E3-46EC-9F9C-98072E65979D.jpeg
    6C708D27-B8E3-46EC-9F9C-98072E65979D.jpeg
    421.7 KB · Views: 163
  • 2A014835-C613-441F-B95C-F027023C4F9A.jpeg
    2A014835-C613-441F-B95C-F027023C4F9A.jpeg
    243.5 KB · Views: 172
  • C1D7548C-4277-460B-9B2A-11DD86E00495.jpeg
    C1D7548C-4277-460B-9B2A-11DD86E00495.jpeg
    150.1 KB · Views: 169
  • B3F1CBDA-F601-4EC3-80E1-A555E616D5C1.jpeg
    B3F1CBDA-F601-4EC3-80E1-A555E616D5C1.jpeg
    146.6 KB · Views: 157
Back
Top