Disco 1 Measurements for Rear Door Gap

This site contains affiliate links for which LandyZone may be compensated if you make a purchase.

Max36

New Member
Posts
9
Hi All,

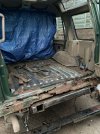
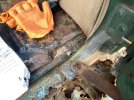
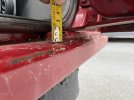
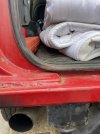
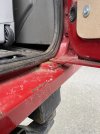
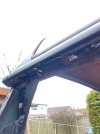
I'm trying to get the rear of my Disco 300tdi straightened up and I want to make sure I'm getting it back to the correct spec when it all goes back together. The rear cross member has always been a bit 'spongy' and I was aware of the rust when I bought it, but perhaps underestimated the extent of the corrosion until I took it all apart. The rear door has always squeaked and scraped on the ribbed plastic strip that sits just underneath it, and I've always had to lift the door slightly to open/close it without it scraping across this bit, but it got to the point I couldn't lift it enough to stop it scraping. Obviously when I put the new cross member in I want the door to be the right height, and I'm assuming it's just dropped because the guide thing on the bottom of the door is sat on an unsupported bit of metal that is pretty much floating in mid air now, but to confirm this I'm trying to find measurements for where the door should sit relative to the rest of the rear aperture.

So far I've managed to strip out all the boot and started cleaning up to find where I'm going to have to patch, and I plan on taking off the quarter panels, supporting the body on acrows and then put in a piece of square tube across the door frame to keep everything lined up while I cut out the remaining bits of metal and weld in the new piece, but I want to make sure I'm starting with the correct measurements and that the door will open and close freely once everything is back together.

Is there a record of the correct measurements for where the door should be positioned within the hole anywhere I can access or can anyone provide measurements to a good solid point from their own D1, or is it just a case of putting it all in and seeing where I need to adjust? I would like to get as much right as possible before I start removing doors and windows so I don't have to leave it like that for too long as I'm doing this outside with no cover.
 

Attachments

  • WhatsApp Image 2025-03-14 at 22.27.40 (2).jpeg
    WhatsApp Image 2025-03-14 at 22.27.40 (2).jpeg
    549.8 KB · Views: 40
  • WhatsApp Image 2025-03-14 at 22.27.40 (3).jpeg
    WhatsApp Image 2025-03-14 at 22.27.40 (3).jpeg
    476.2 KB · Views: 32
I have a D1 mate, live in Blackpool, if it’s any good to you more than welcome to come over and take measurements from mine to make reference points.
Mines had quite a bit welded up round that area too, and closes fine.
If you want any particular pictures or measurements, let me know.
 
I have a D1 mate, live in Blackpool, if it’s any good to you more than welcome to come over and take measurements from mine to make reference points.
Mines had quite a bit welded up round that area too, and closes fine.
If you want any particular pictures or measurements, let me know.
Appreciate it, thank you! I don't know if I'll be able to get over that way any time soon, but if you have a measurement for the gap between the bottom of the door and the ribbed plastic bit when the door is closed, that would be a great starting point for me to aim for. I think it's possible my bottom hinge has been worn away from having the extra stress on it, and now would be a great time to replace it should I need to.
 
Any good??
 

Attachments

  • IMG_1186.jpeg
    IMG_1186.jpeg
    228.3 KB · Views: 24
  • IMG_1185.jpeg
    IMG_1185.jpeg
    301.4 KB · Views: 19
  • IMG_1184.jpeg
    IMG_1184.jpeg
    295.3 KB · Views: 20
Your door was likely scraping due to the hinge sagging mate rather than the metal work sagging. Good shout on the bar across the back - I’ve literally just done the same as what you say albeit I used a crane.
IMG_6869.jpeg
 
Any good??
Perfect thank you so much! I really appreciate the help

Your door was likely scraping due to the hinge sagging mate rather than the metal work sagging. Good shout on the bar across the back - I’ve literally just done the same as what you say albeit I used a crane.
View attachment 337251
That's a great idea - I didn't think of a crane because I didn't think there would be anywhere to lift from, but I see now that the seatbelt mounting points could have worked. It looks like you're doing a much more extensive job though! I've just pulled the side off to reveal most of the top of the window hole on the body is rotten, which is a bit of a fly in the ointment because I was hoping to support the shell from there! Looks like it might be a longer job than I had hoped, but isn't that always the case!
 

Attachments

  • WhatsApp Image 2025-03-17 at 20.34.09.jpeg
    WhatsApp Image 2025-03-17 at 20.34.09.jpeg
    219.8 KB · Views: 16
Perfect thank you so much! I really appreciate the help


That's a great idea - I didn't think of a crane because I didn't think there would be anywhere to lift from, but I see now that the seatbelt mounting points could have worked. It looks like you're doing a much more extensive job though! I've just pulled the side off to reveal most of the top of the window hole on the body is rotten, which is a bit of a fly in the ointment because I was hoping to support the shell from there! Looks like it might be a longer job than I had hoped, but isn't that always the case!
Oh my god, that’s a mess.. genuinely would not even know where to start on that.. fair play to you for even contemplating it
 
Perfect thank you so much! I really appreciate the help


That's a great idea - I didn't think of a crane because I didn't think there would be anywhere to lift from, but I see now that the seatbelt mounting points could have worked. It looks like you're doing a much more extensive job though! I've just pulled the side off to reveal most of the top of the window hole on the body is rotten, which is a bit of a fly in the ointment because I was hoping to support the shell from there! Looks like it might be a longer job than I had hoped, but isn't that always the case!

Yeah I lifted mine from there with wooden blocks. I did a similar repair to the one you’re doing years ago. It’s quite intricate at the boot end! The actual beam isn’t too bad. You’ve got unlucky that it’s gone there.

Yeah I’m doing full restoration on this one 👍🏻

Bare in mind micks pictures there are of a non standard crossmember - assume it’s box section.
 
Oh my god, that’s a mess.. genuinely would not even know where to start on that.. fair play to you for even contemplating it
Yeah pretty disheartening when I took the trim off and it was full of metal; better to do it than to let it get worse though!

Yeah I lifted mine from there with wooden blocks. I did a similar repair to the one you’re doing years ago. It’s quite intricate at the boot end! The actual beam isn’t too bad. You’ve got unlucky that it’s gone there.

Yeah I’m doing full restoration on this one 👍🏻

Bare in mind micks pictures there are of a non standard crossmember - assume it’s box section.
Looks like it's coming together well, there's a lot of work there.

I'm just trying to plan out where to start, every time I pull the grinder out it exposes a new bit I need to patch. The boot floor was replaced at some point but that big bit of foam padding under the boot carpet was soaking wet through and the new floor was starting to rot so I've ground it all back and got it in rust converter to keep it protected while I get the rest of the body to the point I can start thinking about the crossmember. I guess it's all good practice and I'll have a bit more experience by the time I get to the front!

That's good to keep in mind, thank you for pointing that out! It's a good reference for how the bottom door guide piece and everything sits.
 
Yeah pretty disheartening when I took the trim off and it was full of metal; better to do it than to let it get worse though!


Looks like it's coming together well, there's a lot of work there.

I'm just trying to plan out where to start, every time I pull the grinder out it exposes a new bit I need to patch. The boot floor was replaced at some point but that big bit of foam padding under the boot carpet was soaking wet through and the new floor was starting to rot so I've ground it all back and got it in rust converter to keep it protected while I get the rest of the body to the point I can start thinking about the crossmember. I guess it's all good practice and I'll have a bit more experience by the time I get to the front!

That's good to keep in mind, thank you for pointing that out! It's a good reference for how the bottom door guide piece and everything sits.
Shout if you need any more pics as I’ve one D1 in use and that restoration 👍🏻
 
Yeah I lifted mine from there with wooden blocks. I did a similar repair to the one you’re doing years ago. It’s quite intricate at the boot end! The actual beam isn’t too bad. You’ve got unlucky that it’s gone there.

Yeah I’m doing full restoration on this one 👍🏻

Bear in mind micks pictures there are of a non standard crossmember - assume it’s box section.
Yeah, it’s all been done in box section, to be fair the last owner did a decent job of some of the welding needed..
had to do inner , outer sills for mot not long ago, as it was a patch work job, so opted to have it all cut out and re done so it’s done.
 
Yeah, it’s all been done in box section, to be fair the last owner did a decent job of some of the welding needed..
had to do inner , outer sills for mot not long ago, as it was a patch work job, so opted to have it all cut out and re done so it’s done.
Does look nice and solid don’t it and ties in well to the uprights
 
Thank you, that might come in handy when I get to making up repair bits!
Max if you want pictures of it all look at my “try again thread” there’s also details in there for it all. I’ve gone to the extent of new tubs where I didn’t watch to keep patching!

You’ll be buzzing once it’s done.
 
Back
Top