glow plug location td4 freelander HELP

This site contains affiliate links for which LandyZone may be compensated if you make a purchase.

61jason61

Active Member
Posts
109
Location
wiltshire
hi all, got some new glow plugs, as in mornings takes three or four goes to fire up, glow plug light comes on and usually quite easy to get going and fine rest of day.

I know this means basically plugs are not at there best, so got the new ones. just can't find the old ones lol,

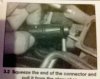
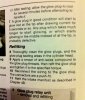
i think they're under these plugs, with the wiring going to them and the fuel? lines on top.


i have tried to remove the right hand one, and lost a nut DOH!, easily replaced tomorrow.
is this the right part i'm trying to take off


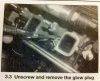
and i'm guessing i need to take the plastic trim off in front of the plugs/injectors to get to the bendy pipe connected to them in this pic (taken of web)


i'm guessing, when the electrical plug, the fuel? line on top and the two nuts are removed from base, and the bendy pipe thing removed of the front of the grey/rusty coloured thing, i'll find glow plugs underneath??

H E L P P L E A S E
 
yep .. top 2 pics be of the injectors

IF i can find a pic of the glowplugs .. i'll post it
THANK YOOOOOOOOOOOOOOOOOOOOO. Can't find a pic anywhere on line or in any forums lol, will have to take better pics along the way and post in the few landrover forums i now use. Fell out with a all marques forum, ask for help and someone suggests buy a manual. I thought the point of these forums was to help each other help. If i had serious issues i would buy a manual, but to be honest not a lot wrong with her, ssshh, think i found a good one. only problems when bought are nsr window not working and door lock on same door only locks, will get another lock and inspect window while door card off. motor works and can hear movement or grinding, not used at all since finding not working. hopefully window just out of runners. but must put nut back on injector housing in morning lol.

thanks again, loads of posts across internet mentioning have done glow plugs, but no one has put a single pic online, except injectors lol.
 
dude, you are awesome. been hunting for three hours, even been in here. think i registered sometime ago but never used forum until now.

only had it 2 weeks lol.

so when i take the plastic bit with four fingers off, the 8 bolts below injectors, then i should see the glow plugs at front of block. glad i didn't go back in and take all them pipes apart lol.
 
then i should see the glow plugs at front of block.
they heat up the intake air ..
so reside next to where the intake manifold joins the head

attached some very quick pics .. ( not best of quality :)
via m.phone camera .. from the 'haynes' manual

rekon i'd soak them with penetrating oil .. for a day or two .. beforehand

btw: i find the lump fires up quicker .. in near zero temps ..
if i **count to 4** after the glow plug dash light has gone off
( as the plugs continue to heat anyway
( during cranking .. after the dash light has gone off

** 1 banana . 2 banana . 3 banana . 4 banana . **
~~~~~~~~~~~~~~~~~~~~~~~~~~~~~~~~~~~~~~~~~~
 

Attachments

  • IMG_1005.jpg
    IMG_1005.jpg
    116.9 KB · Views: 1,855
  • IMG_1007.jpg
    IMG_1007.jpg
    71.7 KB · Views: 1,726
  • IMG_1003.jpg
    IMG_1003.jpg
    128.9 KB · Views: 1,749
  • IMG_1010.jpg
    IMG_1010.jpg
    228.4 KB · Views: 1,622
  • IMG_1012.jpg
    IMG_1012.jpg
    228.9 KB · Views: 1,598
thanks for the info guys, know loads more than i did an hour ago, and near disaster avoided by nearly trying to take the injectors out lol, must replace that nut in morning.
 
Another useful tip is to get the engine nice and hot before removing them as it makes it a lot easier. If you try to remove them with a cold engine they often snap off which is a pain in the rear. They still can snap when doing it with a hot engine but generally they are slightly easier to remove so less likely to.
 
To access the glow plugs which are a lot easier to remove if you have got the engine nice and hot, you will need to remove the engine cover, the air intake,the manifold here are some photo's below.
Remove the small engine cover FL1 04 plate you may have the larger cover ?
303gy6s.jpg
1

acag6p.jpg
2

30cozkz.jpg
3

Once the engine cover is removed you get the first look at the 8 manifold bolts 10mm socket required to remove after the air intake as been removed.
2mwxhu8.jpg
4

You/we now need to remove the air intake and intercooler pipes attached to it and the EGR, unclip the turbo boost sensor wire first.
2vci1x2.jpg
5

30de9zl.jpg
6

Disconnect the air intake hose
2w2r58m.jpg
7

34qv29k.jpg
8

Followed by the EGR hose at the other end.
rhlu20.jpg
9

Then the middle section the turbo boost sensor
3480fmu.jpg
10

You now need to remove to securing screws holding the air intake.
2cdh4yu.jpg
11

The other will be found under the intercooler hose attached to the turbo boost sensor
2dmgu93.jpg
12

102kz0y.jpg
13

2hp6pa0.jpg
14

Remove the air intake hose.
2nrh9w1.jpg
15

Next undo the clip holding the hose to the EGR
sxyg5z.jpg
16

You should now be able to remove the air intake section of the engine.
34g9flk.jpg
17

21eudcz.jpg
18

Put this with the engine cover
jj49pe.jpg
19

Next unplug the small solenoid hose from the EGR.
8zmq0o.jpg
20

2j4zo9f.jpg
21

The jubilee clip must now be loosened from the EGR to exhaust manifold pipe, note the is a special clip.
v457pe.jpg
22

2ah9z0w.jpg
23

You can now finally turn your attention to removing the front manifold, 8 10mm bolts at the top.
fu17up.jpg
24

There are 4 securing nuts below and one bolts all being 11mm
ip9s81.jpg
25

once you have the nuts and bolts off or loosened you need to unplug the MAP sensor on the left of the manifold.
o86wjn.jpg
26

2911e77.jpg
27

Push in the spring clip and unplug the wiring
eqayyh.jpg
28

es88pi.jpg
29

From the manifold remove the engine cover securing clip and keep safe for later.
1180uj7.jpg
30

146zhv.jpg
31

Take out the long bolt from the bottom of the manifold left
hu38l5.jpg
32

On the right hand side of the manifold next to the EGR pipe unplug the fuel wiring
5vqd91.jpg
33

112aot1.jpg
34

With all the lower nuts and one bolt removed from the manifold and the upper captive bolts fully loosened the manifold is ready to ne removed.
wrlsvr.jpg
35

If it is a bit stiff to remove tap it with palm of your hand or rock it and it will come loose, lift clear of the engine.
34rzw46.jpg
36

Place the manifold safe with the other parts removed earlier
nq23kn.jpg
37

You now have full access to the glow plugs and there leads.
wjce8o.jpg
38

Take care removing this glow plug as it is near the engine sensor and you do not want to damage that.
296gg9u.jpg
39

Remove the glow plug lead
29vkzrk.jpg
40

e7yv5z.jpg
41

Once you have replaced the glow plugs and attached the leads, all that is left is to refit the manifold and air intake etc, hope this as helped you in your quest and will be of use to others, I always photo any work I carry out on my FL1 and my MGZT also My Rover 75 diesel, I have over 4000 pictures .
Arctic2
 
Last edited:
well got it done, almost, managed to loose a socket somewhere in engine, and the left bolt of air intake, will replace that tomorrow from scrappy. very left glow plug snapped off and sheared, but starts fine on three and looks like from old ones she needed them.


can i tap or die whichever it is to put a thread in the glow plug hole when its hot and put a bolt in, wait to cool and shrink on bolt and withdraw or tap it, glue a bolt into it and then warm engine to expand around it??
 
Back
Top