You are using an out of date browser. It may not display this or other websites correctly.
You should upgrade or use an alternative browser.
You should upgrade or use an alternative browser.
Blood, sweat & beers ! 1984 Defender 90 restoration
- Thread starter UpandOver
- Start date
This site contains affiliate links for which LandyZone may be compensated if you make a purchase.

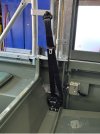
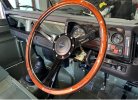
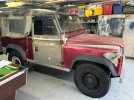
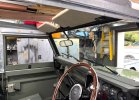
Front arches fitted, and fair play they came with pleant of spare hammer in clips which is unusual. Rear light covers installed and new tailgate chains. The Heritage steering wheel arrived, fitted temporary as the left indicator stalk is a bit temperamental so will have to remove it to fit the new stalk and new plastic surrounds.
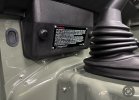
New Lucas dash light switch and hazard switch fitted and tested
New Lucas dash light switch and hazard switch fitted and tested
Attachments
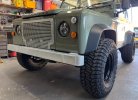
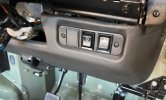
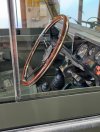
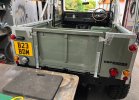
Not much to report today, few little bits finished off, like the new black tow ball and cover fitted , new fuse box cover decal and the steering wheel bolted in thats after doing the tracking which was 1 degree negative which to consider it was done by eye isn’t too bad but nevertheless its been set to about 1/2 degree outward. Steering box centered the heavy duty steeing bar was adjusted to centre the steering wheel, fist time Ive used this method must have just been lucky with the 300tdi (bobs110 hope she’s still running true dude !) Indicator stalk changed for another new un but the problem still existed  diagnosed by google and hey presto the indicator problem is caused by a return feed to the LED lights via the dash indicator incadesent bulb ! FFS ! Apparently its a fault easily fixed by replacing the dash bulb with a LED bulb with a seperate earth (www. Unanimous .com) has a converted lamp for £30
You guest it the soldering station is on standby awaiting the delivery of said green 12v LED bulb or should I say a pack of 10 for £1.79 from ebay. Sitrep as soon as it arrives people.
To be honest I’m a bit gutted that she’s nearing completion and will have to find another excuse to spend time in the cave…… any unwanted landy projects out there keep me posted maybe a 110 station wagon.
diagnosed by google and hey presto the indicator problem is caused by a return feed to the LED lights via the dash indicator incadesent bulb ! FFS ! Apparently its a fault easily fixed by replacing the dash bulb with a LED bulb with a seperate earth (www. Unanimous .com) has a converted lamp for £30 You guest it the soldering station is on standby awaiting the delivery of said green 12v LED bulb or should I say a pack of 10 for £1.79 from ebay. Sitrep as soon as it arrives people.
To be honest I’m a bit gutted that she’s nearing completion and will have to find another excuse to spend time in the cave…… any unwanted landy projects out there keep me posted maybe a 110 station wagon.
Attachments
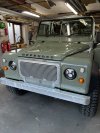
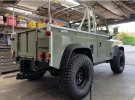
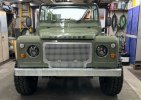
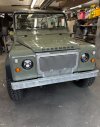
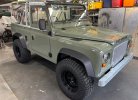
Few photos of hours of blood, sweat and beers and photos of the final result. Who said drinking alcohol was bad for you… oh bugger just realized it should have been painted red 
Attachments
Bobs110
Member
- Posts
- 41
- Location
- Shropshire
I can confirm the 300tdi, Little Blue, is still running straight and true, no adjustment required!Not much to report today, few little bits finished off, like the new black tow ball and cover fitted , new fuse box cover decal and the steering wheel bolted in thats after doing the tracking which was 1 degree negative which to consider it was done by eye isn’t too bad but nevertheless its been set to about 1/2 degree outward. Steering box centered the heavy duty steeing bar was adjusted to centre the steering wheel, fist time Ive used this method must have just been lucky with the 300tdi (bobs110 hope she’s still running true dude !) Indicator stalk changed for another new un but the problem still existed
You guest it the soldering station is on standby awaiting the delivery of said green 12v LED bulb or should I say a pack of 10 for £1.79 from ebay. Sitrep as soon as it arrives people.
To be honest I’m a bit gutted that she’s nearing completion and will have to find another excuse to spend time in the cave…… any unwanted landy projects out there keep me posted maybe a 110 station wagon.
Bobs110
Member
- Posts
- 41
- Location
- Shropshire
That’s looking fantastic. You have a great eye, it’s the perfect balance of beefy, retro and modern. A sympathetic reimagining, but not overdone. Well done!Few photos of hours of blood, sweat and beers and photos of the final result. Who said drinking alcohol was bad for you… oh bugger just realized it should have been painted red
The list of jobs is finally drying up, tow bar electrics fitted, rear view mirror for whats it worth fitted, original sun visors bleached clean and fitted, aluminum front number plate fabricated and plates on.
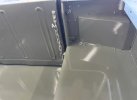
Just emailed Exmoor trim for a quote for two rear fold down rear seat in chestnut brown… to match the front . who suit you sir
Just emailed Exmoor trim for a quote for two rear fold down rear seat in chestnut brown… to match the front . who suit you sir
Attachments

- Posts
- 3,143
- Location
- Seeking shade in the KSA
Stunning 
- Posts
- 6,909
- Location
- South Bucks
You've done an amazing job on this, I've enjoyed watching it progress. I love everything you have done to it, it looks stunning.
You do realise that you can never leave it unattended, because some scrote will want to steal it.
You do realise that you can never leave it unattended, because some scrote will want to steal it.
Thank you for the kind words, I’m so pleased as to how she’s turned out the colour, stance and retro looks just complements the landys age. Can’t wait to post the next set of photos after fitting the cool n’ vintage chestnut seats and canvass hood !You've done an amazing job on this, I've enjoyed watching it progress. I love everything you have done to it, it looks stunning.
You do realise that you can never leave it unattended, because some scrote will want to steal it.