congo181
Well-Known Member
- Posts
- 528
- Location
- Maidstone, Kent, U.K.
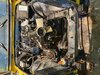
Hi all. Just about to remove the engine on my ‘87 2.5NA 110.
All the ancillaries are off and today I looked at the motor mounts and bell housing.
So question. The left side motor mount, how do you access the bottom 19mm bolt to the crankcase? It seems that the mount is too narrow for an open ended and the mount stud gets in the way of a ring. Any pointers?
Also, I’ve cracked all the bottom bell housing nuts. How many are there in total that need removing?
Thanks all. Jim
") ) which tells me to remove the mounts to enable me to lower the motor to get to the upper bell housing nuts.
) which tells me to remove the mounts to enable me to lower the motor to get to the upper bell housing nuts.