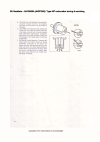
And in a startling turn of events the carb has been refurbished.

The rebuild kit seems to cover several variants as I have plenty of parts left over.
Most of these excess items bear no resemblance to any part I have removed from the carb in the process or form part of the carb as it was as I took it off the car.
Not only have parts been renewed, a full clean up of all surfaces (inside & out) has happened.
I might even buff up the outside with some polish and a buffing wheel.