Paulmitchell1984
Well-Known Member
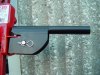
what are the tubes used for on the steering guards? loving the build though cant wait to see it completed and used ")
what are the tubes used for on the steering guards? loving the build though cant wait to see it completed and used


be nice to see this in action at some point, sure you will be out laning with sam sometime in the coming months.
what are the tubes used for on the steering guards? loving the build though cant wait to see it completed and used
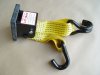
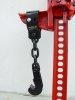
Hi-Lift Jack
I could do with building an articulation ramp lol.
Eh up
Looking good there Ian! **** me there's some room in them arches, as you say the spring hasnt even dropped out yet!
You know the score mate, whenever the motah's ready and you're all tooled up we'll start talking about a laning trip.
Hey Jim did you get anywhere with that ratio selector link? Was it cast?
ye looking at trying to make another selector , thats stronger and not so much play in them , i need mine off the road mate , my crank seal has started ****ing oil out , and i have a transfer box to fit , the rest of the poly bush kit etc etc . bloody landys theres always sumit lol.
I did my crank seal and now it leaks worse than it did before. Suppose it is a v8 of death though...
Probably just bad luck mate if it doesn't seem to be stiffer than normal, unless it was operator error...????
any how it dont matter as yet , cuz the transfer box is coming out , long overdue..... prob was driver area that snapped it with people sat behind me going wtf why aint we moving I have fitted front relocation cones to my Discovery and have an issue which I can't quite get my head around.
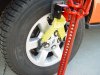
I have fitted the cones in the following order...
Axle
Sprint seat
+3" Spring
Turret ring
Chassis
Relocation cone
Turret
The problem is that the cones on both sides are hitting the front edge of the damper and scratching the paint. This is at rest so as the axle comes up the damper willove forward in the arc and the cone will catch more. When the axle drops the damper moves away.
I have checked that the cones are not angled and they aren't so there isn't a specific way of fitting them.
Can anyone please help!!!!!
Pictures if possible would be great to exentuate a point. Cheers