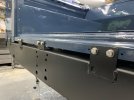
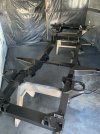
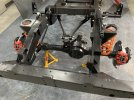
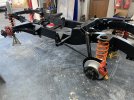
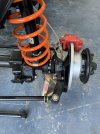
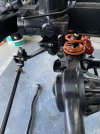
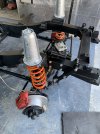
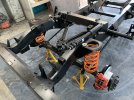
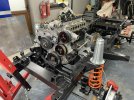
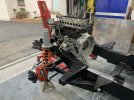
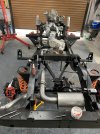
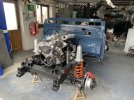
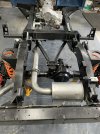
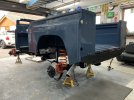
Been 6mths in the waiting, chassis now home gettin prepped for paint, first off a good steam clean with trailer wash then a good going over with an 80 grit flap disk to remove any unwanted dribbles of galv, uneven buildup, and splatter.
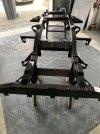
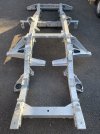
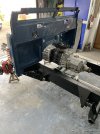
T wash with a 2” paint brush ( used approx 1ltr).
Then let it dry before getting it into the spray booth.
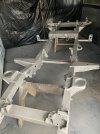
Now that was fun buy myself, but with two of my sons skate boards and some dead lifting techniques that an average Olympian would squirm at its in.
 

Attachments

  • IMG_5627.jpeg
    IMG_5627.jpeg
    624.7 KB · Views: 92
Gonna see the hard prep on everything else come together quick now :)

J
Indeed, decided to refurbish this in a different order to the series 3, where I started with the chassis upward. But this way I was restricted with room in the garage to do all the body work.
Definitely the better way to reatore is to do all the running gear, engine and box first followed by bodywork then chassis last. Only down fall is that you dont see much progress for a long time but only parts scattered around the house.
 
Intershield 300 pure aluminium epoxy high abrasion resistant 2k primer …. Done
 

Attachments

  • IMG_5630.jpeg
    IMG_5630.jpeg
    289.1 KB · Views: 74
Next up international interzone 954 epoxy semi gloss black ….. just in case the landy ever goes out in the rain πŸ˜‚
 
Big box from Paddocks today !
Bilstein shocks front and rear and a set of 1” lowering springs ! Just in time for the start of the build next week πŸ˜€
 

Attachments

  • IMG_5631.jpeg
    IMG_5631.jpeg
    251.6 KB · Views: 88
Lowering spings ???
Are you going for the 'slammed' look or are you shrinking with age ?

Are they Britpart yellow HD springs too ?
 
This is going to spend most of its time on road so though I would lower it 25mm with britpart springs
 
Final coat of black and the chassis is done, taken the paint booth down. Just waiting now for the paint to dry and the giant mecano kit is ready to put back together.
 

Attachments

  • IMG_5643.jpeg
    IMG_5643.jpeg
    398.1 KB · Views: 67
Inner front wing arches blasted repaired and ready for galv. No wonder the new puma has plastic ones these things weight a ton !
 

Attachments

  • IMG_5644.jpeg
    IMG_5644.jpeg
    233.8 KB · Views: 71
Progress report…….
Chassis is now a laden with axles, front shocks and springs, rear springs and A frame, steering box and steering rods.
Couldn’t fit the rear shocks as the lower mounts didnt come with the reduction washers grrrr…. Shame on you mr Bilstein ! Never D mind they have been duly ordered and on their way. Have to admit my new found go to supplier is Island 4x4 they are very competitive on prices.
 

Attachments

  • IMG_5675.jpeg
    IMG_5675.jpeg
    395.1 KB · Views: 80
  • IMG_5674.jpeg
    IMG_5674.jpeg
    368.5 KB · Views: 79
  • IMG_5673.jpeg
    IMG_5673.jpeg
    372.3 KB · Views: 78
  • IMG_5670.jpeg
    IMG_5670.jpeg
    369.7 KB · Views: 80
  • IMG_5661.jpeg
    IMG_5661.jpeg
    422.8 KB · Views: 99
Some close ups of the shiny bits
 

Attachments

  • IMG_5679.jpeg
    IMG_5679.jpeg
    333.8 KB · Views: 84
  • IMG_5678.jpeg
    IMG_5678.jpeg
    347.6 KB · Views: 86
  • IMG_5677.jpeg
    IMG_5677.jpeg
    348.3 KB · Views: 71
  • IMG_5676.jpeg
    IMG_5676.jpeg
    362.5 KB · Views: 71
  • IMG_5674.jpeg
    IMG_5674.jpeg
    368.5 KB · Views: 71
  • IMG_5675.jpeg
    IMG_5675.jpeg
    395.1 KB · Views: 72
  • IMG_5673.jpeg
    IMG_5673.jpeg
    372.3 KB · Views: 71
Just as predicted, progress is rapid ! Engine in, gearbox with heavy duty Valeo clutch, full stainless exhaust with no middle box. Rear struts fitted.
 

Attachments

  • IMG_5681.jpeg
    IMG_5681.jpeg
    425.1 KB · Views: 93
  • IMG_5680.jpeg
    IMG_5680.jpeg
    415.4 KB · Views: 78
  • IMG_5684.jpeg
    IMG_5684.jpeg
    343.9 KB · Views: 96
  • IMG_5687.jpeg
    IMG_5687.jpeg
    362.5 KB · Views: 78
This evening progress report, gearbox oil replenishment (MTF 94), transfer box, front and rear axles full of your finest EP80w-90, front hubs filled with one shot or as it should be called no shot grease! Top tip after taking an hour to fill the first, turn the steering so the hub is pointing outward (so if drivers side wheels would point to the right) leave the bag of grease in boiling water for 10min snip the smallest piece off the corner of the bag and aim to the left of the filler hole. Thats where the largest gap is within the hub. And hey presto second bag empo in less than a minute.
Last job for tonight is fitting the first blue bit, the BULKHEAD is on everyone πŸ˜€
 

Attachments

  • IMG_5735.jpeg
    IMG_5735.jpeg
    391.5 KB · Views: 84
  • IMG_5736.jpeg
    IMG_5736.jpeg
    349 KB · Views: 88
  • IMG_5737.jpeg
    IMG_5737.jpeg
    280.6 KB · Views: 100
Brake lines done, chassis loom repaired, re taped and pulled through the chassis, tripple taped the section that runs theough the chassis box dont want any more chafing now !
 

Attachments

  • IMG_5753.jpeg
    IMG_5753.jpeg
    318 KB · Views: 74
  • IMG_5752.jpeg
    IMG_5752.jpeg
    364.2 KB · Views: 73
Big blue bit goes on !
Quick polish using Farecla liquid G3 compound on a pink polisher foam disk then mer ultimate polish on a black foam pad and its looking very shiney 😎 
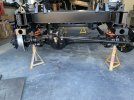
not bad for an electrician if I do say so myself.
 

Attachments

  • IMG_5769.jpeg
    IMG_5769.jpeg
    322.9 KB · Views: 83
  • IMG_5767.jpeg
    IMG_5767.jpeg
    304.9 KB · Views: 66
  • IMG_5770.jpeg
    IMG_5770.jpeg
    176.7 KB · Views: 77
  • IMG_5771.jpeg
    IMG_5771.jpeg
    228.9 KB · Views: 82
Do you recon lining up all the bolt heads is taking this restore a little too far? Theres OCD them there’s me πŸ€¦β€β™‚οΈ 
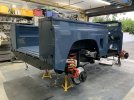
oh well at least I can sleep tonight knowing they are all straight πŸ˜‚
 

Attachments

  • IMG_5772.jpeg
    IMG_5772.jpeg
    229.4 KB · Views: 87

Similar threads