I will double check tomorrow it's been so long now 2012 i think it was, will need to go through my photos, but i think once you have got it started the top unscrews.
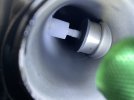
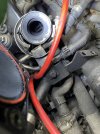
I think the sensor head screws off, the fitting on the slide hammer loosens it but the frame of the oil filler cap is in way unscrewing the first injector.

Just to note brought the car for 200 mile drive to Cork today with work and never sounded better, but getting it to start was hassle. Had to get mate to jump start, after about 6 attempts came to life. Battery is 10 years old so bought new one today for the long trip (with old fully charged in the boot!).

I get the feeling it must be the glow plugs, so will do a resistance test when I get back to Dublin. Do you have any photos to show how to test the glow plugs with a voltmeter?

Many thanks Artic,
A
Diesel leaked from dodgey injector on way home, ended up being a piggy back with AA flat bed 🤪

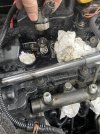
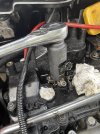
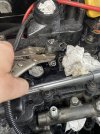
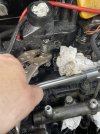
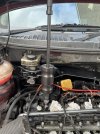
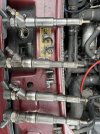
Managed to remove the injector as per photos shown below as follows:
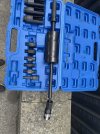
1. Loosen the injector using side hammer kit 30mm socket.

2. This loosens it enough to unscrew head using a spring grip wrench (30mm).

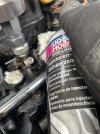
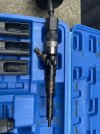
3. Remove head, attach slide hammer with injector attachment and plenty of Molly injector remover. Then 3 hefty upward whacks, injector freed.

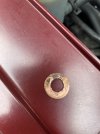
4. Checked the injector - the washer was off left at bottom of well.

5. Looked pretty worn… cleaned up and refitted, won’t start. So disconnecting the head seems to have left stuck open stopping pressure build up to start the car.

6. Ordered refurbished injector from uk supplier so should work no bother.

Hopefully will resolve, and changing the glow plugs too just to be sure.

Question - do new injectors work from the box or does it need to be mapped using a programming machine?

Cheers 👍
 

Attachments

  • IMG_0938.jpeg
    IMG_0938.jpeg
    252.4 KB · Views: 44
  • IMG_0931.jpeg
    IMG_0931.jpeg
    413 KB · Views: 46
  • IMG_0930.jpeg
    IMG_0930.jpeg
    534.1 KB · Views: 45
  • IMG_0927.jpeg
    IMG_0927.jpeg
    434.8 KB · Views: 48
  • IMG_0928.jpeg
    IMG_0928.jpeg
    459 KB · Views: 46
  • IMG_0929.jpeg
    IMG_0929.jpeg
    391.1 KB · Views: 47
  • IMG_0932.jpeg
    IMG_0932.jpeg
    408.8 KB · Views: 46
  • IMG_0933.jpeg
    IMG_0933.jpeg
    260.7 KB · Views: 48
  • IMG_0936.jpeg
    IMG_0936.jpeg
    319.7 KB · Views: 45
Diesel leaked from dodgey injector on way home, ended up being a piggy back with AA flat bed 🤪

Managed to remove the injector as per photos shown below as follows:
1. Loosen the injector using side hammer kit 30mm socket.

2. This loosens it enough to unscrew head using a spring grip wrench (30mm).

3. Remove head, attach slide hammer with injector attachment and plenty of Molly injector remover. Then 3 hefty upward whacks, injector freed.

4. Checked the injector - the washer was off left at bottom of well.

5. Looked pretty worn… cleaned up and refitted, won’t start. So disconnecting the head seems to have left stuck open stopping pressure build up to start the car.

6. Ordered refurbished injector from uk supplier so should work no bother.

Hopefully will resolve, and changing the glow plugs too just to be sure.

Question - do new injectors work from the box or does it need to be mapped using a programming machine?

Cheers 👍
Hi ajfarrell.
When you removed the top did you notice any shims or collet, spring etc, and if so were these put back in, and the top tightened down properly, of cause you are using new copper washers yes.
7mVj22Hl.jpg
1

XVdOUfVl.jpg
2

VLrsF44l.jpg
3

CGZpJZjl.jpg
4

Forgot to post this up earlier in the thread.
5aEvP1Fl.jpg
5

The tips of the injectors can be removed with care and cleaned, i always do this to make sure the spray pattern is good.
VtJZB6ql.jpg
6

ricfCDql.jpg
7

b1g1WLml.jpg
8

6X4TAYfl.jpg
9

Obippnzl.jpg
10

uKkQbpgl.jpg
11

7rR5vnTl.jpg
12

with the above removed you can then use carb cleaner or brake disc cleaner, to spray into the nozzle, this cleans out the spray pattern holes, which are as fine as an hair on your head.

iUqEMPpl.jpg
13

7dYto5rl.jpg
14

The above usually sorts out the spray pattern.

More cleaning can be done but it is very invasive.
qg046r8l.jpg
15

When fitting a new injector there should be no coding for the FL1 TD4 but the same number must match those already in the FL.
This is a R40 one FL1 is different
5tA1XQ1l.jpg
16

t6j1eNVl.jpg
17

Manifold off for changing the glow plugs use a good six sided deep socket, maybe also spray some plus gas round them the day or night before removing, again always nice to have the engine hot helps with removal.
OWOhTZnl.jpg
18

IH7Y3IPl.jpg
19

turn slow not a bull at a gate.
qgZlqPal.jpg
20

5s3C2E7l.jpg
21

do the rest the same.
m72kCvbl.jpg
22

Bit of copper grease on the new ones or your choice of grease,
T8TMsh5l.jpg
23

good luck


Thanks Artic,

I didn’t tighten the top cap and yes did put its spring back in.
I’ll try what you did while waiting for delivery of refurbished.
Where is the R40 number?

Cheers,
A
 
Hi ajfarrell.
When you removed the top did you notice any shims or collet, spring etc, and if so were these put back in, and the top tightened down properly, of cause you are using new copper washers yes.
7mVj22Hl.jpg
1

XVdOUfVl.jpg
2

VLrsF44l.jpg
3

CGZpJZjl.jpg
4

Forgot to post this up earlier in the thread.
5aEvP1Fl.jpg
5

The tips of the injectors can be removed with care and cleaned, i always do this to make sure the spray pattern is good.
VtJZB6ql.jpg
6

ricfCDql.jpg
7

b1g1WLml.jpg
8

6X4TAYfl.jpg
9

Obippnzl.jpg
10

uKkQbpgl.jpg
11

7rR5vnTl.jpg
12

with the above removed you can then use carb cleaner or brake disc cleaner, to spray into the nozzle, this cleans out the spray pattern holes, which are as fine as an hair on your head.

iUqEMPpl.jpg
13

7dYto5rl.jpg
14

The above usually sorts out the spray pattern.

More cleaning can be done but it is very invasive.
qg046r8l.jpg
15

When fitting a new injector there should be no coding for the FL1 TD4 but the same number must match those already in the FL.
This is a R40 one FL1 is different
5tA1XQ1l.jpg
16

t6j1eNVl.jpg
17

Manifold off for changing the glow plugs use a good six sided deep socket, maybe also spray some plus gas round them the day or night before removing, again always nice to have the engine hot helps with removal.
OWOhTZnl.jpg
18

IH7Y3IPl.jpg
19

turn slow not a bull at a gate.
qgZlqPal.jpg
20

5s3C2E7l.jpg
21

do the rest the same.
m72kCvbl.jpg
22

Bit of copper grease on the new ones or your choice of grease,
T8TMsh5l.jpg
23

good luck


Many thanks Artic,

Got the glow plugs out fine.

Just to check - how do I test if glow plugs are working using a voltmeter?

Best,
A
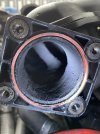
 
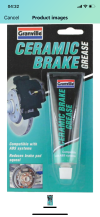
Finally got new injector in to replace faulty one, then had to take all out again as wouldn’t start… because didn’t fix the copper washers in place with ‘ceramic grease’.

Now I’ve done that, starts no problem at all… except big puff of white smoke near the EGR, after revs the hose there is leaking at jubilee clip and EGR.

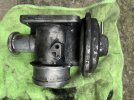
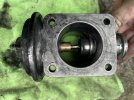
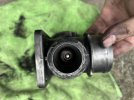
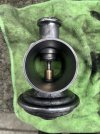
Took off EGR was dirty, cleaned it but looks like the top manifold is badly caked with carbon so will power wash.

Final question - how can I test if the EGR is actually working? Should I just buy a new EGR since this one is 20 years old? Blanking isn’t my preference as less NOx with the standard design plus no MOT issues…

Please see photos attached for insights:
1. Photos of injectors show new in left (dry), with existing ones to right, one has diesel leaked half way up the other all the way up one not at all (this was after taking out having not inserted with ceramic grease indicating they didn’t land proper twice).

2. Photo of EGR after clean…but is it working?

Many many thanks for any feedback, especially artic who sent so much good advice.

Best,
Anthony
 

Attachments

  • IMG_1113.jpeg
    IMG_1113.jpeg
    325.7 KB · Views: 39
  • IMG_1112.jpeg
    IMG_1112.jpeg
    379.3 KB · Views: 38
  • IMG_1111.jpeg
    IMG_1111.jpeg
    202.7 KB · Views: 38
  • IMG_1110.jpeg
    IMG_1110.jpeg
    265.8 KB · Views: 37
  • IMG_1109.jpeg
    IMG_1109.jpeg
    388.6 KB · Views: 39
  • IMG_1108.jpeg
    IMG_1108.jpeg
    373.4 KB · Views: 51
  • IMG_1107.jpeg
    IMG_1107.jpeg
    304.2 KB · Views: 36
  • IMG_1106.jpeg
    IMG_1106.jpeg
    390.5 KB · Views: 43
  • IMG_1101.png
    IMG_1101.png
    3.3 MB · Views: 37
Finally got new injector in to replace faulty one, then had to take all out again as wouldn’t start… because didn’t fix the copper washers in place with ‘ceramic grease’.

Now I’ve done that, starts no problem at all… except big puff of white smoke near the EGR, after revs the hose there is leaking at jubilee clip and EGR.

Took off EGR was dirty, cleaned it but looks like the top manifold is badly caked with carbon so will power wash.

Final question - how can I test if the EGR is actually working? Should I just buy a new EGR since this one is 20 years old? Blanking isn’t my preference as less NOx with the standard design plus no MOT issues…

Please see photos attached for insights:
1. Photos of injectors show new in left (dry), with existing ones to right, one has diesel leaked half way up the other all the way up one not at all (this was after taking out having not inserted with ceramic grease indicating they didn’t land proper twice).

2. Photo of EGR after clean…but is it working?

Many many thanks for any feedback, especially artic who sent so much good advice.

Best,
Anthony
Yes it's best if you can remove the manifold and clean it out, you must first remove the MAP sensor from the side of the manifold, 10mm small bolt, give that a wipe over with a clean rag under no circumstances poke anything into the hole of the sensor.
FkPOia0l.jpg
1

pfvWAull.jpg
2

As you can se the MAP also gets clogged up but a wipe over should clean it.
Y6ilWtbl.jpg
3

I have been cleaning manifolds EGR and MAP sensors since late 2011/early 2012. up to present day.

Your manifold is about a 5 that being 1 is clean 10 is really dirty.
DfTIylZl.jpg
4

jFoiQfSl.jpg
5

jn45Wmll.jpg
6

This is a 1 cleaned by using oven cleaner, left to soak over night, and jet washed out remembering the MAP is removed, all rubber seals removed.
uIjpRK8l.jpg
7

You can clean the EGR with an old or new tooth brush & some Swarfega, wiping out as you go along with old rags, once all or most of the black gunk is removed spray inside with brake cleaner.
Cjiakqjl.jpg
8

I also fit gutted EGR so the problem does not happen again.
svIBfPdl.jpg
9

2j4nMV1l.jpg
10

HBwX3Itl.jpg
11

again been doing then since 2012.
OwOsyQXl.jpg
12

pbfV2YZl.jpg
13

CPdxJfml.jpg
14


Pass the MOT easy.


dsEkw8gl.jpg
15
 
Last edited:
Yes it's best if you can remove the manifold and clean it out, you must first remove the MAP sensor from the side of the manifold, 10mm small bolt, give that a wipe over with a clean rag under no circumstances poke anything into the hole of the sensor.
FkPOia0l.jpg
1

pfvWAull.jpg
2

As you can se the MAP also gets clogged up but a wipe over should clean it.
Y6ilWtbl.jpg
3

I have been cleaning manifolds EGR and MAP sensors since late 2011/early 2012. up to present day.

Your manifold is about a 5 that being 1 is clean 10 is really dirty.
DfTIylZl.jpg
4

jFoiQfSl.jpg
5

jn45Wmll.jpg
6

This is a 1 cleaned by using oven cleaner, left to soak over night, and jet washed out remembering the MAP is removed, all rubber seals removed.
uIjpRK8l.jpg
7

You can clean the EGR with an old or new tooth brush & some Swarfega, wiping out as you go along with old rags, once all or most of the black gunk is removed spray inside with brake cleaner.
Cjiakqjl.jpg
8

I also fit gutted EGR so the problem does not happen again.
svIBfPdl.jpg
9

2j4nMV1l.jpg
10

HBwX3Itl.jpg
11

again been doing then since 2012.
OwOsyQXl.jpg
12

pbfV2YZl.jpg
13

CPdxJfml.jpg
14


Pas the MOT easy.


dsEkw8gl.jpg
15


I can vouch for these from Arctic… and no issues at all with mot.
 
I can vouch for these from Arctic… and no issues at all with mot.
Thanks gents, some great photos and advice.

I cleaned out the intake manifold, was caked up bad, had to shove screwdriver through 2 ports to break it free, then filled with mr muscle oven cleaner and flushed through with water three times until it ran clear.

Replaced the egr valve, connected back up and really struggled to start. Eventually with easy start kicked off large plume of smoke out back.

Now sounds very well tonight, starting without issue.

Brought for short spin and all good. Engine seems a bit hotter than normal though, and oil symbol appeared to flicker on way home…

Needs an oil change?

Any ideas on this? Coolant temperature on obd2 was 70 Deg C but that seems ok?

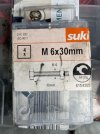
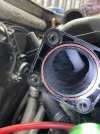
To answer the original thread query, an m6 30mm bolt actually fixed that issue, snug as a bug! See attached.

Cheers,
A
 

Attachments

  • IMG_1120.jpeg
    IMG_1120.jpeg
    255.2 KB · Views: 28
Any ideas on this? Coolant temperature on obd2 was 70 Deg C but that seems ok?

If anything it’s a little low.
Do you have the inline stat mod fitted? If not, consider it - nice and toastie in the winter ;)

Mine runs at around 87-90 deg, needle bang in the centre.
 
I can vouch for these from Arctic… and no issues at all with mot.
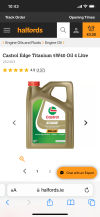
Going to change out oil today - just double checking that 5W 40 FULLY synthetic is the best given already at 120k miles and to orient bearings etc (thanks Nodge)?

Best,
Anthony
 

Attachments

  • IMG_1200.png
    IMG_1200.png
    822.4 KB · Views: 29
Going to change out oil today - just double checking that 5W 40 FULLY synthetic is the best given already at 120k miles and to orient bearings etc (thanks Nodge)?

Best,
Anthony
There are 2 schools of thought on oil grades.
The first is that bearing wear on these engines is minimal, so using the recommended 5w30 is all that's needed, especially as a 30 grade can flow through narrow oil ways faster.
The second school of thought is that a 40 grade will support the bearings better, as the running clearances increase with mileage, although at 120k, I'd not expect to see much wear.
I tried both grades in my TD4, finding minimal difference between the two, but the engine definitely sounded less noisy with the 40 grade oil, but my FL1 TD4 had more than 120k on it, about 160 IIRC.

I use fully synthetic 5w30 in my FL2, and buy it in 20L barrels, which is the cheapest way to obtain engine oil. I measured the big end bearings on my FL2 at 120k, and found no measurable wear on the factory clearance.
Thanks Nodge, I used 5w40! Fully synthetic but still showing oil light flickering when engine heats during an hour driving, checked oil level is still very black…
Is there a drip tray that can be removed under engine to clean out very old oil? It only took just over 5l oil was expecting 6.7L… I read somewhere adding half litre diesel helps clear out engine, would you recommend?
Many thanks folks, the Freelander is running very smoothly but also whistling ! the small right hand side intercooler hose connecting to the Egr (looking from front of vehicle) is very oily so may be leaking… i will replace and report back. All jubilee clips very tight! Is there a nM for them?

Also replaced with a new egr valve, very clean after few runs as shown.

Thanks again,
Anthony
 

Attachments

  • IMG_1222.jpeg
    IMG_1222.jpeg
    197.9 KB · Views: 29
Hi, the hoses tend to go like plastic after years of getting hot & cold so they sometimes won't seal properly so could be worth replacing it. I would have just blanked the egr valve (but not thrown it away, for mot purposes 😉) as it stops all that gunge accumulating in the manifold.
 
Yes it's best if you can remove the manifold and clean it out, you must first remove the MAP sensor from the side of the manifold, 10mm small bolt, give that a wipe over with a clean rag under no circumstances poke anything into the hole of the sensor.
FkPOia0l.jpg
1

pfvWAull.jpg
2

As you can se the MAP also gets clogged up but a wipe over should clean it.
Y6ilWtbl.jpg
3

I have been cleaning manifolds EGR and MAP sensors since late 2011/early 2012. up to present day.

Your manifold is about a 5 that being 1 is clean 10 is really dirty.
DfTIylZl.jpg
4

jFoiQfSl.jpg
5

jn45Wmll.jpg
6

This is a 1 cleaned by using oven cleaner, left to soak over night, and jet washed out remembering the MAP is removed, all rubber seals removed.
uIjpRK8l.jpg
7

You can clean the EGR with an old or new tooth brush & some Swarfega, wiping out as you go along with old rags, once all or most of the black gunk is removed spray inside with brake cleaner.
Cjiakqjl.jpg
8

I also fit gutted EGR so the problem does not happen again.
svIBfPdl.jpg
9

2j4nMV1l.jpg
10

HBwX3Itl.jpg
11

again been doing then since 2012.
OwOsyQXl.jpg
12

pbfV2YZl.jpg
13

CPdxJfml.jpg
14


Pass the MOT easy.


dsEkw8gl.jpg
15
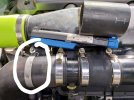
Hi Artic, what’s the best way to cushion the impact of the left hand screw just under the turbo cooler hose (viewing from from vehicle) as is cutting into tube wall and likely to create a hole if not avoided?

Best,
Anthony
 
Hi Artic, what’s the best way to cushion the impact of the left hand screw just under the turbo cooler hose (viewing from from vehicle) as is cutting into tube wall and likely to create a hole if not avoided?

Best,
Anthony
If it's the one circled in the pic, I put that jubilee clip round the hose.
 

Attachments

  • 20211004_123512.jpg
    20211004_123512.jpg
    329.4 KB · Views: 21

Similar threads