top drive
Well-Known Member
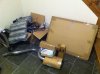
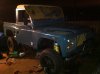
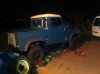
Exhaust fitted - straight through middle and a rear silencer for now - going for the not attracting attention for its first mot....
Fixed up a weapin fuel line, jubalee clip had stripped
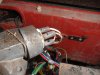
Removed my buggered main and engine loom and fitted grayhairs old 200tdi loom , fitted glow plug timer kit, ( now my glowplug light works as well . Starts and runs with no bodging at all.
Had to fiddle with the new 200tdi ignition as it must have been different to greyhairs as fitting it up as he had it meant it turned over at position 1.
All my dash works , interior lights work . Ive fitted up a front headlamp /side light and indicator , side indicator and all the rear lights . Wipac leds and sealed beam - i need to paint the other wing still so didnt throw the lights on it.
None of my lights work yet as i need to bypass the dim dip unit and work out where the flasher unit is on this loom.
Put new hinges on and my door now fits propper and lines up with the curves nicely.
Its getting close now , ive been stealing shots in my mates when i fix it and it still brings a smile to my face to be driving it
If weathers a bit better tomorow ill try and get my doors and wing painted up so that the painting is done.
Fixed up a weapin fuel line, jubalee clip had stripped
Removed my buggered main and engine loom and fitted grayhairs old 200tdi loom , fitted glow plug timer kit, ( now my glowplug light works as well . Starts and runs with no bodging at all.
Had to fiddle with the new 200tdi ignition as it must have been different to greyhairs as fitting it up as he had it meant it turned over at position 1.
All my dash works , interior lights work . Ive fitted up a front headlamp /side light and indicator , side indicator and all the rear lights . Wipac leds and sealed beam - i need to paint the other wing still so didnt throw the lights on it.
None of my lights work yet as i need to bypass the dim dip unit and work out where the flasher unit is on this loom.
Put new hinges on and my door now fits propper and lines up with the curves nicely.
Its getting close now , ive been stealing shots in my mates when i fix it and it still brings a smile to my face to be driving it
If weathers a bit better tomorow ill try and get my doors and wing painted up so that the painting is done.
Last edited:
top drive
Well-Known Member
Cheers for that , mines now set up the same as that how ever the numbers on my sp land rover ignition must have been different as the numbers on the cables didnt match up with the numbers on the ignition or what the multimeter said at the terminals.
So i just put it where it needed to go to make the right bits live at the right time")
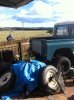
Got up early doors and headed into the city did the shopping for the week , filled her blingo and picked up a jerry can of black stuff for the landy , the benifit in doing so is that i bring home bacon , eggs and rolls..... So hopefully those three items mean i get a free pass for the rest of the day at this - and i get bacon rolls ...win win . Quick coffee and some apple cake and ill get back on it.
So i just put it where it needed to go to make the right bits live at the right time
Got up early doors and headed into the city did the shopping for the week , filled her blingo and picked up a jerry can of black stuff for the landy , the benifit in doing so is that i bring home bacon , eggs and rolls..... So hopefully those three items mean i get a free pass for the rest of the day at this - and i get bacon rolls ...win win . Quick coffee and some apple cake and ill get back on it.
Last edited:
top drive
Well-Known Member
Headlights both working through the boomslang loom
Side lights working
Hazzards working indicators working- how ever the light in the dash board only works when i turn left , when i turn right the green dash light doesnt flash!
Still not run a loom to the back thsi is 100% easier than my existing loom , it had shorts all over and melted wires , tracing faults of faults of faults takes too much time !
mick the builder
Well-Known Member
Do you reckon a boomslang loom is worth the money?Headlights both working through the boomslang loom
Side lights working
Hazzards working indicators working- how ever the light in the dash board only works when i turn left , when i turn right the green dash light doesnt flash!
Still not run a loom to the back thsi is 100% easier than my existing loom , it had shorts all over and melted wires , tracing faults of faults of faults takes too much time !
top drive
Well-Known Member
sorted my indicator flash issue out now flashes both ways. bad earth (isnt it always)
Needed a new stalk for the main beam/wipers as its sticky as hell.
also needed one for the wipers as it is the old style pre GA chassis 5 bullet and the loom is the new style 6 HA - VA model.
Had to buy new glass channel for the door tops as the original disintigrated when i took it apart for painting - so i got the truck cab stuff as well - hopefully that will stop it rattling.
My chasssis loom is stuck in the chassis - the rear grommet is stuck against the front exit hole and i cant get the dam thing through - ive even tried cutting the grommet. lesson learned that one - the chassis was so rotten at the rear it fell into the chassis and i didnt think to take it off before i pulled it forward - any tips ?


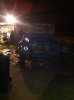
check my wooden windscreen.

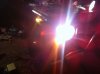
plain old sealed beam units + wipac LED side and indicators.

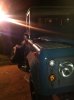
Wipac rear LEDs - dont like the NAS fog and reversing light so got some square incandecent types for now - eventually ill stick LED floods on the roof for reversing i think. Badly timed photo as future mrs T-D cycles past ha.

How long will those zinc hinges stay silver ? i quite like the silver on blue contrast........
Needed a new stalk for the main beam/wipers as its sticky as hell.
also needed one for the wipers as it is the old style pre GA chassis 5 bullet and the loom is the new style 6 HA - VA model.
Had to buy new glass channel for the door tops as the original disintigrated when i took it apart for painting - so i got the truck cab stuff as well - hopefully that will stop it rattling.
My chasssis loom is stuck in the chassis - the rear grommet is stuck against the front exit hole and i cant get the dam thing through - ive even tried cutting the grommet. lesson learned that one - the chassis was so rotten at the rear it fell into the chassis and i didnt think to take it off before i pulled it forward - any tips ?
check my wooden windscreen.
plain old sealed beam units + wipac LED side and indicators.
Wipac rear LEDs - dont like the NAS fog and reversing light so got some square incandecent types for now - eventually ill stick LED floods on the roof for reversing i think. Badly timed photo as future mrs T-D cycles past ha.
How long will those zinc hinges stay silver ? i quite like the silver on blue contrast........
top drive
Well-Known Member
i just cant help my self.....its a monday thing and im sitting here trying to do a mist refresh on the other screen with my brain slowely draining out of my left hand ear into my coffee cup.
autosparks chassis loom on its way - ill just pull on the other till something gives or it comes out.... it was cut mess at the back anyway.
will run it in conduit Pclipped to the chassis rail this time , much easier for when it becomes galvy chassis and bulkhead time in a few years.
replacement stalks ordered , new interior light switch ordered - i used to have a two way dash lights on/off but its broke and a new ones 45 quid !!!!!
also got a reverse light sorted out a brake pedal switch and all the seals/catches and the glass tracks for all the windows.
greyhair
Well-Known Member
Tips for getting black bits black again . The spats and headlight surrounds ? Boot polish ? Back to black ? Paint ?
I read somewhere that you can use a heat gun to turn the items back to the original color
top drive
Well-Known Member
hmmm interesting theory ..... i foresee me ending up witha pile of black plastic on the drive !
Im also having issues getting the doors to line up - might have to sacrafice some door tops to this bulkhead.... ive choped so much outof the chassis and bulkhead ill be surprised if its within even land rovers tollerances !
its tilted as far forward as the bracket adjustment will go - and been spaced out with 4 spacers on the drivers side and none on the passengers ..... - which means the bulkheads now square to the slam panel so the bonnet now shuts as land rover intended- better than when i bought the damn thing.
the drivers door needs to lift at the tail a quarter inch - but is hitting the windscreen frame/bulkhead already - which tells me the angle of the bulkhead where the screen bolts on is wrong probably....
the other side the same issue - the door needs to lift by an 1/8th to fit in the gap at the top but theres nothing left to give in the bulkhead.
i can get it all to fit nice if i ratchet strap it up to the front bumper but it just springs back - is there anything else to that other than loosen all bolts , pull and retighten ? - ive done the roof top rail bolts , footwell bracket bolts and the outrigger bolts - ratcheted it to place then tightened it all - and it just reverts to the original position damn as near it.
If i cant get it any better i can get the door bottom square and ill just have to apply the file to the door top to make it all fit - because oddly enough Its my new SP door tops that dont fit .... when i fit vils old door tops(only one .... left as the other disintigrated when i stripped the glass to paint it- no where to screw the chanels too as it all came out in one) it all goes together nicely actually....Must measure then cut
nobber
Well-Known Member
Tips for getting black bits black again . The spats and headlight surrounds ? Boot polish ? Back to black ? Paint ?
Peanut butter , no , really.