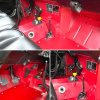
Evening
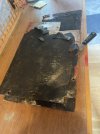
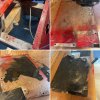
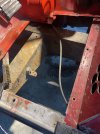
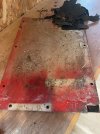
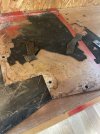
Can’t stop peeking… finished painting the pedals and added new rubber on my 1974 Series three, but wanted oi look at the floor boards they had some galvanic white powder on top and wanted to check out the chassis under the feet… easy to take out and found the chassis with normal surface rust (phew) but the underside of the floor boards had a @1mm rubber pad glued to the panels… It was pretty tired and oil where an old Feary overdrive was removed by the last owner. So I scraped off one panel (hard) but then thought to ask the group some questions I can’t find here or in the manuals:
1. Is the pad for sound proofing? The panel was painted underneath so think this is a later DIY.
2. Is it necessary or recommended… having scraped it off, so do I now I buy new pad and reglue? Or paint and set it back without the pad… parts manual doesn’t show any pad. Is there a gasket just around the edges to reduce any rattles down the road?
3. I got the Masai red paint and am
wondering how to treat the panels before painting finish coat… scrape/sand to bare aluminum or something less? What’s best to take off old glue? Then degrease? Lots of “miracle” products or just use lacquer thinner?
4. Is it etch primer on bare aluminum or something else?
5. Spray or roll with finish coat? Do you then clear coat for durability… this will all be covered with fitted rubber mats that came with the truck but I want to start doing things right before I tackle any visible interior parts that need some TLC

Note to all… the exterior patina will be kept but the interior needs some help… and will paint the chassis with Por15 after a bit of a clean up.

Thanks in advance for any advice!!
 

Attachments

  • IMG_8552.jpeg
    IMG_8552.jpeg
    392 KB · Views: 73
  • IMG_8555.jpeg
    IMG_8555.jpeg
    488.8 KB · Views: 79
  • IMG_8554.jpeg
    IMG_8554.jpeg
    436.3 KB · Views: 81
  • IMG_8553.jpeg
    IMG_8553.jpeg
    345.4 KB · Views: 74
If paint has managed to stay stuck to the aluminium then it’s unlikely it will fall away now. It depends how much original paint remains.
I’d be tempted to try and keep it if it was mostly sound but once you’ve got the grot off it could be compromised anyway.
You need an etch primer on bare ally and this can effect sound paint by blistering it, making total removal necessary anyway.
If you take it back down to bare metal give it a wipe over with mordant T wash, rinse and dry then get a coat of acid etch primer on it as quickly as possible. Aluminium does strange things over the first minuets it’s exposed to the air.
You can reduce drumming by applying expensive noise reducing mats underneath or get a close cheaper effect if you have some scrap flashband.
I mostly use EVA interlocking floor tiles but I have to use evostick as it doesn’t come with adhesive backing. I also use standard kitchen silicone to stop the water creeping through the joints. It doesn’t stick and is easily removed and reapplied if and when you need to access under the floor panel.
The white powder is harder to get rid of long term as it’s electro galvanic corrosion. Two dissimilar metals cause this when in contact. It’s handy in a battery but a pain in the arse when your ally and steel come into contact and eats the aluminium. Minimise steel to ally contact including bolts. Galvanised bolts do it less but it’s a constant fight.
Thanks. Can you sand aluminum? Would be easiest to get down to bare metal all over? But don’t want to compromise anything… I figured the footboards are a good training project (flat,
Small and under the floor mats anyway) I like the idea of the silicone caulking around the edges.
 
Thanks. Can you sand aluminum? Would be easiest to get down to bare metal all over? But don’t want to compromise anything… I figured the footboards are a good training project (flat,
Small and under the floor mats anyway) I like the idea of the silicone caulking around the edges.
Yep. Use a slightly heavier paper than for traditional finishing to maximise the key. Just get it sealed from the air within an hour. Aluminium begins oxidising immediately and the longer you leave it exposed the harder it is to paint. To the point you’d have to T wash it again.
 
The black coating on up the underside would reduce vibration and also help protect aluminium from wear and tear , not original and not required.
To seal the edges you can get a neoprene seal the one I bought is 20mm x 4mm ,comes with one sticky side. It also does the heater matrix to bulkhead seal and similar places.

I have used the POR15 system in chassis and axles it’s very robust.
If the existing floor panel paint is sound you can lightly sand and paint , I use synthetic enamel with a bit white spirit in , flows very nice and no brush marks.

The undersides look only partially painted , if you want to paint them then take them right down to shiny metal and get your etch primer on quick as mentioned , top coat , don’t need a lacquer coat . The white ‘rust’ Is a bugger and best to remove it all to virgin metal if you can otherwise it can come back and bubble under your new paint!

IMG_3384.jpeg
 
Evening
Can’t stop peeking… finished painting the pedals and added new rubber on my 1974 Series three, but wanted oi look at the floor boards they had some galvanic white powder on top and wanted to check out the chassis under the feet… easy to take out and found the chassis with normal surface rust (phew) but the underside of the floor boards had a @1mm rubber pad glued to the panels… It was pretty tired and oil where an old Feary overdrive was removed by the last owner. So I scraped off one panel (hard) but then thought to ask the group some questions I can’t find here or in the manuals:
1. Is the pad for sound proofing? The panel was painted underneath so think this is a later DIY.
2. Is it necessary or recommended… having scraped it off, so do I now I buy new pad and reglue? Or paint and set it back without the pad… parts manual doesn’t show any pad. Is there a gasket just around the edges to reduce any rattles down the road?
3. I got the Masai red paint and am
wondering how to treat the panels before painting finish coat… scrape/sand to bare aluminum or something less? What’s best to take off old glue? Then degrease? Lots of “miracle” products or just use lacquer thinner?
4. Is it etch primer on bare aluminum or something else?
5. Spray or roll with finish coat? Do you then clear coat for durability… this will all be covered with fitted rubber mats that came with the truck but I want to start doing things right before I tackle any visible interior parts that need some TLC

Note to all… the exterior patina will be kept but the interior needs some help… and will paint the chassis with Por15 after a bit of a clean up.

Thanks in advance for any advice!!
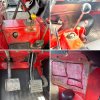
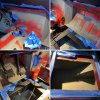
Just wanted to say thanks for all the helpful advice! I just finished refreshing the interior floorboards, bulkhead, pedals and levers with new paint & rubber. The prep is always the hardest part and removing the bulkhead liner was the worst, but Goo Gone proved to be the most effective and getting rid of the rubber insulation in the bottom of the seat trays was second. That was just sheer elbow grease. The painting was satisfactory with a mix of spray (rattle can) and brush… I found the Masai Red went on very thin so it took 3 coats on top of the etch primer. Painting the pedals and shifters and adding new pads and knobs just gave a finishing touch. And lastly cleaning surface rust and painting Por15 on the chassis parts I could reach will help as I do the same as I access different parts along the way. The interior looks way better after a week’s work and next up is the dash (vinyl all cracked) and new windscreen glass (chipped and fogged)… gaining confidence in these low tech jobs!
 

Attachments

  • 5904406B-82A3-4904-9A42-1EC05B3474E5.jpeg
    5904406B-82A3-4904-9A42-1EC05B3474E5.jpeg
    583.1 KB · Views: 76
  • 54B0E0E8-E953-4F8B-BEF0-F0BD9C4E99E8.jpeg
    54B0E0E8-E953-4F8B-BEF0-F0BD9C4E99E8.jpeg
    597.9 KB · Views: 77
  • 54607D96-A64F-4185-B07B-544AEB98D53A.jpeg
    54607D96-A64F-4185-B07B-544AEB98D53A.jpeg
    411.9 KB · Views: 81
  • 2353DE0A-7E12-485D-AFBC-0E5A522D6A39.jpeg
    2353DE0A-7E12-485D-AFBC-0E5A522D6A39.jpeg
    371.4 KB · Views: 77

Similar threads