Alantoo

Member
I have spent a happy day searching through the forum but cannot find information I am looking for. Plenty of "how to remove" the rear quarter panel, which I have from the manual as well, but nothing specific with regard to reaffixing.

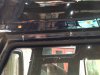
The Discovery 1 manual refers to four different 3M products to seal the rear quarter panels. None of which appear to be readily available any more.

An adhesive bead all-round before offering up the panel ( I was going to use a PU like Sikaflex 221, PU40 or Tiger seal)

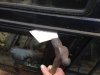
Some self adhesive patches at the self-tapper fixing points on the inside face of the rear door aperture (I presume they are to electrically isolate the aluminium form the steel pillar so a glued on bit of rubber could do. Optionally I have some rolls of sticky rubber putty stuff used to seal roofing panels together, or, some of the foam heat tape with a shiny cover used for Poly-tunnel frames)

Thumbable stuff on the inside around the window frame ( I was going to use the DUM DUM equivalent sold by Woollies)

A softer gap filler run along between the underside of the gutter and the top of the panel….No idea but thought I could probably use more PU.

Slightly worried that the PU stuff might make it impossible to remove without damaging the panel in the future, but maybe I will never have to…

Anybody have any advice or experience to share?

Alan
 
I have taken off the panel now and there appears to be three different sealants.

A still very wet and sticky one around the frame which I will replace with non setting Butyl rubber gutter seal stuff.

The bead under the roof gutter and down below the passenger door catch seem to be a much harder though still flexible rubber and as they have been painted over I guess the PU40 or Sikaflex 221 will do well.

The Woolies thumb-able stuff in the corners and down the back door frame.

If anybody is about to take theirs off... there were a couple of self tap screws going up into the internal gutter above the window from below which were not mentioned in the manual. And I found the bit that stuck the most was the hard rubber under the gutter which I tried cutting and sawing through but gave up after a bit. I eventually used a 50mm wide strip of 1.5 or 2mm sheet and held one end and tapped one long edge at the other end into the joint to punch through it. It worked well without damaging the panel.

Well worth doing. Apart from being able to do a good repair to the wheel arch/inner body work and around the seatbelt fixings you can get at the cavity to give it a coat or two of paint. They must have pointed the spray gun up under the panel after fixing it on and given the bare metal underneath at least it a half second burst of primer! Amazing any of them survive.

I would still like to hear of other's experience if you care to share.

Alan
 
Last edited:
Must admit I didn't come across any self tappers when I removed my rear wing save for the 4(?) that hold the quarter to the rear hatch door shut.

There are plenty of bolts plus a couple hidden in the inner arch area. there are also a couple of rivits to drill out for the speaker mounting bracket on the E post.
 
You can cut through both silkaflex and the original sealant with a new blade to get you started and then thread some wire rope between the panel and the inner structure.
Wrap the rope around a wooden clothes peg and two people one inside one outside can Saw through it just like a cheese wire.
 
any piccies ?

@ MGBGTV8. The wire cable saw sounds good, but Billy-no-mates here does not have long enough arms to do both sides at the same time, and wanted to find a way to do it by myself without removing the window glass.

The photo shows the bit of sheet and the hammer, I just held on to the pointy bit to maintain that angle and just tapped it back towards the rear.

The other photo shows the position of the two self taps I found which were not mentioned in the manual. I have paint penned an arrow below them. This is an R reg 1997 if that makes a difference.

Pictures uploading is acting up hope they show...

Alan
 

Attachments

  • image.jpg
    image.jpg
    227.6 KB · Views: 751
Last edited:
Given up! Every time I tried to add the second image it deleted the first. Herewith the other image...
 

Attachments

  • image.jpg
    image.jpg
    194.1 KB · Views: 558
Last edited:
Another technique I used when removing mine was to slip two sheets of paper between the panel and the base unit as we cut through at bit at a time.
As you cut through the bitumen sealant and move on to the next section the bitumen residue on both the base unit and panel re-bonds when they contact. The purpose of the paper is so that the bitumen glues itself to the paper and prevents the re-bonding.
 
The purpose of the paper is so that the bitumen glues itself to the paper and prevents the re-bonding.

I have found that re-bonding "feature" has been really useful the last few days.

The Discovery is outside at the moment so I can just offer the panel back at close of play and it sticks itself back on and keeps the rain out. Saves sheeting it with a tarpaulin and so does not look so depressingly far off from being finished!

Did you take all the bitumen sticky off and redo it with the gutter seal or rely on the original stuff to re-bond?

I was going to try and clean it all off use the gutter seal gloop after I had put some layers of paint on.

Alan
 

Similar threads