biketeacherdave
Well-Known Member
In response to a few pms iv decided to give my wheel refurb its own post with each stage. All done with rattle cans....enjoy.

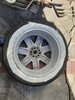
So my wheels were pretty bad and needed cleaning up the plan was a full rub down some primer then some new wheel silver spray paint.

Cleaned up ok mixture of wire brush, dremmel for the corners and rubbing down with sand paper of various grade.
Iv had to make do with what I had in the shed, garage and any other place I had bits of old sand paper laying around. Lock down nothing open no where to buy new supplies.

All the wheels got a few coats of etch primer needed to help the top coat stick to the bare metal, there was lots as the corrosion was down to the alloy in a lot of places

Here we have a finished wheel. I managed to get rattle cans off the bay. This was called wheel silver. I hated the colour and the finish was poor due to me not preping the wheels well enuff.
Back to the drawing board. Time to start again. Rub the wheels down once again order up some filler primer and different top coat.

This time iv spent a lot longer on prep. Better rubbing down more coats of etch primer followed by filler primer. I love this stuff it goes on pretty good x3 coats per wheel 1 every 15 mins and left over night to dry. No wet sanding like I did on the etch primer.

It's all in the prep. It's now time for top coat I decided on something dark but not black as the car is Baltic blue.......took me ages but decided on Bavarian anthracite dark grey.

Had todo the wheels 2 tone the inside rims have been given x3 coats of satin black.

There never gonna be purfect but 100% better than they were.
Iv let the top coat dry for a few days or so time for clear coat. Got x1 wheel done late today.

Here is the final finish my lockdown rattle can special hand preped odds and sods sand paper a few cans of etch primer a few cans of filler primer some top coat and clear coat and a lot of man hours.
So my wheels were pretty bad and needed cleaning up the plan was a full rub down some primer then some new wheel silver spray paint.
Cleaned up ok mixture of wire brush, dremmel for the corners and rubbing down with sand paper of various grade.
Iv had to make do with what I had in the shed, garage and any other place I had bits of old sand paper laying around. Lock down nothing open no where to buy new supplies.
All the wheels got a few coats of etch primer needed to help the top coat stick to the bare metal, there was lots as the corrosion was down to the alloy in a lot of places
Here we have a finished wheel. I managed to get rattle cans off the bay. This was called wheel silver. I hated the colour and the finish was poor due to me not preping the wheels well enuff.
Back to the drawing board. Time to start again. Rub the wheels down once again order up some filler primer and different top coat.
This time iv spent a lot longer on prep. Better rubbing down more coats of etch primer followed by filler primer. I love this stuff it goes on pretty good x3 coats per wheel 1 every 15 mins and left over night to dry. No wet sanding like I did on the etch primer.
It's all in the prep. It's now time for top coat I decided on something dark but not black as the car is Baltic blue.......took me ages but decided on Bavarian anthracite dark grey.
Had todo the wheels 2 tone the inside rims have been given x3 coats of satin black.
There never gonna be purfect but 100% better than they were.
Iv let the top coat dry for a few days or so time for clear coat. Got x1 wheel done late today.
Here is the final finish my lockdown rattle can special hand preped odds and sods sand paper a few cans of etch primer a few cans of filler primer some top coat and clear coat and a lot of man hours.
Attachments
Last edited:
")
