martin41076

Active Member
Since my 55 plate TD4 has been off the road (MOT failure), I've been carrying out all the necessary repairs - as well as some others that I came across on my travels.
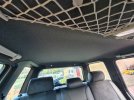
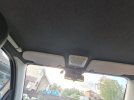
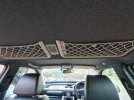
One of those was that the roof lining started to sag and got worse by the day.
Decided to have a crack myself, what do you think?
I'm quite pleased with it, so have decided to freshen up the interior.
Next up, door cards. 🤞
Will post pics once I'm done.
 

Attachments

  • 20231003_132756.jpg
    20231003_132756.jpg
    397.7 KB · Views: 199
  • 20231003_132728.jpg
    20231003_132728.jpg
    279.1 KB · Views: 150
  • 20231003_132718.jpg
    20231003_132718.jpg
    490.8 KB · Views: 161
Since my 55 plate TD4 has been off the road (MOT failure), I've been carrying out all the necessary repairs - as well as some others that I came across on my travels.
One of those was that the roof lining started to sag and got worse by the day.
Decided to have a crack myself, what do you think?
I'm quite pleased with it so have decided to freshen up the interior.
Next up, door cards. 🤞
Will post pics once I'm done.
Hi - looks great, well done. The roof lining in my 2004 TD4 has sagged - how did you do it please? Any particularly awkward or difficult areas?
 
I took the whole roof panel out, it's on a thin fibreglass board. Getting some of the trim out of the way was a pain. I did it on my own but would suggest you get someone to help take it out and put it back in.
Cloth pretty much fell away and then removed the old foam with a stiff brush to give a clean surface.
Bought a roll of 3mm scrim foam on ebay 1.4m wide x 3m (it's sold by the metre), got the extra so I can match the door cards.
Take your time positioning and moulding the foam, you want it to be just right before fixing.
You can stick it with spray adhesive. I used a brush on contact adhesive as it allowed me to slowly work a section at a time.
The really tough area was the centre where the cargo nets are.
Also, before you put it back, cut out all the holes for all the roof fixings, I missed cutting one and it was a bastard to find.
This is not a job to rush! Good luck 👍
 
Congrats! I just stappled some stitches with a upholstery stappler and that was all. But you can t find stapples in the car s colour though..
 
Congrats! I just stappled some stitches with a upholstery stappler and that was all. But you can t find stapples in the car s colour though..
If it works for you to do that then why not.
It's a big fiddly job, but I think mine was getting beyond anything other than full replacement. 👍
 
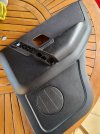
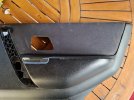
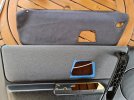
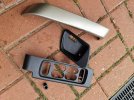
Just finished replacing fabric on door cards to match roof lining. Tomorrow, spraying the plastic bits and then another job off the list!
 

Attachments

  • 20231003_155311.jpg
    20231003_155311.jpg
    627.6 KB · Views: 158
  • 20231003_155320.jpg
    20231003_155320.jpg
    531.1 KB · Views: 129
  • 20231004_155640.jpg
    20231004_155640.jpg
    664.1 KB · Views: 135
  • 20231004_161602.jpg
    20231004_161602.jpg
    547.6 KB · Views: 131
  • 20231004_161613.jpg
    20231004_161613.jpg
    361.6 KB · Views: 135
You've done an amazing job 👏

Want to come over and do mine 😃

Back of my roof is starting to sag and the interior really does need a refresh!

Planning on doing it in the spring with better weather.
 
@martin41076 Absolutely first class! I REALLY need to do my headling and whilst I have the Alpaca leather interior with a similar colour lining, I really like the look of colour you used, which contrasts well with the fittings!

Any tips for getting the edges of the door card pannels to fit well? I'd like to replace mine with leather but haven't worked out how to get the edges to fit neatly into the groove and look professional.
 
You've done an amazing job 👏

Want to come over and do mine 😃

Back of my roof is starting to sag and the interior really does need a refresh!

Planning on doing it in the spring with better weather.
I don't think I could face doing it again! Spring is probably a good shout, I did mine on the table in the back garden. Garage was too cluttered (that's a whole other job!).
 
@martin41076 Absolutely first class! I REALLY need to do my headling and whilst I have the Alpaca leather interior with a similar colour lining, I really like the look of colour you used, which contrasts well with the fittings!

Any tips for getting the edges of the door card pannels to fit well? I'd like to replace mine with leather but haven't worked out how to get the edges to fit neatly into the groove and look professional.
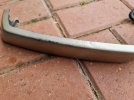
I'm painting the handle/pull insert/window buttons tray tomorrow - Cairns Blue to match the exterior, painted the door release today - Gun Metal Grey (not a fan of the LR Champagne Silver).
The old fabric on the cards practically fell off. Cleaned the old foam off with a stiff brush. Used the old cloth as a template for the new scrim foam/grey fabric that went on, cutting it to the same size and cutting out all the holes.
On the outer groove of the door card, I ran a strip of electrical tape (so when it came to glueing I could get right into the groove without getting any on the rest of the panel.
Placed the new foam on the card, lining it up.
Once I was happy, I placed some masking tape around the door release hole to the back of the panel and some at the top of the foam to hold it in position.
Carefully poked the excess foam into the groove with a pair of scissors (flat head screwdriver will do the same job).
Once everything was in place and I was happy, I ran a length of masking tape horizontally around the centre of the card overlapping at the top down onto the plastic of the door card. This allowed me to peel half the foam back without the whole thing shifting. Glued using a brush contact adhesive (getting right into the groove), removed the electrical tape and then stuck the foam down, repeating pushing into the groove with scissors/screwdriver, masking taped the top of the fabric over onto the back of the panel (until glue dries. Removed the central line of masking tape and repeated on the other side.
Sounds like a lot of faff, but didn't actually take that long - especially after the first one, I got into a bit of a rhythm.
It's all in the prep, the actual sticking down is the quick and easy bit. Like the roof lining, you only want to do it once, so take your time to get it right. 👍
 
So, in short, you glued the foam and afterwards glued the fabric. Can you mention the glue make/type?
Thank you
I used Aortha Orthabond contact adhesive.
Good stuff but you need to work quickly with it.
Fabric already came attached to foam, if you need to stick fabric to foam then use a spray adhesive so it doesn't seep through.
 
And what paint for plastic? Will it hold ok on handles, for example?
Give it all a sand and clean.
Will be using Hycote plastic primer, although I'm sure any plastic primer will do.
Base coat matched to car colour and then a lacquer.
Should hold if I do it properly 🤞
 
Usually, in my experience, painted plastic scratches and peels over time and especially frequent use. Handles surely. Beware?
 
Usually, in my experience, painted plastic scratches and peels over time and especially frequent use. Handles surely. Beware?
Yeah, it is a risk.
I'm doing it because the original LR paint has gone that way so at this stage anything is an improvement.
I did try vinyl wrapping them at first but there's too many awkward curves and it looked a mess.
 

Similar threads