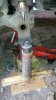
get them out however you want...

to put them in - put the ball joints in the fridge/freezer for a few hours. warm the yoke with burner/blow torch....the ball joints will drop in. :)

If your using genuine ball joints dont touch the tapper screw adjuster as your new joints will be near enough to not worry about adjusting them.


Does this actually work?
 
yes :)

And if you want the easy way to get them out....oxy/act burner and hammer. 5 mins and youll have them all out. while still warm drop in the new ones.


Thanks guys,

I get the heating cooling idea and will be using that idea, was more wondering if it possible to get away without adjusting the taper

Cheers
 
A little cold thing will always fit in large warm hole. Have you never had a girlfriend? :D:D:D
 
some of us are blessed with neither a small or a cold thing:D
however back on topic, if your lucky the tapers might be identical and it'll be a straight swap, be prepared for it not being though.
 
some of us are blessed with neither a small or a cold thing:D
however back on topic, if your lucky the tapers might be identical and it'll be a straight swap, be prepared for it not being though.


Thanks, will measure with a calliper also to check
 
As diagnosed during annual vehicle DOE test the side slippage was outside tolerance. This was also evidenced to me by the wearing of the tyres on the outer corners and the tendancy to feel steering wander when I travelled onto the hard shoulder. So I did a search on here and on rave to be slightly perturbed at the daunting task. Not having access to a proper heavy press clamp to install or remove the ball joints, I came up with the following method. As I was doing both sides I ordered: 2no. Ftc3570 and 2 no. ftc3571. They dont come with nuts so if you want to order aswell (as they are metric fine M16&M14). The no's are NY214047 and NY216047(ANR3140)/ Also consider the half shaft oil seals, 2no. FTC4822.


Strip down involves: remove wheel, brake caliper, screw from disc, nuts from ball joints and drive shaft.
Remove brake disc by hitting from behind. Insert suitable spacer (e.g nail bar) between brake sheild and disc so you can hit disc left and right. Undo brake sheild and 4x bolts from the back which retain the hub housing. Pull out the ABS sensor using a pliers, Rave suggests also removing the spring sleeve and housing sleeve of the ABS sensor. I did but not sure why the need.
The hub housing has to be split by chisel at each of the bolt holes. When this comes out so too will the drive shaft.
I was surprised a how easily the tapers of the ball joints let go by hitting the housings simultaneously with opposing lump hammers.
I chose then to cut the tops of the ball joints with an angle grinder. This allows for removal of the innards which provides you with a hole in the centre of each. I then cut out the remains using an oxy acetylene torch.


To insert the new ones I took the advice of another post on here and put them in the freezer overnite which slightly reduced their size and made the job easier. However it still necessitated beating them in using a 14lb sledge. This was done while supporting the frame with the bottle jack and suitable tubing as per pics. After assembly I fitted new tyres and had the tracking done. It feels much lighter on the steering now and the DOE retest didn't find anymore side slippage. Hopefully these ball joints last another 125k like the originals.
 

Attachments

  • 20140316_170637.jpg
    20140316_170637.jpg
    855.9 KB · Views: 207
  • 20140317_100006.jpg
    20140317_100006.jpg
    582.1 KB · Views: 226
  • 20140317_104013.jpg
    20140317_104013.jpg
    991.9 KB · Views: 177
Good to know that all you need to do the job is a welding plant and a 14 pound sledge hammer. You don't work on heavy plant by any chance do you? :D:D
 

Similar threads