Me thinks dicky height sensors.....but strange it is both rears...
Have you checked the ride height calibrations?? no wait...you tried it on the height blocks didn't you...
My thoughts if the sensors read right, the calibration was completed correctly....can only be either
1)a leak past the rear valves and inlet valve allowing air to slowly leak into the bags from the Resevoir and raising the rear height
2) Dicky height sensors on the rear
3) Dodgy EAS ECU thats lost its marbles....
4) Driver pack randomly opening valves when it shouldn't
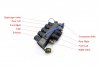
 I know that sounds like I've got the solenoids back on in the wrong positions, but I'm 100% certain they are where they came from originally. Two reasons I'm that certain, I numbered them before I took them off originally, from the diaphragm solenoid (which as you know will only go on one end!).