Not that I can see, the block is in great shape as are the various bits and pieces. The last time the block was apart I cleaned the whole thing so I’d hopefully have spotted something.


I’m wondering if that’s a possibility. I took the whole tank back to bare metal a while ago and covered it in por15, I might remove it and try to bastardise together some way to test it. Not sure how to go about that yet.

The NRV physically looked ok to me but unless there was something very wrong with it I maybe wouldn’t know. The conical shape of the top is perfect and all the seals used are the black ones from X8R.
Did you check the NRV seats?
 
To test the tank, get some spare airline & a 6mm schrader valve. Fill the tank with any compressor & check the valve holds pressure. Periodically check pressure & leak points. That way there's only a few possible leak points:

1) The schrader valve
2) The tank airline & fitting.
3) The tank itself.

I did the same on my project car after removing, de-rusting & painting the tank. It held 100psi for many days, until the weather allow re-fitting to the car !!
I’ve got spares and I’ve ordered a shut off valve but what I might do is get it up to pressure and then fire it into the bath, will wait for the missus and kids to go out for that one.

Did you check the NRV seats?
I had a look at them and they seemed ok, nothing obvious to me seemed wrong.
 
It’s been a week or two since I’ve been at this (HEVAC problems too) but I was wondering about the NRV and diaphragm in the exhaust so to try and rule them out I had the valve block out last night and replaced the diaphragm valve again with one from LandyAir since their valve comes with the large washer type fitting all ready pre fitted, and then I also checked the NRVs, which looked to be in excellent shape and had no misshapen heads or anything. Ran up to pressure and this morning, say 14 hours later or so, I’ve gone from 140 psi to 55 psi. The battery has been disconnected in this time too as I’ve had air bags in and out with the dash so the height isn’t self adjusting down and I’ve lost no height in the corners, just a loss of pressure at the tank reservoir. I’m really at a loss as there’s still no sign of a leak anywhere and I was confident a new diaphragm would cure it
Pinhole in the line going to the airtank from an exhaust leak?
 
Pinhole in the line going to the airtank from an exhaust leak?
I wondered that but I ran a new piece of 6mm hose from the air tank up to the valve block with the same result. If it’s reservoir related then I think it’s got to be the tank itself.
 
I wondered that but I ran a new piece of 6mm hose from the air tank up to the valve block with the same result. If it’s reservoir related then I think it’s got to be the tank itself.

Or the airdryer?
 
The air path to diaphragm & dryer should be blocked by NRV-1. Look at the diagram I put in post #9 again.

NRV-1 "should" be closed & holding air. A leak here will show at the exhaust port.
NRV-2 is open & passes air to the Inlet Valve.
Inlet valve "should" stop air getting to the main gallery. Take solenoid off, and check for leaks around the valve body.

First places to look (after airlines), are the valves & NRV's. If the inlet valve leaks internally to gallery, then check exhaust valve for leaks.
 
Does the system not shutoff the pathway to the air dryer when the system is off? When there’s no power I thought each element was isolated, my battery is disconnected at present and it’s still doing it

It should but I seem to recall @Dopey having a mysterious leak which @Saint.V8 tracked to a leaky dryer.
 
Dryer leak only impacts tank filling. It's used to dry the air from the pump when that's running, and to use airbag air to push moisture from the dryer beads when lowering the car.
 
The air path to diaphragm & dryer should be blocked by NRV-1. Look at the diagram I put in post #9 again.

NRV-1 "should" be closed & holding air. A leak here will show at the exhaust port.
NRV-2 is open & passes air to the Inlet Valve.
Inlet valve "should" stop air getting to the main gallery. Take solenoid off, and check for leaks around the valve body.

First places to look (after airlines), are the valves & NRV's. If the inlet valve leaks internally to gallery, then check exhaust valve for leaks.
Thanks, It was your suggestion that made me look at the NRVs but they look ok to me, beyond a visual inspection how do you tie a leak to a bad NRV in the case of NRV1? I am losing air through the exhaust port, *I think*, after putting a balloon on it and seeing a slight inflation in it over an evening with the EAS relay removed
 
So if it’s not leaking via exhaust then it’s getting out elsewhere. If NRV1 is leaking it can also then appear at dryer as well because the air goes via that to exhaust.

Start with inlet & exhaust valves. First get a cuppa. Take solenoids tops off & spray both with very soapy water. Then watch the valves for a bit while you drink the cuppa slowly.

If tank is leaking slowly the bubbles will take time to appear.

Beyond that it needs bench test so it can be pressurised & all ports accessible.
I’ll try that over the weekend if I get my hvac problems sorted. My heads fried looking at both issues, I think it’s just testing me. Failing that a bench test would be good but no one local to me will touch it. In fairness I wouldn’t either. 😂
 
I'm going the a very similar exercise myself. Did a full rebuild, o-ring set etc but still slow. leaks.
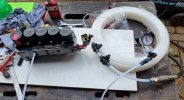
Putting the block on the bench, hooked up to an airline with a tap and gauge T-eed in as below, I can pressurise each bag line in turn.
20240127_111138.jpg
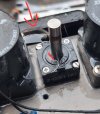
Pressure up, soapy water, and the leak presents:
20240127_104354.jpg
It's the thin o-ring at the bottom of the plunger!

Clean, refit with a dash of lube and it now holds pressure.
 

Similar threads