JamesBB

Active Member
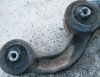
Here is a photo of my shot bushes.

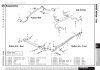
While I am here, can somebody advise on the smaller bush that goes on the rear of the front radius arm?

The other parts pic (courtesy of bearmach.com) shows there is 1 rear bush and that is item 20, part number ANR2563.

Now when I took my arm off there were 2 rear bushes on the O/S and not 1. I have not got round to the N/S arm yet, so not bothered checking if there are 2.

My question is how many should there be on each arm? if there should be 2 why does the diagram show 1 and vice versa..........?

Cheers again in adcance.
James
 

Attachments

  • shotbushes.jpg
    shotbushes.jpg
    52.7 KB · Views: 710
  • range-rover-p38-parts-000025.jpg
    range-rover-p38-parts-000025.jpg
    75 KB · Views: 2,202
You should have 2 on the back of the arms. 1 in front of the bracket and 1 behind. If you remember these are the bushes I said to put a small chamfer on. This helps getting the arm in enough to get the nut and washer on.

Both sides have 2.

If you had the qty reqd list, you would find that they have a total of 4 per car.

I know this as I order parts all day long for my job. They only show a single diagram. Its just the way parts suppliers work.
 
Last edited:
AFAIK there are 2 bushes - back to back....over time I think they meld together...

But I could be remembering the Classic.....

EDIT: as Above by SAS
 
You should have 2 on the back of the arms. 1 in front of the bracket and 1 behind. If you remember these are the bushes I said to put a small chamfer on. This helps getting the arm in enough to get the nut and washer on.

Both sides have 2.

If you had the qty reqd list, you would find that they have a total of 4 per car.

Hi yes I remember you said to put a chamfer on them, and I better order 2 more ANR2563 bushes.

Thanks for your help there.
 
Ok, odd, just plain odd..........

The O/S arm is back on (N/S not taken off yet as per Wammers suggestion in other thread).

Problem is these rear bushes. I cannot get the damn things on, the bushes themselves fit with no problem, but there is not enough thread on the rear of the arm poking through to fit the rest on.

Seems it should be (front to rear) - Arm-Washer-Bush-Chassis-Bush-Washer-Nut.
The front of the arm is attached as per expected by the 2 new bolts (not tightened up) but the rear of the arm does not poke through the hole enough.

What have I done wrong? Surely if the front is as per the mounting holes, the rear should be too?

Confused..........

Cheers
 
Did you drop vehicle to bump stops before you started. You need radius arms straight if there is any angle chassis to arms they won't go in enough.
 
Did you drop vehicle to bump stops before you started. You need radius arms straight if there is any angle chassis to arms they won't go in enough.

Amazing, that is kinda just what I realised before I read your reply.

The axle stands are still under the chassis, the jack is still under the diff. DOH!:doh::doh::doh::doh:

Will check that in the morning. I am not sure if I need to unbolt the font end first, or leave it and see if I can get enough thread through while the front is all in situ......

Cheers:)
 
bit of brute force got mine on, but I like SAS's idea of chamfering them, a bit more controlled than my method.

Was a git to do though :)
 
Always put the back in first. Then the front. Makes it a bit easier.

I put the back in first, but did not put the nut on, main reason was to allow a litttle movement as I lined the front up.

I am pretty certain once I drop the axle down to level the arm will move back and then all should be ok.

Regarding ratchet straps.......... would the axle have moved that far forwards? I guess it could have. I unbolted the antiroll bar too which alllowed a little extra space to get the arm (s) off.

Ta.
 
Yes. It can move a fair bit. I had to use the wheel chocks to push it back yo get the front lined up. Took me 3 hours each side on my own.
 
Yes. It can move a fair bit. I had to use the wheel chocks to push it back yo get the front lined up. Took me 3 hours each side on my own.

OK cool. I have seen some cheap ratchet straps down the road, will grab some. I reckon the O/S has moved upto an inch forward so should not be too difficult to pull back.

The air springs are still inflated, Wammers said drop it to the bump stops but should I pull the axle back a little first?

On a positive note, the track rod is completely off now.

Cheers
hes right before trying to remove radius arm suspension should be able to sit on the bump stops ,so that arm is straight to fit bushes and tighten them up
 
hes right before trying to remove radius arm suspension should be able to sit on the bump stops ,so that arm is straight to fit bushes and tighten them up

That would mean moving the axle stands from the chassis rails to back under the axle, or getting another pair of stands?

Or (sound of penny possibly dropping) one stand under each (chassis and axle) and this is what he meant by one side at a time...............................?:eek:

hmmm, hopefully it is not too late, I am sure I can sort this one out that is 90% back on.

Thanks
 
It is back in, looks good.

The other one (N/S) I cannet get out as one of the the bolts is screwed. No idea how it happened as I was using the same socket as the first one. ?The head has rounded off. I unscrewed about 3 turns and lost grip and slipped.......... Looks like a long job this side....
 
I have to admit, it has beaten me. I cannot get a grip of the bolt head at all. I may have to pay for somebody to come out and remove it. :(
 

Similar threads