I had mine done beginning of the year! Both wings and bulkhead.
Garage done the welding! I done the fabrication
This is not all the picks! (Site does not take all)
Kev
Garage done the welding! I done the fabrication
This is not all the picks! (Site does not take all)
Kev
Attachments
-
 IMG-20240117-WA0024.jpg172.1 KB · Views: 12
 -
 IMG-20240117-WA0023.jpg147.5 KB · Views: 14
 -
 IMG-20240117-WA0019.jpg126.2 KB · Views: 12
 -
 IMG-20240117-WA0015.jpg215 KB · Views: 12
 -
 IMG-20240117-WA0012.jpg237.5 KB · Views: 15
 -
 IMG-20240117-WA0003.jpg191.4 KB · Views: 13
 -
 IMG-20240117-WA0006.jpg131 KB · Views: 13
hughdavies
Well-Known Member
There is a guy on the ==D2 boys club site with pictures and descriptions.
The trouble with "after" shots is, if you've done it right, there's nothing to see...
Having said that, here are my "after" shots (nothing to see here, folks)...
o/s bulkhead to inner arch joint, looking upwards (below brake servo)

same but looking at it level

o/s bulkhead to inner arch, looking down from above brake servo

same, a bit closer

Crappy shots, sorry, taken with phone, a bit like looking at a black cat in a coal bunker...
I shielded the wiring loom & other parts with some aluminium sheet and old welding gloves, both on this and when I did the nearside inner arch, rather than trying to remove them.
Taking photos wasn't a priority as I was constantly dodging rain showers .
Having said that, here are my "after" shots (nothing to see here, folks)...
o/s bulkhead to inner arch joint, looking upwards (below brake servo)
same but looking at it level
o/s bulkhead to inner arch, looking down from above brake servo
same, a bit closer
Crappy shots, sorry, taken with phone, a bit like looking at a black cat in a coal bunker...
I shielded the wiring loom & other parts with some aluminium sheet and old welding gloves, both on this and when I did the nearside inner arch, rather than trying to remove them.
Taking photos wasn't a priority as I was constantly dodging rain showers .
Same area as mineThe trouble with "after" shots is, if you've done it right, there's nothing to see...
Having said that, here are my "after" shots (nothing to see here, folks)...
o/s bulkhead to inner arch joint, looking upwards (below brake servo)
View attachment 321609
same but looking at it level
View attachment 321610
o/s bulkhead to inner arch, looking down from above brake servo
View attachment 321611
same, a bit closer
View attachment 321612
Crappy shots, sorry, taken with phone, a bit like looking at a black cat in a coal bunker...
I shielded the wiring loom & other parts with some aluminium sheet and old welding gloves, both on this and when I did the nearside inner arch, rather than trying to remove them.
Taking photos wasn't a priority as I was constantly dodging rain showers .

But I had both sides
 and both wings! Same garage for the MoT! So surprised it was not picked up the year before??
Kev
Mine (o/s) was partly hidden by underseal but was squishy & noted by tester would need doing before next one.
The n/s was solid, so I just cleaned & recoated it.
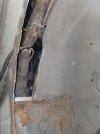
They didn't see the top inners holes, being hidden behind the plastic liners, holed on both sides; looks like the plastic rivet holes were the rust source.
Luckily on the o/s I got away with washer-sized inserts, but the n/s needed 2 or 3 inserts about 2 inches wide x 6 inches long.
I did them as flush inserts rather than surface patches, so once they were painted & sealed top and bottom, they just disappeared again...
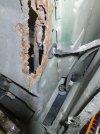
I think this was the first photo of me starting on the o/side, had to grind-off all the screws on the wheelarches & broke all the plastic rivets; just getting the liners off was an ordeal !

The n/s was solid, so I just cleaned & recoated it.
They didn't see the top inners holes, being hidden behind the plastic liners, holed on both sides; looks like the plastic rivet holes were the rust source.
Luckily on the o/s I got away with washer-sized inserts, but the n/s needed 2 or 3 inserts about 2 inches wide x 6 inches long.
I did them as flush inserts rather than surface patches, so once they were painted & sealed top and bottom, they just disappeared again...
I think this was the first photo of me starting on the o/side, had to grind-off all the screws on the wheelarches & broke all the plastic rivets; just getting the liners off was an ordeal !
Last edited:
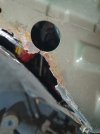
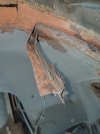
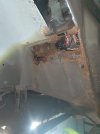
Here's one of the n/side rust just after I got the liner off and before I turned one hole into 3... 

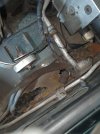
Aaand then I just had to remove the sill covers to see a little hole which turned into this -

Then into This -


Still Blew-through & had more work to fix & dress it, then painted & sealed & inside treated etc all between showers, and again it all just disappeared ...
Aaand then I just had to remove the sill covers to see a little hole which turned into this -
Then into This -
Still Blew-through & had more work to fix & dress it, then painted & sealed & inside treated etc all between showers, and again it all just disappeared ...
Looks like a very good job, or set of jobs!Here's one of the n/side rust just after I got the liner off and before I turned one hole into 3...
View attachment 321623
Aaand then I just had to remove the sill covers to see a little hole which turned into this -
View attachment 321625
Then into This -
View attachment 321626
View attachment 321627
View attachment 321628
View attachment 321629
View attachment 321630
Still Blew-through & had more work to fix & dress it, then painted & sealed & inside treated etc all between showers, and again it all just disappeared ...