SteveG4TRA

Active Member
Last night my 2003 Discovery S2 developed a rear ACE pipe leak. Inspection this morning shows the usual pipe corrosion around the area towards the rear anti-roll system at the point it goes over the chassis outrigger clamp, forward of the offside rear wheel. It is difficult to prove it as it only leaks under pressure and up on axle stands I am not going to trigger the system on the Nanocom. But considerable seepage and staining point to this area and the pipes are very rusty. So I need to remove the two feed pies (seems sensible to do both) and fit new ones.

Now I have read various horror stories regarding this job so I have some questions:

1. Is it safe to do this job using axle stands?
2. Is it possible to release the pipe clamps on top of the out rigger, or just bite the bullet and cut them off.
3. After releasing the nuts securing the anti roll bar links to the axle does the actuator just rotate to allow access to the banjo connectors on the pipes?
4. I have heard of difficulties getting the pipe to release from the control block on the offside chassis member. Is there a secret here?
5. Where is the best place to purchase replacement pipes. They seems to be very expensive.
6. I have read that it is possible to insert a 10mm length of copper pipe using plumbers 10mm compression connectors. Any views on this as it would make the repair much less costly.
7. Am I right in assuming that following a repair that bleeding of the system can be done just by taking the vehicle in a run? This will purge any air in the system satisfactorily?

Or am I just a dreamer thinking that the ACE system will ever work again on my car!
 
 
I hydraulic hose converted mine
Thanks for the ideas gents.

As I see it there are three choices when it comes to ACE repairs all with their own pros and cons.

1. Keep it standard. Bite the bullet, purchase two new pipes.
For: It was how the car was designed in the first place and essentially is quite a good system.
Against; Will the pipes come out of the valve block and if they do will the new pipes seal OK. Cost of the two pipes: £300

2. Repair corroded section with 10mm copper and plumbers compression fittings.
For
: Initially seems to offer a dead cheap solution.
Against: May be difficult to get to corroded section and if one part is corroded there's a good chance the rest is on it's way out. System operates up to 160 to 175 bar. Standard plumbers fittings only relatively low pressure 10 bar, so it would be important to use steel or brass hydraulic compression fittings. Also it is not safe to use even thick walled hard copper R290 pipe, the use of steel hydraulic tubing is advised.

3. Replace steel pipes with hydraulic braided hoses.
For
: Overcomes the issue of inflexible routing. Chances of leakage and future corrosion is low.
Against: Cost. Seven new braided hydraulic hoses plus valve block machining, could be other bits as well. £350 to £1000. Lot of labour too.

4. ACE delete kit.
Rip out the ACE system and replace it with inert roll bars.
For: Never have a problem with hydraulics again.
Against: Non original conversion. Cost £500 for an ACE delete kit. Lot of labour

This time I have decided to go the 1st choice and have purchased two new pipes. Most all the pipe retaining fittings and drop links have had to be cut off and I haven't even started removal of the old pipes from the block. I'll try a WD40 soak and then see if I can get a bit of rotational movement,

Hey Ho what a ****ty job.
Not all D2s had ACE, so calling it a "non-original conversion" is stretching things a wee bit. Put it this way it wouldn't bother an insurance comapny nor an MOT tester.
 
Be aware that if you bought complete pipes untill the block you need new seals(RVW100010) and plastic collars(ANR6700) under the bracket, some sellers say they are for air suspension which is wrong, the old ones are not reusable
 
Not all D2s had ACE, so calling it a "non-original conversion" is stretching things a wee bit. Put it this way it wouldn't bother an insurance comapny nor an MOT tester.
I understand that, but I was referring to my particular car.
So I now have most of the bits, just awaiting the banjo washers. However I am somewhat bemused as to the fitting of the seal kit for the valve block end. The "instructions" are very Ikea like, and as such I should like to ask for advise from anyone who has installed this kit.
Instructions.jpg


It shows the insertion of a 10mm bolt. Is this to remove the old seals? Then the insertion of the new O rings using the tool, tapped home with a hammer. is that right. I take it the new o rings find the groove in the valve block and insert themselves?
O ring insertion tool.jpg
Removal of the tool should leave the new o rings neatly secured into the valve block, then by the look of it one has to go and drink beer....am I right?
It doesn't mention what to do with the plastic collets:
20250404_153101.jpg
and why there are two of them?
Also I guess that use of ACE fluid to lubricate this job when inserting the pipes would be a good idea.
Thanks in anticipation of any assistance please.
 
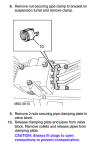
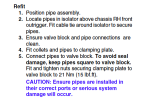
The bolt is to remove the old seals... tap in the new seals and bin that black plastic part but after you removed the old seals clean very well the holes cos the old o-rings used to get stuck in there or leave residues which can hurt the new ones and they'll leak, it's up to 140 bar there when the ACE kicks in at high speed... the plastic collars will fit around the pipes after they were pushed into the seals, you'll figure it out when you remove the plate and the old ones, the bracket(clamping plate) tightens them on the pipes as to fix them well when you refit it, see attachments ...and yes lubricate the new seals.

better save THIS and open with acrobat... the ACE is in the front suspension section you have everything there
 

Attachments

  • 1743785665568.png
    1743785665568.png
    62 KB · Views: 0
  • 1743785829982.png
    1743785829982.png
    49 KB · Views: 0
Last edited:
Although a bit late on this one, it is possible to repair your ace pipes using compression fittings. the pipes are 3/8" not 10mm.
Use steam fittings and 3/8" air-con pipe which is made to work at much higher pressure than normal plumbers pipe.

I repaired my second set of rear pipes some years ago, also keep them covered with grease now.
 

Similar threads