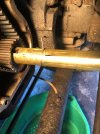
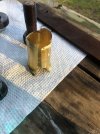
Progress report - I made a first test shim to try with the timing cover still off just to see how hard it would be to introduce the damper (I realize the key is out - will replace the key). This is .007 brass shim stock. I formed it to a diameter slightly smaller than the crank so it wants to grab the crank. Aviation lock wire was used to pinch it tight before introducing the damper. I left a lot of extra length on the shim to feed through the middle of the damper while I experimented. As you can see in the picture the shim wants to buckle at the gap . The problem is that the damper has a 45 degree chamfer at its rear and this is too aggressive to feed over the shim. I am going to hand file a very gentle taper in the first 2.5 mm or so. I will make a new shim with no extra length. I then plan to oven heat the damper to 200 deg F or so (95 C). I have ordered a very long M20x1.5 bolt. I will use the long bolt to pull the damper over the shim and hopefully put everything in place.
Attachments
dag019
Well-Known Member
Which as mentioned above is what I used on mine when I had the same happen.Loctite 638, fills up to 0.25mm, that is 0.00984 of an inch.
tottot
Well-Known Member
Have a look at "Loctite" website as to how their compounds work. There are even ones that can add to a metal surface.
Removal is usually application of heat locally, in the case of a crank pully a blast on the end away from the seal.
Also videos on the you tube about using the different Loctite compounds you may like to view.
Removal is usually application of heat locally, in the case of a crank pully a blast on the end away from the seal.
Also videos on the you tube about using the different Loctite compounds you may like to view.
Last edited:
Here is the latest work with some photos. First photo is the "kit" I created. There is the .007 brass shim rolled form to be a good fit around the crank. My wife has named this the "Crankshaft Cozy." Then there is the long bolt I ordered. I also made a damper holding tool.
Attachments

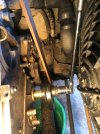
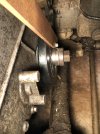
Third photo - The damper in place with the 90mm bolt in place. Damper rotation restricting tool bolted to front of damper (this is a 1/4 inch by 3 inch piece of bar stock with holes for the damper bolt pattern). Large ratchet with 30mm socket on bolt.
Attachments
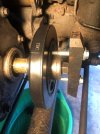
Fifth photo - The Crankshaft Cozy was not going to survive under this plan, no matter what. New plan -> Adapting some suggestions here into a combination. I will make a new Crankshaft Cozy out of .005 steel. I will use aerospace epoxy to bond this to the crankshaft - with aviation lockwire being used to minimize the glue gap by clamping the Cozy in 10 + locations. I also plan to drill a pattern of vent holes in the Cozy. The result should be a well-bonded Cozy that is a bit oversized in overall diameter. About .002 to .003 oversized. At least then the fit will be too tight instead of too looses. I will then carefully sand down the new outer diameter of the crank extension. I will next heat the damper and possible bore it out as needed to make a good fit. Follow this with Loctite or similar as recommended in this thread.
Attachments
I appreciate the comments - but I would like to know what sort of wobble you wound up with when filling a .014 (.36 mm) gap with filler? I think the prior experiences have been with a chewed crank but one that did not have such a massive and uniform reduction in diameter.Carry on with your old type bodge method if you must, but better modern methods are available today as noted by myself and others on this forum.
I don't see how you don't wind up with a a helluva pulley wobble if you try to use filler for a gap that big. The second thing nobody has yet answered is how easy the damper was to get off the next time the cam belt needed removing.
So firstly i dont know the engine, But.
Can I clear up somethings first.
You dont have a tapered crank?
You have a sloppy fit. I.E the pully just goes on with no resistance?
Ok so my thoughts.
The straight shaft indicates to me that it has to be a clamping force that holds it together. the keyway is there so the timing marks are in the right place. (how am I doing so far).
For the pulley to spin on the shaft suggests that either the bolt wasnt tight or there was a lot of resistance on the belt, or a mix of both.
So taking material off the back of the pully does nothing except put the belt out of alignment.
You have a Mill .
.
So, Put 4 blobs of weld on the dampner/pulley inside both ends, that wont heat it to much. Mill it out to the interference fit you want and use as suggested above a filler type of your choice.
You now have it centered with a bit of grip over its full internal.
Then do up the bolt kin tight.
If I have no idea of what you have then please ignore my post.
J
Can I clear up somethings first.
You dont have a tapered crank?
You have a sloppy fit. I.E the pully just goes on with no resistance?
Ok so my thoughts.
The straight shaft indicates to me that it has to be a clamping force that holds it together. the keyway is there so the timing marks are in the right place. (how am I doing so far).
For the pulley to spin on the shaft suggests that either the bolt wasnt tight or there was a lot of resistance on the belt, or a mix of both.
So taking material off the back of the pully does nothing except put the belt out of alignment.
You have a Mill
.So, Put 4 blobs of weld on the dampner/pulley inside both ends, that wont heat it to much. Mill it out to the interference fit you want and use as suggested above a filler type of your choice.
You now have it centered with a bit of grip over its full internal.
Then do up the bolt kin tight.
If I have no idea of what you have then please ignore my post.
J
You are correct that it is a non-tapered shaft. No taper at all. It is much more than just a loose sliding fit between the damaged crankshaft and the damper.. You can grab the damper and wobble it while it is on the shaft in the installed position (without the bolt cranked tight). The amount of slop (in terms of diameter) is .014 inches, or .36 mm. That's a big gap.
Your idea to add material to the inner diameter of the damper may be where I wind up going. The weld-on idea could work. I have a TIG and can add material if I take my time without a bunch of heat. I am more likely to turn the inner diameter much larger with the plan of turning a sleeve having a fairly thick wall with the Woodruff key slot in it. I will then braze that thick sleeve in place in the damper. As you say, the trick is to not fry the polymer in the damper.
However, I decided first to make a high-carbon steel shim and try that in place of the brass. I actually succeeded in getting the damper about 2/3 of the way installed on the steel shim with no buckling. At that point the sharp edge of the keyway on the damper tore into the shim. I plan to file a good chamfer on the Woodruff keyway, make a new steel shim and try again. This was so close to working I want to give it another try.
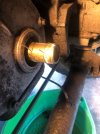
Success ") . I made a new steel shim after filing the sharp edges off the Woodruff key slot in the damper. I then took my time and managed to introduce it the whole way without buckling or tearing. It is really tight. I have not assembled the rest in order to start the engine yet - but it measures less than .005 runout at the edge of the damper while running it off the starter.
. I made a new steel shim after filing the sharp edges off the Woodruff key slot in the damper. I then took my time and managed to introduce it the whole way without buckling or tearing. It is really tight. I have not assembled the rest in order to start the engine yet - but it measures less than .005 runout at the edge of the damper while running it off the starter.
. I made a new steel shim after filing the sharp edges off the Woodruff key slot in the damper. I then took my time and managed to introduce it the whole way without buckling or tearing. It is really tight. I have not assembled the rest in order to start the engine yet - but it measures less than .005 runout at the edge of the damper while running it off the starter.Attachments
Might be helpful to others to know how this problem started so I will pass along my thoughts on this -> I don't think the bolt was loose initially. I replaced the cam belt 2 years ago and when I went to reinstall the damper I think I damaged the Woodruff key (without realizing it at the time). I did not have the Rover tool LST--- that you use to hold the damper while tightening the bolt. Instead I just chocked the wheels and used the drivetrain to hold things. You can usually get away with this for a tapered engagement but - in this case - I probably loaded a LOT of torque into the Woodruff key. If you look back to the start of the thread you will see an image of the key as I found it at the start of this mess - sheared off. I think I likely deformed the key and set it up to fail a few thousand miles later.
In short - You really need to get or make a damper holding tool when removing or replacing the bolt. The one I made in the repair process is just a piece of mild steel bar stock. It worked fine.
In short - You really need to get or make a damper holding tool when removing or replacing the bolt. The one I made in the repair process is just a piece of mild steel bar stock. It worked fine.
And one more thought ... Several of you chimed in to say you would work really hard on some kind of bodge before pulling the engine and swapping the crank. This was helpful advice because I was actually starting down the road of pulling the engine. It would've been a shame because this 200 Tdi only has about 150k and is running very well.
Also helpful to learn the word "bodge" - which we don't have in Merica.
Also helpful to learn the word "bodge" - which we don't have in Merica.